This document contains complete information on how to build an AudioworX Starter Kit by interfacing and configuring hardware components from the ground up. The scope of the document is limited to the steps that are required to be completed as a pre-requisite to the Getting Started Guide in AudioworX Starter Kit Overview only when the components of the Starter Kit are sourced independently.
Caution: Some of the steps given here require careful handling of the electronic components and we encourage users to observe caution during the hardware installation steps.
- Required Components
- Assembling the HiFiBerry HATs on to the Raspberry Pi 5
- Flashing the AudioworX Starter Kit Custom Image on the MicroSD Card
- Verifying the Setup using the SKUtility
- Upgrading the Starter Kit Software from an Earlier Release of AudioworX
- Configuring the JBL DSP-4086/Infinity DSP6840 Amplifier (Only for Passive Speaker Systems)
Required Components
Following is a list of hardware components along with approx. cost (without shipping and taxes) and their recommended variants to be procured before getting started with the assembly of the AudioworX Starter Kit.
| # | Item | Description | Approx. Cost |
| 1 | Raspberry Pi 5 Kit
|
The main processing unit of the AudioworX Starter Kit. Recommended Variants:
|
$150 |
| 2 | HiFiBerry DAC8x | Sound card (output only) | $65 |
| 3 | HiFiBerry ADC8x Add-on | Sound card (input only) | $75 |
| 4 | JBL DSP 4086 – 8-channel amplifier
or |
Power amplifier to drive passive speakers. Only required when using the Starter Kit with a passive speaker system.
Users may choose any other power amplifier depending on their setup. |
$440 |
| 5 | 12V 20A power supply for the JBL/Infinity amplifier | Power supply for the JBL DSP-4086/Infinity DSP6840 amplifier. | $20 |
| 6 | Miscellaneous items |
|
|
| Total Cost (without shipping and taxes) | = $750 | ||
Assembling the HiFiBerry HATs on to the Raspberry Pi 5
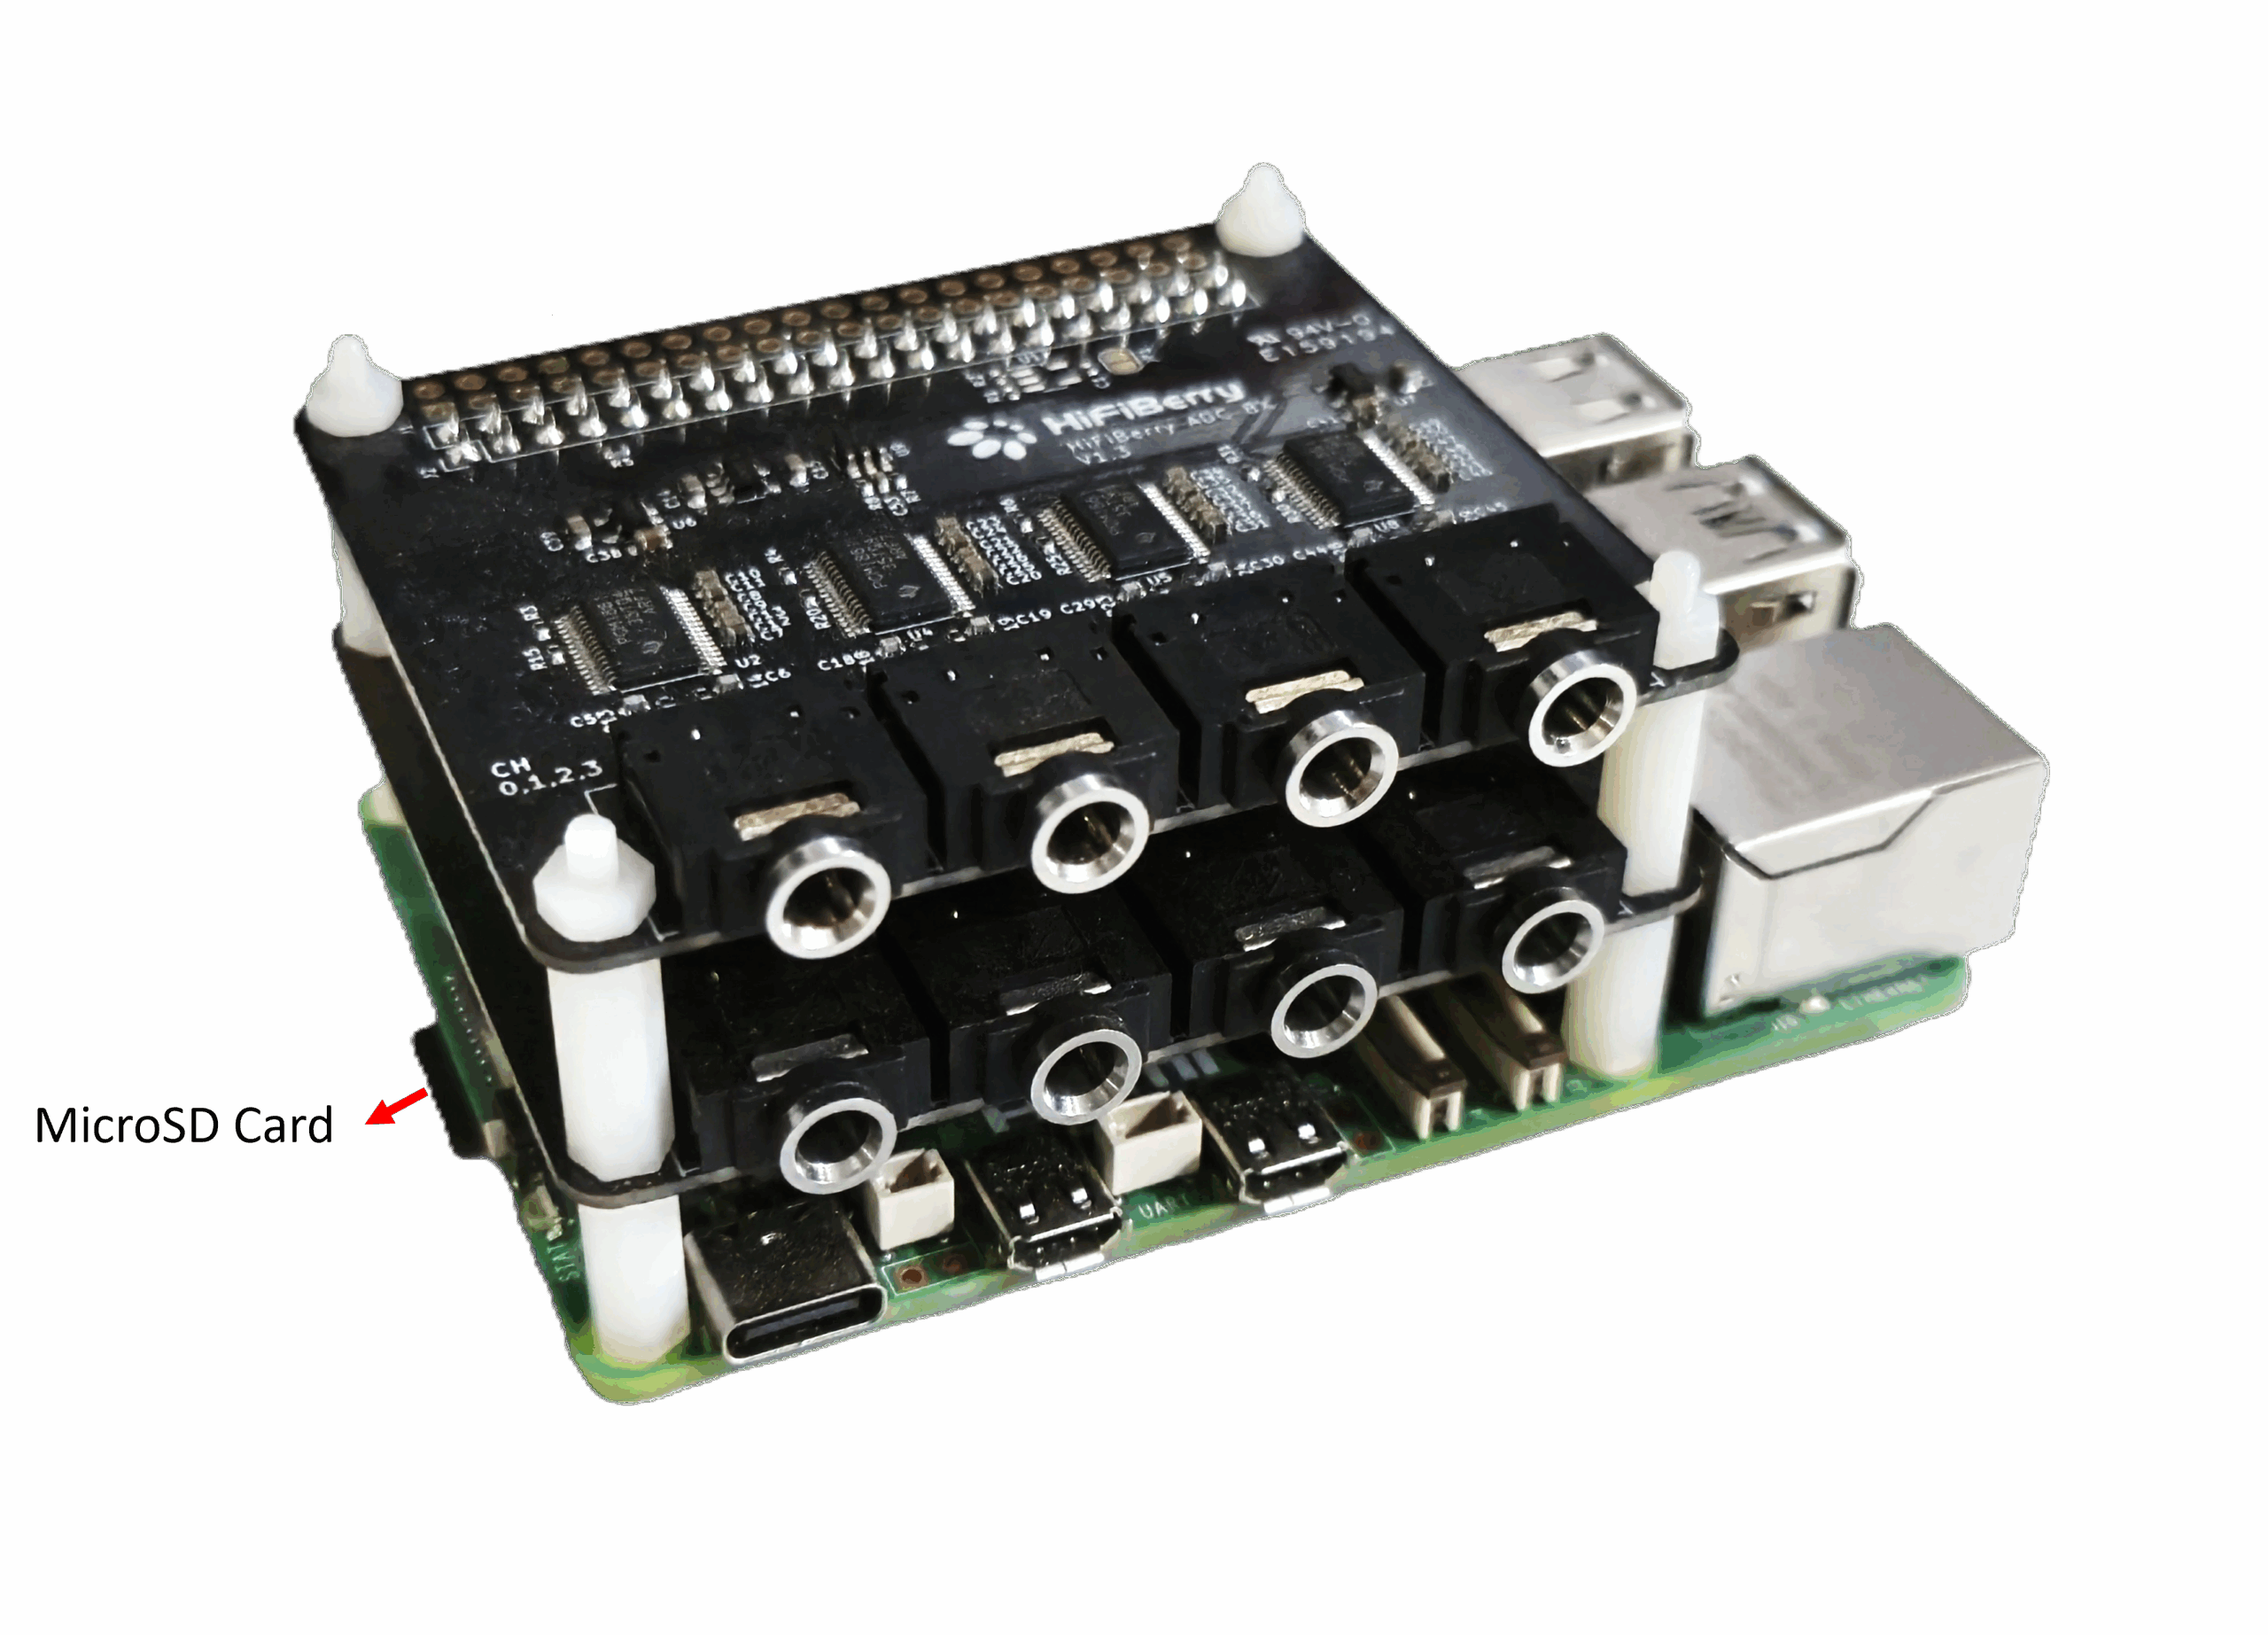
In the latest version of the AudioworX Starter Kit, the HiFiBerry DAC8x (8-channel line audio input HAT) and the HiFiBerry ADC8x Add-on (8-channel line audio output HAT) are the default and recommended audio interface for the setup’s compactness, robust interfacing and multi-channel capabilities.
The HiFiBerry HATs must be stacked on top of the Raspberry Pi 5 (the bottom-most layer in the stack) using the 40-pin header in the given order:
- HiFiBerry DAC8x (middle layer in the stack) on top of the Raspberry Pi,
- HiFiBerry ADC8x Add-on (top-most layer in the stack) on top of the DAC8x.
Observe caution when stacking the HATs. Disconnect the power from the Raspberry Pi 5 before installing the HATs.
It is important that the pins perfectly align with no open pins visible upon installation. Use the plastic spacers provided with the HiFiBerry HATs to ensure that the hardware is secured in place and does not budge while connecting cables to the audio input and output ports.
The below figure shows a complete Starter Kit setup.

Any class-compliant USB audio interface can be used with the Starter Kit. The SKUtility Tool allows users to configure their choice of audio interface for use with the AWX Amp application (see Audio Config in SKUtility Tool – Graphical Application.
The Starter Kit has been tested to work stably with the following audio interfaces:
– Focusrite Scarlett 2i2
– TASCAM US-16X08
– RME Fireface UCX-II
– DigitalLife U2Audio7
– UGREEN USB to 3.5mm Headphone Audio Adapter
Flashing the AudioworX Starter Kit Custom Image on the MicroSD Card
The AudioworX download page contains a Starter Kit Package, which is a pre-configured disk image for the Raspberry Pi 5, pre-installed with all dependencies and configured to run the AWX Amp application with the Starter Kit example SFD upon successful boot-up (refer to Getting Started with the Example Project. This section provides instructions on how to make a bootable MicroSD card for the Raspberry Pi 5 using the custom image.
Requirements
| Hardware Required | Software Required |
|
|
Steps for Flashing the Custom Raspberry Pi Image
- Mount the SD card in the card reader and plug it into your PC for flashing.
- Open the Raspberry Pi Imager. Under “Device”, select the “Raspberry Pi 5”.
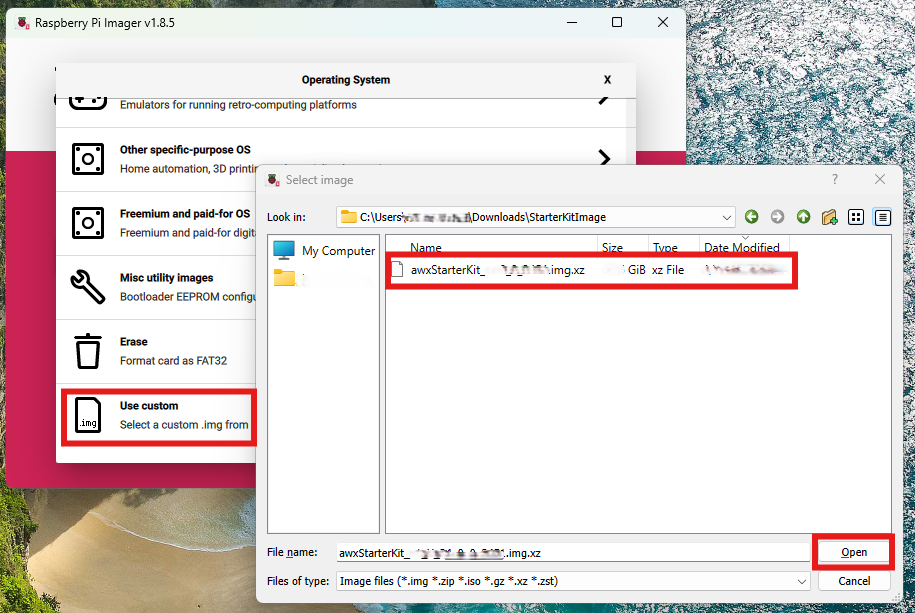
- Under “Operating System”, click “Choose OS”, scroll down and click “Use Custom”.
- In the pop-up, browse for the downloaded image file and select it.
- Now, in the main Raspberry Pi Imager window click the “Choose Storage” button, select the mounted drive to be flashed and click “next”.
- The Imager will then show a prompt for OS customizations. Click on “Edit Settings”.
- In the OS Customization → General tab (shown below):
- Enter “awx” in both the username and password fields. Alternatively, users may enter a username and password of their choice and use the same in the SKUtility to login to the Starter Kit later.
- (Optional) If direct ethernet connection between the Raspberry Pi and the PC is not possible:
- Tick the check box “Configure Wireless LAN” and enter your home Wi-Fi/mobile hotspot credentials in the SSID (Wi-Fi name) and password fields,
- Specify the Wireless LAN country code according to the country that the Starter Kit is being used from the drop-down menu. Here, it is set to GB (Great Britain).
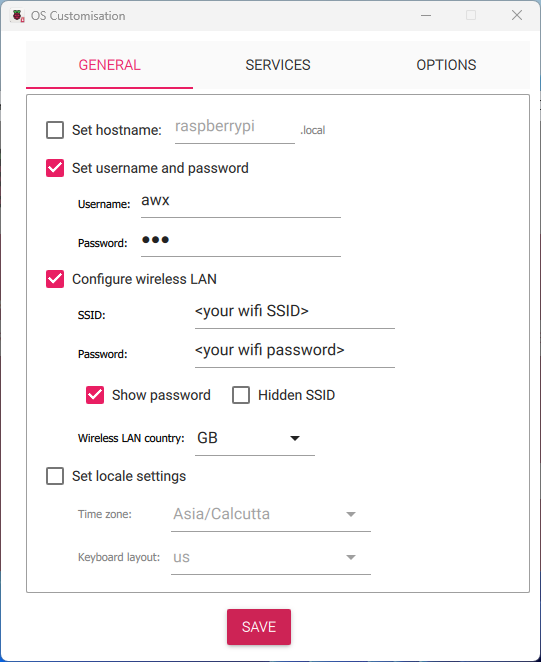
Direct ethernet connection between the PC and the Raspberry Pi is recommended for stable connection to the Starter Kit. Refer to the Troubleshooting Guide for alternative ways to establish connection between the PC and the Raspberry Pi.
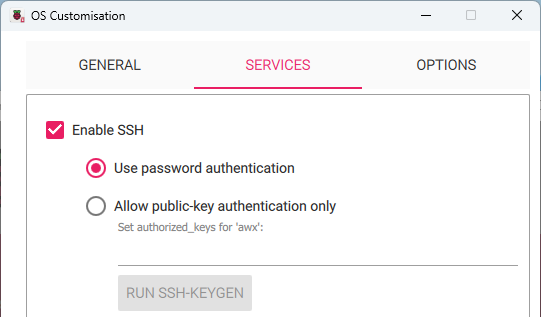
- In the “Services” tab, enable SSH login and click “Save”.
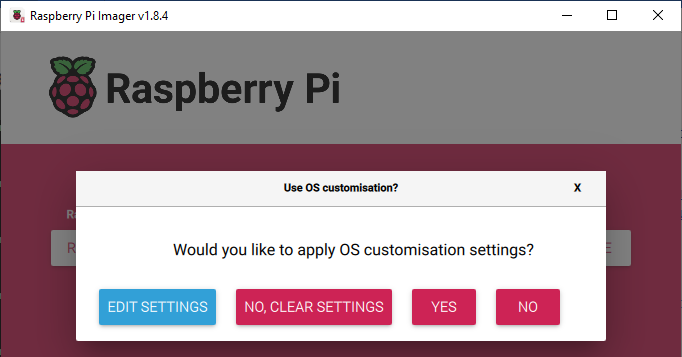
- In the following window, click “Yes” to apply OS customizations.
- You might see a warning (shown below). Click on “Yes” to continue.

- Once the image has been flashed, eject the MicroSD card from the card reader, insert it into the Raspberry Pi’s Micro SD card slot on the underside (shown below) and power it on.
First-time boot could take a few minutes since the disk partitions get resized at this time. The Power LED on the Raspberry Pi 5 will turn static Red after some time, after which the power needs to be reset by pulling out the power cable and plugging it back in. On successful boot-up, the Power LED will light-up Green and blink randomly, indicating disk activity. A noticeable pattern in the Power LED blinking could indicate a possible issue in booting. Refer to Unresponsive Raspberry Pi5 on First Boot – Troubleshooting Steps for instructions on how to fix the issue.
Verifying the Setup using the SKUtility
To verify if the Raspberry Pi has been configured properly, connect it to the host PC using an ethernet cable (or ensure that the PC and the Raspberry Pi are configured to connect to the same network), run the SKUtility Diagnostics as described “Verifying Hardware Connections with the AudioworX Starter Kit Utility” section in Hardware Components Setup. This tool is installed as part of the Global Tuning Tool (for instructions on installation of GTT, refer to Installing AudioworX Setup.
Verify from the log printed on the right-hand side pane if step 1 of the diagnostics is successful, i.e., the PC can reach the Raspberry Pi over the network. If the Raspberry Pi is inaccessible even after resetting power, follow the instructions in the next section to troubleshoot.
Unresponsive Raspberry Pi5 on First Boot – Troubleshooting Steps
There may be cases where the Raspberry Pi is inaccessible due to issues while booting up. In such cases, the Power LED on the Raspberry Pi may flash in a regular pattern corresponding to an error code listed in the official Raspberry Pi website. One common issue when using a PC that has USB-write restrictions to flash the MicroSD card could be the “start*.elf not found” error preventing the Raspberry Pi from booting up. In this case, the Power LED flashes 4 times in short bursts, followed by a pause and repeats the same pattern.
The following are the steps to fix this issue:
- Remove SD card from Raspberry Pi, insert it into the Micro SD card reader and plug it into the PC.
- Open the Raspberry Pi Imager tool, select the “Erase” option in the “Operating System” menu and select the inserted SD card in the Storage menu.
- Click the next button in the main menu and click on “Erase” when prompted to fully format the SD card.
- Once the formatting is complete, from the main menu of the Raspberry Pi Imager:
- Select “Raspberry Pi 5” in the “Raspberry Pi Device” menu,
- Open the “Operating System” menu and select “Misc Utility Images → Boot loader (Pi 5 family) → SD card Boot”.
- Select the SD card in the “Storage” menu and write the image.
- Now, insert the SD card in the Raspberry Pi, power it up and wait for the green LED to continuously blink at a constant interval.
The final step is critical in configuring the boot loader of the Raspberry Pi 5. Complete all the steps in the same order to rectify the issue.
Once the above steps are completed, follow the steps in Steps for Flashing the Custom Raspberry Pi Image to reflash the custom image and boot up the Raspberry Pi again. Then, follow the steps in Verifying the Setup using the SKUtility. If the Raspberry Pi is still unresponsive, it could indicate a different issue. Please contact Harman AudioworX (AudioworXSupport@harman.com) support for further assistance.
Upgrading the Starter Kit Software from an Earlier Release of AudioworX
The AudioworX Starter Kit software binaries and other resources are installed on the PC along with GTT to allow for upgrading an existing Starter Kit to the version of GTT installed. The SKUtility Tool can be used to upgrade the version as detailed below.
Before upgrading the AudioworX installation on the Starter Kit, it is highly recommended to take a back-up of the exiting AudioworX installation directory Raspberry Pi.
If the pre-installed AudioworX version on the Starter Kit is before Y-release (v25.x.x.x), run the below command using the older version of the SKUtility Tool (CLI tool installed with the old version of GTT):
python3 SKUtility.py rmt -snp
For AudioworX installations on the Starter Kit post Y-release, use the SKUtilityGUI using the Remote > Snapshot option.
The back-up will be saved in C:/ProgramData/Harman/StarterKit (SKSnap_<date_and_time_stamp>.zip).
Steps for Upgrading the AudioworX Version on the Starter Kit
- Install the latest version of GTT (refer to Installing AudioworX Setup),
- Open the SKUtilityGUI from the start menu,
- Connect to the Starter Kit,
- Go to Configuration > Factory Reset,
- Click Yes to install the version of AudioworX on the Starter Kit hardware associated with the GTT installation,
- Finally, reboot the Starter Kit using Remote > Reboot.
Since the binaries and data files for the Starter Kit are installed along with GTT, the above instructions can also be used to revert to any older releases of the AudioworX Starter Kit post W+1 (v24.1.1.2444) by performing Factory Reset with the SKUtility Tool associated with the GTT installation.
The Starter Kit software can be installed on an existing Raspberry Pi 5 with the Raspbian OS using the SKUtility Tool by logging into a sudo user account following the same steps as above. However, there could be missing dependencies that may need to be installed before being able to use the Raspberry Pi 5 as an AudioworX Starter Kit.
Additional Changes Required for HiFiBerry HATs on Older Releases of the Starter Kit
The support for the HiFiBerry DAC8x and ADC8x Add-on HATs with the Starter Kit has been added by default in the custom image only from the Y-release of AudioworX (July 2025). However, if using an existing release of the AudioworX Starter Kit or if installing the Starter Kit software on an existing Raspberry Pi 5 with the Raspbian OS, additional steps are required for enabling their use.
The support for HiFiBerry ADC8x Add-on HAT was added to the official Linux Kernel’s February 2025 release (see the official HiFiBerry post on this topic). This necessitates a Kernel update on Raspberry Pies with older kernels.
Step 5 (Linux Kernel update) requires internet access in the Raspberry Pi and using direct ethernet connection to the PC may not work. The recommended method for enabling support for the HiFiBerry HATs is by using the custom image for Y-release of AudioworX (see Flashing the AudioworX Starter Kit Custom Image on the MicroSD Card).
To install support on an existing Starter Kit, ensure that the Starter Kit and the PC are connected to a Wi-Fi network or a wired-LAN with internet access. To configure the Starter Kit to connect to an external Wi-Fi, refer to “Starter Kit Configuration > Wi-Fi Config” in SKUtility Tool – Graphical Application.
- SSH into the Raspberry Pi 5 using the Windows Command Prompt by running the following command:
ssh awx@raspberrypi.local
ssh <username>@<hostname> - Run the following command in the ssh terminal:
sudo nano /boot/firmware/config.txt - Add the following line to the end of the file:
dtoverlay=hifiberry-dac8x - Press Crtl+S to save the file and Crtl+X to exit.
- Update the Linux Kernel on the Raspberry Pi by running the following command:
sudo rpi-update
Reboot the Raspberry Pi from the SKUtility Tool (Remote > Reboot) to complete the installation.
To verify that the HiFiBerry HATs are accessible using the SKUtility Tool, connect to the Starter Kit, go to Configuration > Audio Config, and verify that “sndrpihifiberry” is available under both, the input and output audio device drop-down menu as shown below:

Configuring the JBL DSP-4086/Infinity DSP6840 Amplifier (Only for Passive Speaker Systems)
The JBL DSP-4086 amplifier and Infinity DSP6840 are the recommended amplifiers for the Starter Kit for their robustness in car systems. Users may choose to opt for an amplifier of their choice depending on the speaker specification and availability of the amplifier.
The JBL DSP-4086 and the Infinity DSP6840 (both amplifiers are very similar in appearance and identical in specification and operation) are capable of simple DSP operations for equalizations, volume and distance tuning which can be configured via the DSP tuning application provided. In the Starter Kit context, ideally, the DSP processing is expected to be confined to the Starter Kit hardware (Raspberry Pi 5). The JBL DSP-4086 and the Infinity DSP6840 must be reconfigured for the Starter Kit use-case to turn off all DSP processing. The following are instructions to reconfigure the amplifier.
Requirements
| Hardware Requirements | Software Applications |
|
|
Instructions for Configuring the Amplifier
- Download and install the DSP tuning application.
- Power up the amplifier as follows:
- Connect the SMPS power supply’s AC power input using the 3-pin Power Cord (exact connections shown in the image below)
- Connect the Power Harness of the amplifier as follows:
- Red thick wire (+12V) to the +V port of the SMPS power supply,
- Black thick wire (0V COM) to the -V port of the SMPS power supply,
- Blue thin wire (Remote In) to the +V port of the SMPS power supply.
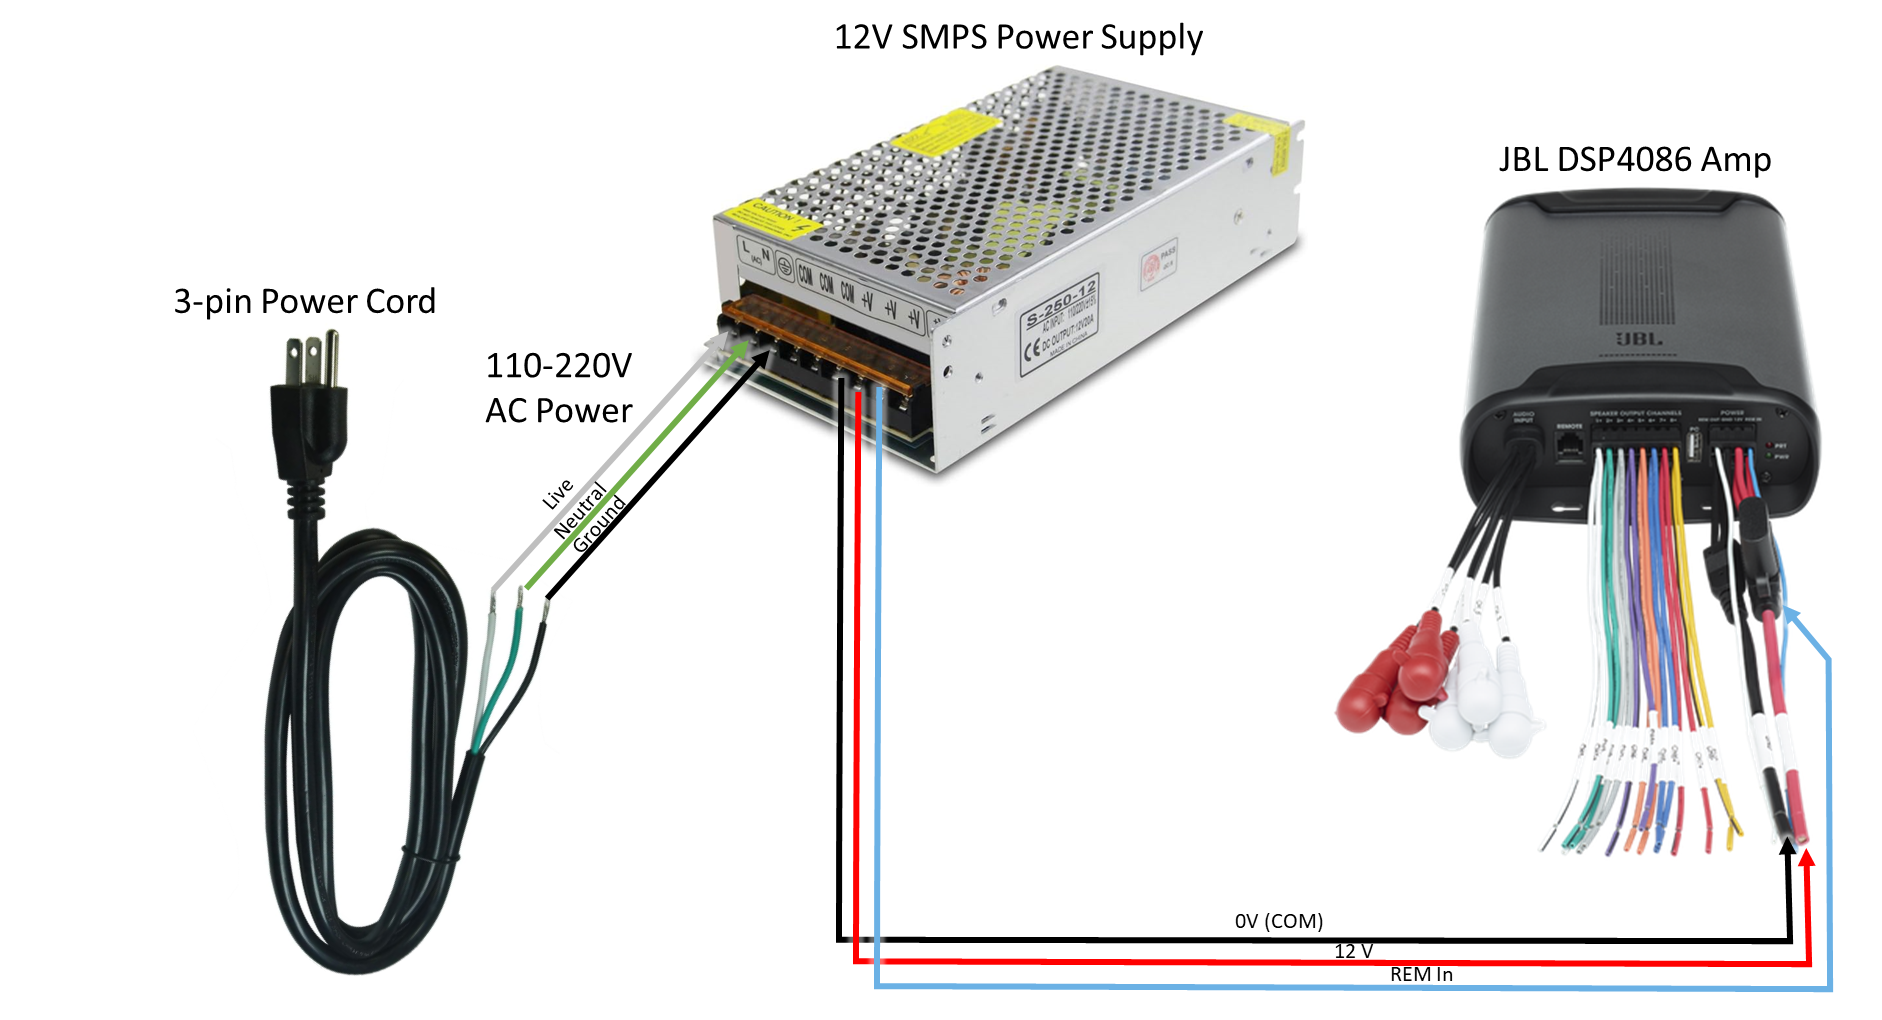
- Connect the amplifier to the PC via USB (USB cable supplied with the amplifier).
- If using the JBL DSP-4086 amplifier, set the PC to flight mode.
- Now, open the JBL/Infinity DSP application from the Windows Start menu. If the amplifier is properly connected, it will be clearly shown on the top-left of the application.
- Download the AWX_SKAmpConfig.bin file.
- Load the file from the “Save File → Load Scene” menu:
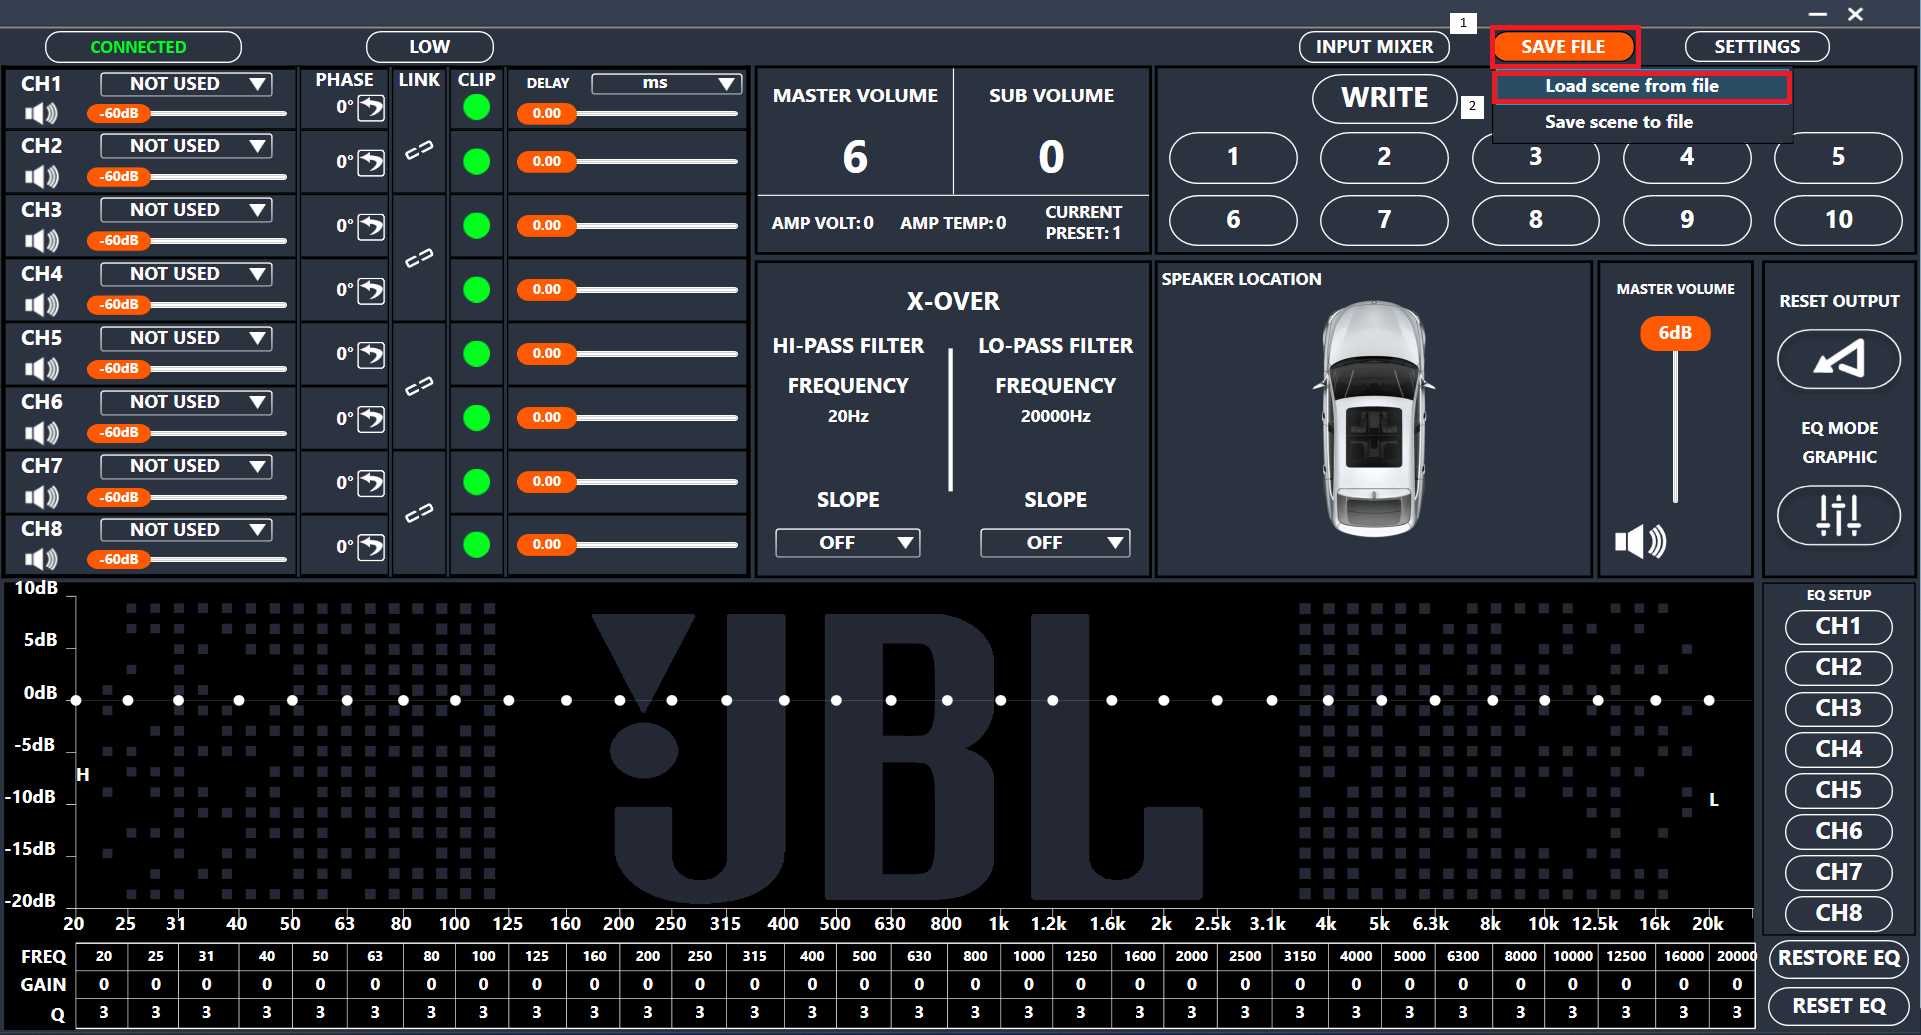
In this configuration, output channels 7 and 8 of the amplifier are unused. They may be enabled to drive additional speakers with signals derived from the 6 input channels. For example, an additional sub-woofer or front stereo tweeters may be driven by the amplifier. - Finally,
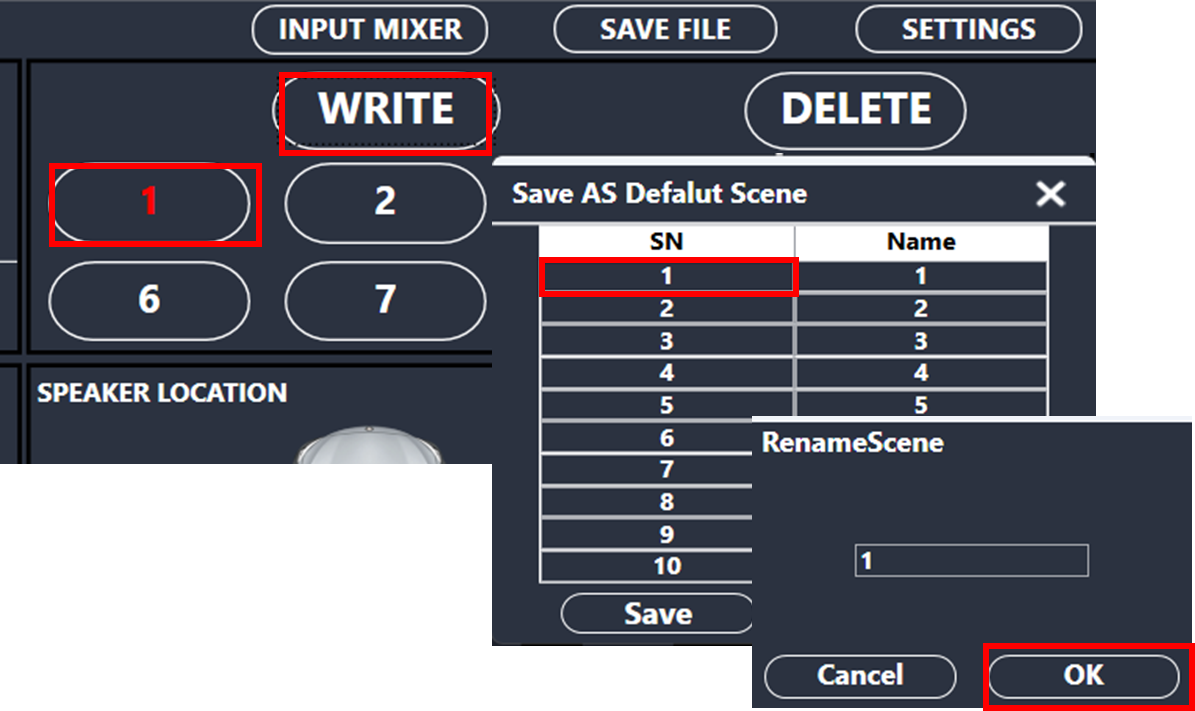
- Select preset “1” from the top-right preset list,
- Click the “Write” button,
- Select the first row,
- Click “Ok” in the renaming window,
- Click “Save” in the “Save as Default Scene” window to write the preset into the amplifier.
The amplifier configuration is now complete, and the amplifier may be unplugged from the PC.
Step 4 above (putting the PC in Flight-mode when using the JBL DSP-4086 amplifier) is necessary to ensure that the DSP software starts up correctly and connects to the amplifier (as mentioned in this post). Once the application starts up and the amplifier is connected, Flight-mode may be deactivated.


