Harman Logo
AUDIOWORX
  • Home
  • Documentation
  • Videos
  • Release Notes
  • Login
Harman Logo
AUDIOWORX
  • Home
  • Documentation
  • Videos
  • Release Notes
  • Login
Harman Logo
AUDIOWORX
  • Home
  • Documentation
  • Videos
  • Release Notes
  • Login
  • Getting Started
  • User Guides
  • Developer Guides

Table of Content

Global Tuning Tool

  1. About Global Tuning Tool
    1. System Requirements
    2. Global Tuning Tool Workflow
  2. Workspace Overview
    1. Home Screen
      1. Home screen Options
      2. Application Options
    2. Device Designer Overview
      1. Tools
      2. Connection
      3. Import and Export
      4. Tuning
      5. Device Panels
    3. Devices and Template View
    4. Core Objects Toolbox
    5. Device Operations
    6. Properties Panel
    7. Device View
    8. Help
  3. Configurations
    1. Configure State Variable
    2. Configure Default Control-Ids
    3. Configure Preset Controller
      1. Configuring Controller Slot
      2. Core Object Settings
      3. Custom Actions Settings
      4. Exporting Preset Configurations
      5. Maintain Folder Structure
      6. Loading Slots on the Device
      7. Handling Dual Responses
      8. Send Preset Data Online
    4. Link Window
    5. Configure Controller
    6. Launch MIPS Profiling
    7. Launch Memory Profiling
    8. Editing Memory Latency
    9. Configure Streaming and Polling
      1. Start Live Streaming
      2. Record Streaming Data
      3. FFT for Streaming
    10. Configure File controller
    11. Configure Control IDS
    12. Custom Device Usage
    13. Multi-xAF Library Support
    14. Configure External Endpoints
  4. Operations
    1. Create a New Project
    2. Create Signal Flow
    3. Connecting a Device
    4. Routing (Connections)
    5. Device Synchronization
    6. Launching Multiple Signal Flows
    7. Tune a Signal Flow

Signal Flow Designer

  1. Overview Of Signal Flow Designer
  2. Components of Signal Flow Designer
  3. Operations in Signal Flow Designer
    1. Pin Labelling
    2. View Audio Object Metadata
    3. Column Name Configuration Panel
    4. Upgrade Audio Object
    5. Audio Object Processing State
    6. Metering the Signal Flow
    7. Copy and Paste Operation
    8. Undo and Redo Operation
    9. Block Control
    10. Signal Flow Design Validation
    11. Securing Audio Objects
  4. Create a Signal Flow
  5. Tune a Signal Flow
  6. Native Panels
    1. Launching Native Panel
    2. Common Operation in Native Panel
    3. Configuring Custom Native Panels
  7. Additional Audio Parameters
  8. Harman Audio Library Service
  9. Multiple Framework Instances Support
  10. Feedback loop in Signal Flow
  11. Compound Audio Object
    1. Create a Compound Audio Object
    2. Import and Export CAO
    3. Tuning and Editing CAO
    4. Create Preset for CAO
    5. Edit CAO Instance
    6. Set password for CAO
    7. Linking Custom Panel to CAO
    8. Multi dll support for CAO
    9. Delete a Compound Audio Object

Audio Object Description

  1. Audio Object Description Overview
  2. Audio Object General Information
  3. Interface Objects
    1. AudioIO
    2. ControlIn
    3. ControlOut
  4. Basic Objects
    1. Delay
      1. Delay Panel
    2. Gain
      1. Gain Panel
    3. Level Monitor
      1. Level Monitor Panel
    4. FaderBalance
      1. Fader Balance Panel
    5. Volume and Mute
      1. Volume and Mute Panel
    6. VolumeLite
  5. Control Objects
    1. Control Math
    2. Control Grouper
    3. Control GroupSplitter
    4. Control Multi Adder
    5. Control Mixer
      1. Control Mixer Panel
    6. Control Router
      1. Control Router Panel
    7. Control Smooth
    8. AudioToControl
    9. Lookup Table (LUT)
      1. Lookup Table (LUT) Panel
    10. Rate Control
    11. Control Generator
    12. Control Demux
  6. Routing Objects
    1. Router
      1. Router Panel
    2. Splitter
    3. Demux
    4. Selector
  7. Source Objects
    1. Noise Generator
      1. Noise Generator Panel
    2. Wave Generator
    3. FilePlayer
  8. Mixer Objects
    1. Adder
    2. Matrix Mixer
      1. Matrix Mixer Panel
    3. Merger
    4. Fader Matrix
      1. Fader Matrix Panel
  9. Dynamic Object
    1. Limiter
      1. Limiter Panel
  10. Filter Objects
    1. Filter Objects General Information
    2. ParameterBiquad
      1. Parameter Biquad Panel
    3. CoefficientBiquad
      1. Coefficient Biquad Native Panel
    4. Tone Control Extended
      1. Tone Control Extended Panel
    5. XoverBiquad
      1. Xover Biquad Panel
    6. FastConv
      1. Fast Conv Panel
    7. FIR Filter
      1. FIR Filter Panel
  11. Core Objects Toolbox

Panel Designer

  1. Panel Designer Overview
  2. Panel Designer Components
    1. Panel Designer Ribbon
      1. Text Design
      2. Fader Design
      3. Rotary Design
      4. Button Design
      5. Box Design
      6. LED Design
      7. Meter Design
      8. Other Design
      9. Images
      10. Advanced
    2. Panels View
    3. Custom Panel Properties View
    4. Designer Workspace
    5. Editor Windows
      1. Parameter Address Editor
      2. Multi-Parameter Address Editor
      3. System Function Editor
      4. State Indication Setup Window
      5. Select Color Window
      6. Discrete Values Editor
      7. Indication Configuration Editor
      8. LED Values Editor
      9. Graph Parameters Window
      10. Scale Editor
  3. Create a Custom Panel in GTT
  4. Switch between Multiple Parameter Sets

Parameter Set

  1. Parameter Set Overview
  2. Parameter Set Components
    1. Apply Delta in Parameter Sets
    2. Retrieve and Verify Parameter Sets
    3. Importing and Exporting Set File
    4. Preset Comparison
  3. Create a Parameter Set in GTT

Real Time Analyzer

  1. Real Time Analyzer Overview
  2. Real Time Analyzer Components
  3. Settings
    1. Channels Settings
    2. Generator Settings
    3. Analyzer Settings
    4. Microphone Calibration
    5. RTA Advanced Settings
      1. Sound Card Settings
      2. Plugin Host Setting
      3. Advanced Analyzer Settings
      4. Advanced Generator Settings
      5. Graph Display Settings
      6. Mimo Convolver Settings
      7. Recorder Settings
      8. Routing Settings
    6. Saving and Loading RTA File
  4. Integrated Virtual Process Options
  5. Probe Point Configuration
  6. Real Time Data View
  7. Graph Settings and Measurement
  8. Traces
    1. Trace Toolbar
    2. Trace Configuration
    3. Trace Functionalities
    4. Offline Traces Anlaysis
    5. RTA Shortcuts
  9. Analysing Audio Signal

Measurement Module 2.0

  1. Measurement Module Overview
  2. Configurations
    1. Device Output Mapping
    2. Generator
    3. Test Sound
  3. Understand Measurement Process
    1. Scene Setup
    2. Speaker Configuration
    3. Microphone Configuration
    4. Define Measurement
      1. Define Mannequin Measurement
    5. Measurement Session
  4. Performing Measurement

Central Viewer

  1. Central Viewer Overview
  2. Central Viewer Window
    1. Configurations
    2. Scene Mode
    3. Chart Selector
    4. Waterfall Chart
    5. Graph Area
    6. Curve Lists
    7. Domain Selector
  3. Import Export Central viewer settings

Starter Kit Utility Tool

  1. Starter Kit Utility Tool (SKUtility) Overview
  2. SKUtility Tool - Graphical Application
  3. SKUtility Tool - Command-Line Interface
    1. Useful Commands for Starter Kit
  4. Starter Kit Troubleshooting

2.1.2.Application Options

  • Global Tuning Tool
  • Application Options

The option menu allows you to configure various settings in GTT, such as the general settings, project settings, custom panel grid settings, native panel, and event log settings.

You can configure the following settings.

  • General Settings
  • Project Settings
  • Custom Panel Designer Settings
  • User Interface Settings
  • Tuning Data Settings
  • Native Panel Settings
  • Event Log Settings

General Settings

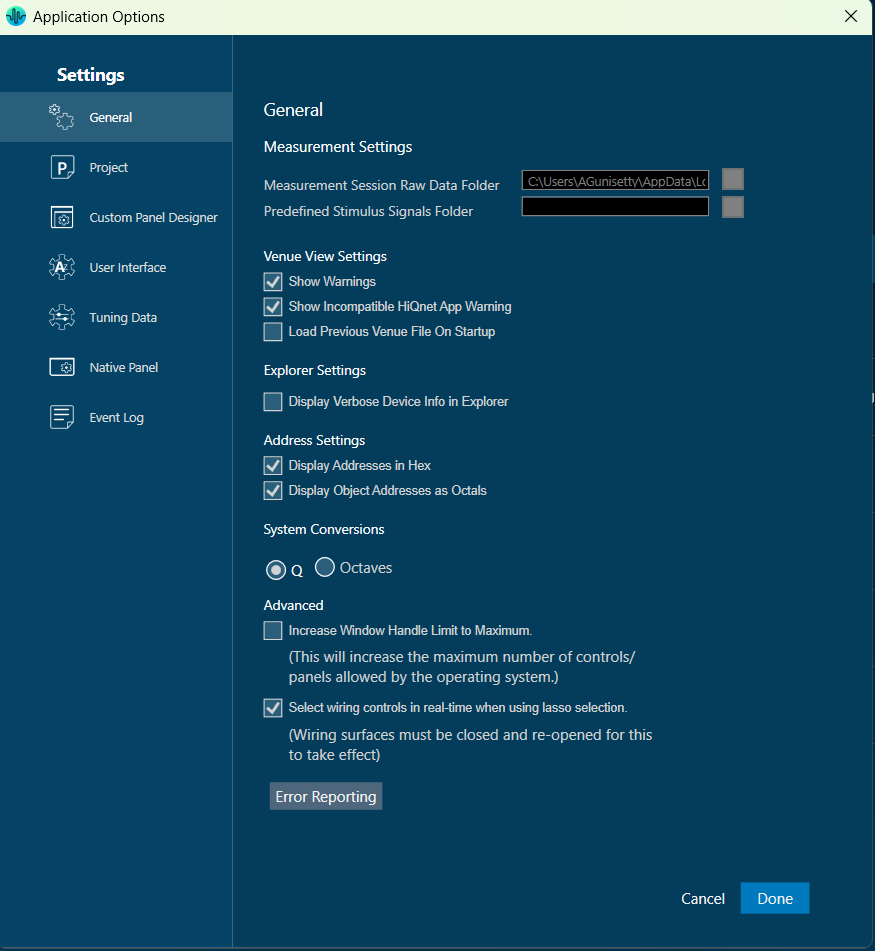
In the general settings dialogue box, you have the option to customize measurement settings, venue menu settings, explorer settings, address settings, and system conversion settings.

General Settings Description
Measurement Settings Measurement Session Raw Data Folder: Specify a desired location where you would like to store the raw data for the measurement session.

Predefined Stimulus Signals Folder: Specify a desired location where you would like to store the predefined stimulus signals.

Venue View Settings  – Show Warnings: If enabled, all device alerts will be displayed in the venue.

 – Show Incompatible HiQnet App Warning: If enabled, a warning dialog will appear upon startup if another HiQnet application is already running.

 – Load Previous File On Startup:

  • If checked, the venue file that was last used or saved will be automatically loaded upon startup.
  • If unchecked, the venue file needs to be loaded manually (default)
Explorer Settings If enabled, a drop-down arrow appears next to discovered devices in the venue explorer. When the arrow is clicked, the complete device information is displayed.
Address Settings  – Display Addresses in Hex.
  • If checked, displays device and object addresses in hexadecimal.
  • If unchecked, it displays the device and object addresses in decimal.

 – Display Object Addresses as Octals.

  • If checked, it displays the object addresses in three period-separated values.
  • If unchecked, it displays object addresses as a single value.
System Conversions This option makes all instances of parametric EQ displayed either as bandwidth in Octaves or as bandwidth as Q at the user’s discretion. Switching from one option to the other will be on a global basis for the entire application.
Advanced  – Increase Window Handle Limit to Maximum: This option allows you to set the handle limit to its maximum value (checking the checkbox), this will increase the maximum number of controls/planes allowed by the operating system. By default, this option is unchecked.

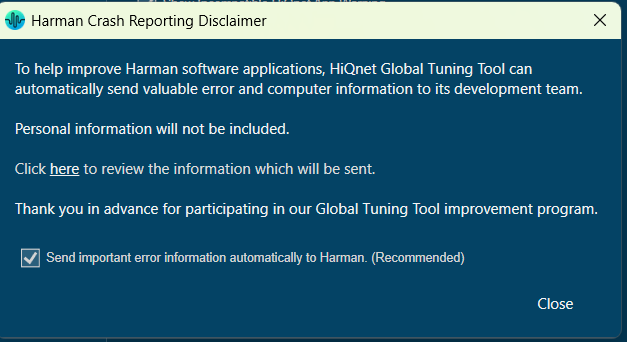
If GTT exhausts its handle resources and is unable to launch a panel, it will notify you of the issue and prompt you to close any unused panels in order to free up resources.

 – Select wiring controls in real-time when using lasso selecting: When using the lasso to select objects, having this box checked allows the selection of wiring. This option makes all instances of parametric EQ displayed either as bandwidth in Octaves or as bandwidth as Q at the user’s discretion.
Switching from one option to the other will be on a global basis for the entire application role.

 – Error Reporting: This option enables GTT to send important error information automatically to Harman.

On the Harman Crash Reporting Disclaimer dialogue box, check the “Send important error information automatically to Harman” option. This feature will send application and computer information to the Harman GTT team in the event of an application crash.

Uncheck the checkbox if you do not want any information sent.

Project Settings

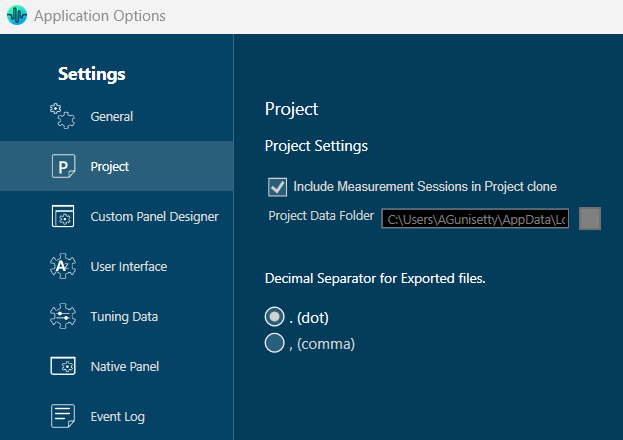
In Project Settings, have an option to include measurement sessions in Project, to select Project Data Folder, and Decimal Separator for Exported files.

Project Settings Description
Project In the project settings, you have the option to designate a folder where you would like to store the project file. If you want to exclude Measurement Session data from the project export, uncheck the “Include Measurement Sessions in Project Export” option.
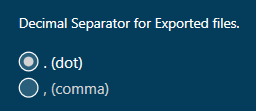
Decimal Separator for Exported Files You can select between a dot or a comma to specify the separator of any quantity for the files you export in GTT.

Currently, this option is only supported for traces exported in .txt and .txtrclist in the RTA module.

Make sure to configure the project settings prior to initiating the export process.

Custom Panel Designer Settings

In GTT, you can modify the settings for the custom control panel design view, such as the grid, snap lines, and control transparency configuration.
However, it is important to note that once you make changes to these settings, you must close any open custom control panel designer and reopen it for the changes to take effect.
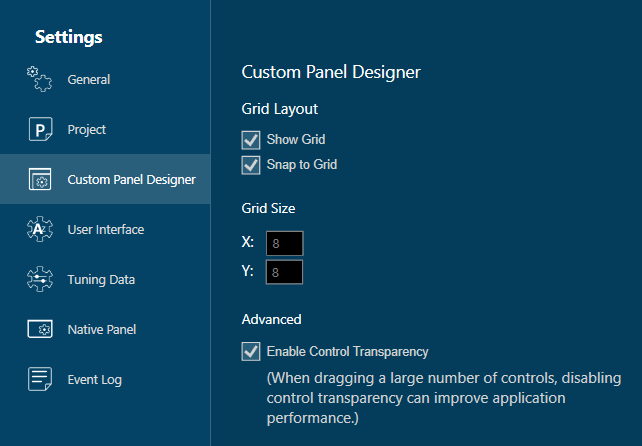
Custom Panel Design Settings Description
Grid Layout The design grid allows you to arrange controls relative to specific marks on the design view of the Custom Panel.
  • Show Grid: If checked, it will display the design grid. This feature is overridden with the “Snap Lines” feature below.
  • Snap to Grid: If checked, it will snap design objects to the design grid (if selected).
  • Grid Size: It is the distance between grid lines (in pixels); x = horizontal, y = vertical
Advanced Enable Control Transparency

Control transparency gives the controls on Custom Panels transparent backgrounds. While this option makes the control panel designer more attractive, it may slow the computer system performance significantly to process all the graphics.

If you are having problems with the graphics building too slowly on the screen, uncheck the box “Enable Control Transparency.”

While they will show up as overlapped on the Custom Panel designer, they will show up as transparent on the Custom Panel if the background is transparent (defined in Control Properties).

User Interface Settings

In these settings, have an option to select the Font Size.
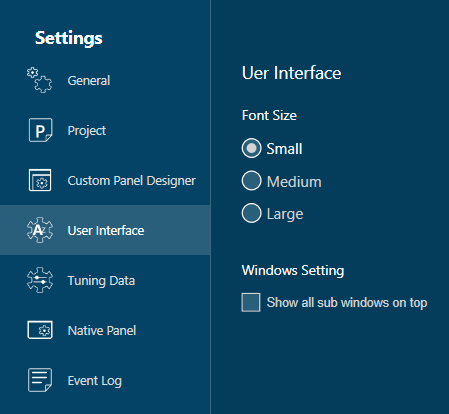
User Interface Settings Description
Font Size Choose the desired font size:
  • Small (12 points): Select this if you prefer a smaller font. This is the default setting.
  • Medium (16 points): This size is suitable for a moderate, more comfortable reading experience.
  • Large (20 points): Choose this if you prefer a larger, more readable font.

Currently, font size changes will impact only in the Central Viewer Browsing and Permanent curve name font sizes.

Windows Setting – Show all sub-windows on top:

Check this option to ensure all sub-windows are always visible above the main window.
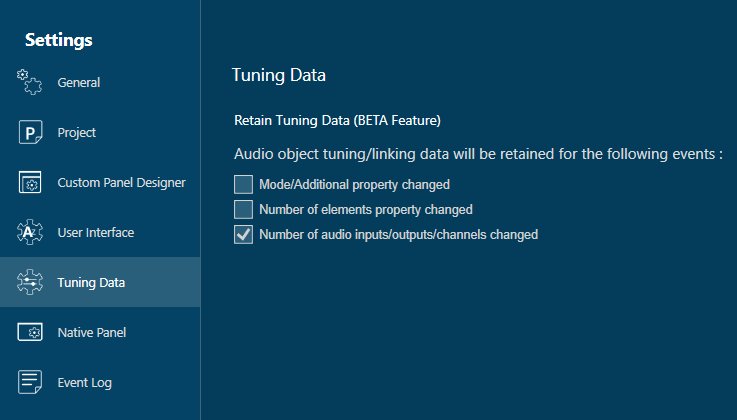
Tuning Data Settings

Tuning Data Description
Retain Tuning Data By default, tuning data of the Audio object will be lost when the Mode, Additional Parameter, or Number of Elements property changes in the signal flow.
To retain tuning data in the above cases, please check the appropriate option based on your needs.

Native Panel Settings

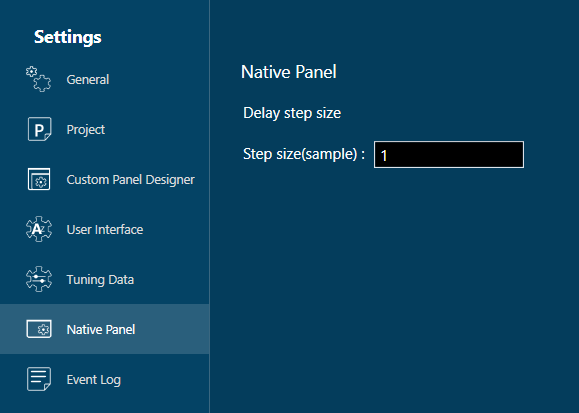
In these settings, have an option to set the delay step size.

Event Log Settings

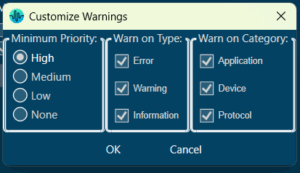
In these settings, have an option to set Event log view, view update rate, and see Event log archive, and can customize warnings.
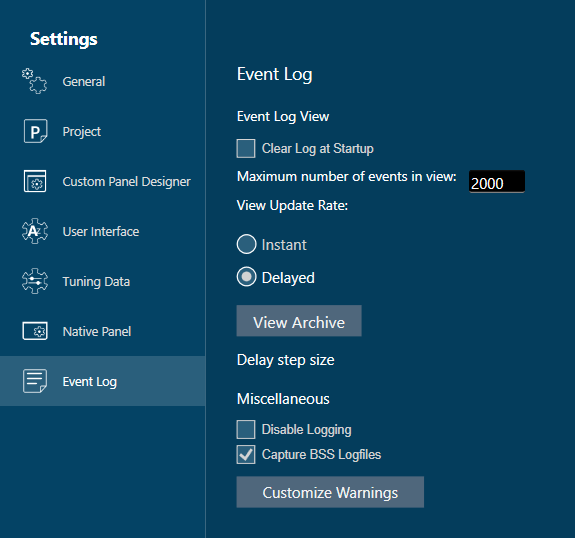
Event Log Settings Descriptions
Event Log View
  • Clear Log at Startup: Enabling this option will result in the event log being automatically cleared every time GTT is started up.
  • Maximum number of events in view: Sets the maximum number of events shown in the event log window.
  • View Update Rate: You can configure the update rate to be either instantaneous or delayed.
  • View Archive: Brings up the “Event Log Archive” dialogue box.

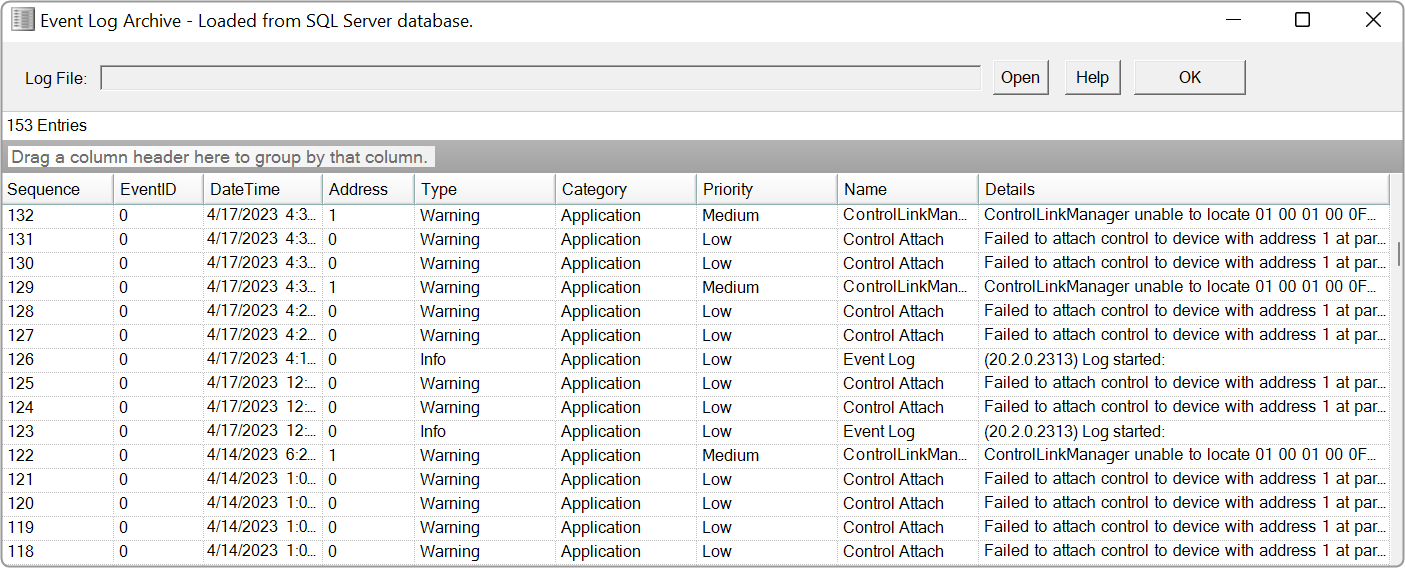
The Event Log window tab shows events that have occurred on HiQnet devices. The log may be utilized by individual devices to perform certain operations. You can also use the logs for troubleshooting.

The Event Log Indicator will notify you in real-time as events occur.

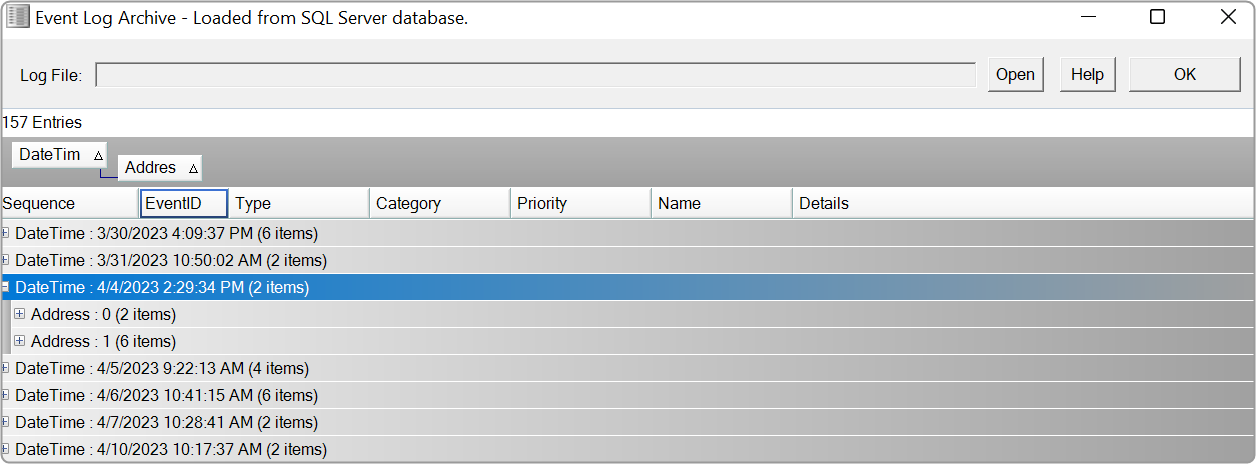
You can also group information by heading. Click and hold on the heading and drag it to the top, just below the log file to the “Group(s)” option. The screen will now display the heading you selected.

To remove the grouping, click and hold on the heading and drag it off the “Group(s)” option.

The Event Log Archive is a store of the Event Log from when the application was opened.

Miscellaneous
  • Disable Logging: Turns off the Event Log.
  • Capture BSS Logfiles: Include the Log Files that have been saved in the BSS devices in the Audio.
  • Customize Warnings: This window allows you to set the minimum warning priority level, which warning types you want to receive a warning from, and which category you want to receive warnings from.
« Home screen OptionsDevice Designer Overview »
Suggest Edit
  • Careers
  • Contact
  • Sitemap
  • News

© 2025 HARMAN International. All Rights Reserved. Privacy Policy | Cookies | Terms of Use

If you are using a screen reader and are having problems using this website, please call (800) 645-7484 for assistance.