This section outlines the process to be followed for creating a new project with a custom device type, providing instructions for efficiently creating a project environment that supports custom audio configurations and leveraging the full capabilities of GTT with the Starter Kit.
Steps to create a new empty GTT project:
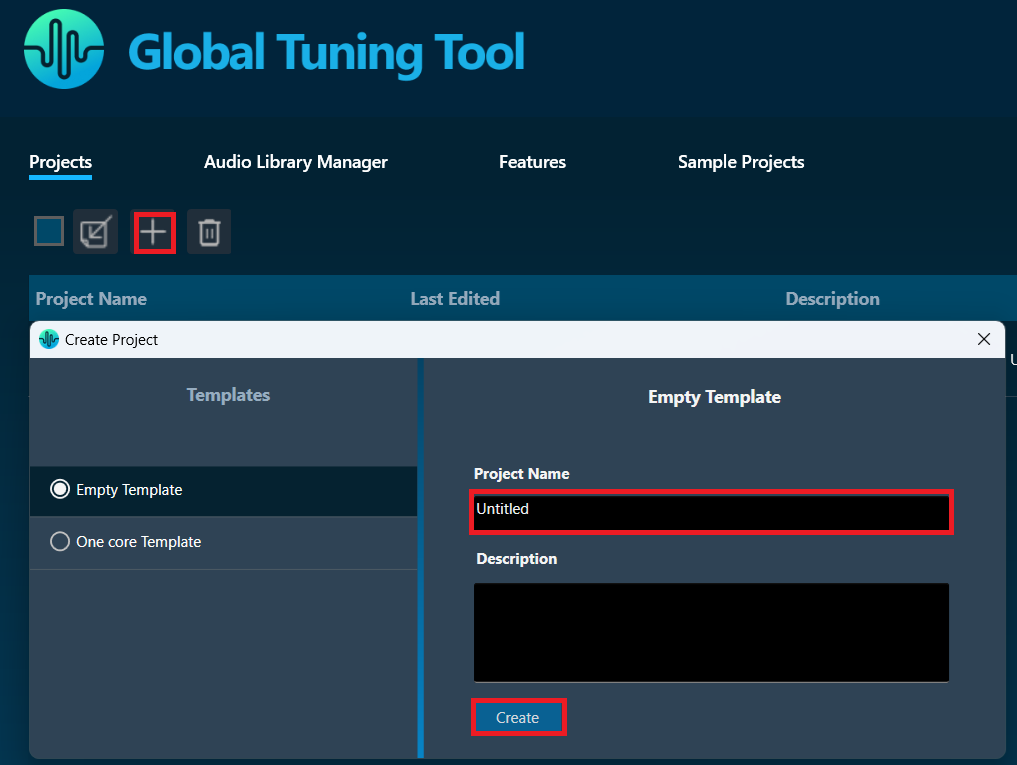
- Click the + button in the “Projects tab” of the “Home Screen” of GTT.
- Select Empty Template and provide project title and description.
- Click the Create button to create a new empty project.
Adding a Device to the Project
The first step after creating a GTT project is to add a device to the project, either from a template or by defining a custom device, within which the audio processing pipeline will be implemented. GTT provides the capability for defining a device with a custom number of audio inputs, outputs, virtual cores processing audio data at custom sample rates and block lengths, etc., to build audio systems requiring precise audio data handling, ensuring that the audio system is fully customized to support the project’s audio processing needs.
GTT can also learn the capabilities of an AudioworX amplifier within which the audio processing pipeline is to be built by querying the target amplifier.
The following section provides instructions on how to define a custom device that is compatible with the Starter Kit hardware.
Configuring a Custom Device Compatible with the AudioworX Starter Kit
A custom device can be defined by creating a “device file” that contains information on the physical cores available on the target amplifier, virtual cores configured for audio processing at custom sample rates and block lengths within each physical core, and groups of audio input and output channels to stream audio data to the virtual cores.
The device file can be customized to support complex audio workflows, enabling scalability, optimized resource usage, and the flexibility to handle different audio streams simultaneously.
Steps to create a custom device file:
- Click the + button in the “Devices” pane of the Device Designer tab.
- Select the Create Device File option on the right side of the window.

Creating a Device File
This will open a “Device File Editor” where a user can define the high-level capabilities of the device.
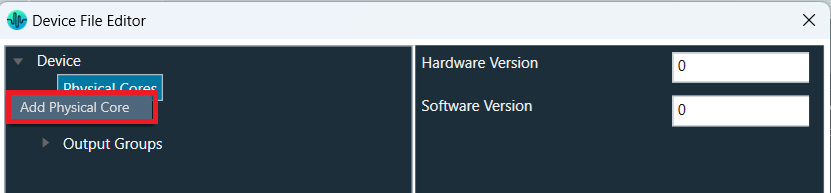
First, a physical core must be created to describe the DSP core that the target amplifier is equipped with and provide details on its MIPS and core-type. An AudioworX supported amplifier hardware may have more than one DSP core that can be used for audio processing, each of which need to be separately added to the device file.
Steps to create the physical core in the device file editor for the Starter Kit:
- Right-click Physical cores and click Add Physical Core.
- Select Physical Core 0 choose arm64-v8a in the Core-type drop-down menu, which corresponds to the processor core type of the Raspberry Pi 5. This is an essential step to ensure that the GTT project is compatible with the Starter Kit.
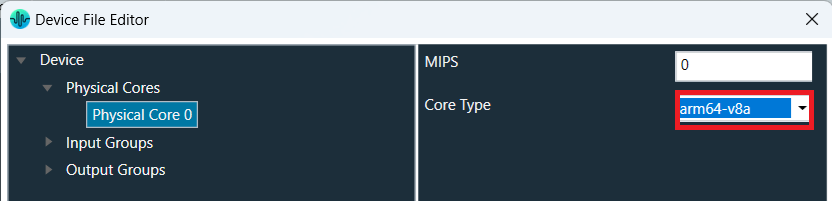
The Starter Kit currently only supports one Physical Core of type “arm64-v8a” despite the Raspberry Pi 5 having a quad-core processor.
Further steps on adding and defining “Virtual Cores” and detailed information on the “Device File Editor” can be found in Create Device File.
Device level Input and Output Groups can also be edited in the “Device File Editor” to suit the needs of the audio processing pipeline. Here, the user is expected to set the properties of audio input and output data streams that the physical device is capable of, including the number of channels, sample rate of the audio data and the format of the audio data.
The Starter Kit currently only supports the following configuration:
- Sample rate: 48,000 Hz
- Max. number of input channels: 8
- Max. number of output channels: 8
- Audio data format: Float
As a last step after editing the device file, click Save Device Template and save the device.flash file on local file system. This device.flash file must be sent to the Starter Kit hardware using the Starter Kit Utility to make the kit fully aware of the exact device defined in GTT.
To send the exported device.flash file, with the Starter Kit connected in the SKUtilityGUI.exe tool, go to Configuration > Send Device File, select the file to send, and click Open. For the Starter Kit to adopt the new device configuration, remove all other flash files from Configuration > Flash Files, and reset the AWX Amp application using Remote > Reset.
For more details on how to send the device.flash file refer to “Flash a Device File” in the “Starter Kit Configuration” section of SKUtility Tool – Graphical Application.
Discovering the Device Properties from the AudioworX Starter Kit Hardware
GTT can learn the device capabilities using the “Discover Device” option in the “Add Device” menu. The discovered device type can then be used in the GTT project to design the audio processing pipeline.
Ensure that the AWX Amp application is running in the Raspberry Pi for GTT to be able to learn from the Starter Kit Hardware. Refer to the “Running Starter Kit Diagnostics” section of SKUtility Tool – Graphical Application.
Steps to query the Starter Kit hardware to discover the device properties based on the device.flash file that has been already flashed on to the kit:
- Launch AmpSrv2 from the Desktop or from the Windows Start bar.
- Go to File > Options > Socket and set the host name as “raspberrypi.local” and port as “25001”.
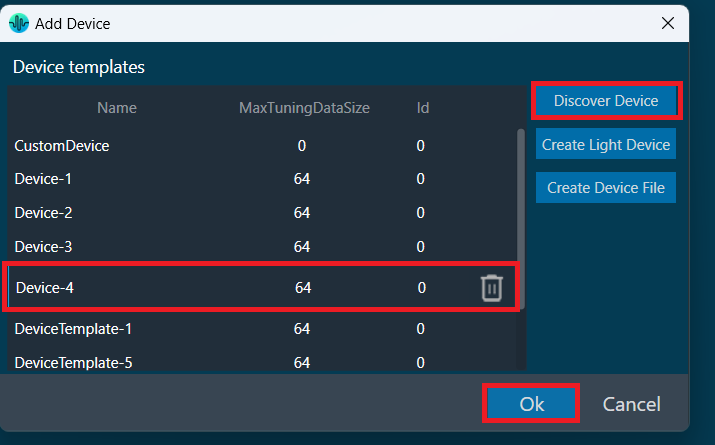
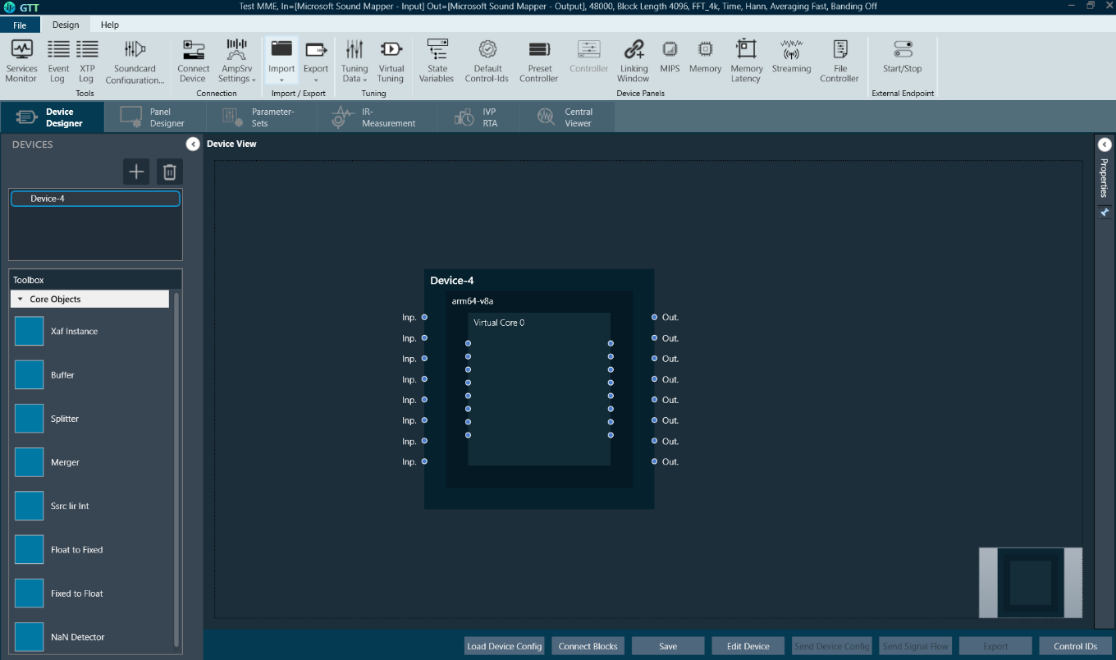
- While keeping the AmpSrv2 window open, in the “Add Device” window of GTT, click the Discover Device button. This will get the device information from the Starter Kit hardware and display as a new device under the templates list (“Device-4” in the below figure).
- Select the device and click Ok to add the device into the GTT project.
For the device capabilities to be discoverable from the Starter Kit hardware, the Starter Kit should have been previously flashed with a device.flash file.
By default, the Starter Kit is configured with a device.flash file that corresponds to the device type used in the example project. This file can be restored in case it was deleted using Configuration > Factory Reset.
More details on this can be found under “Starter Kit Configuration” in SKUtility Tool – Graphical Application.
Leveraging AudioworX Audio Features
GTT facilitates enhanced testing and experimentation with custom audio setups, providing flexibility and control over the audio workflow.
The GTT system includes “Xaf instances” and Core AOs using which developers can enhance audio processing systems, ensuring seamless integration and efficient handling of audio tasks. AudioworX provides a robust framework for manipulating audio data while taking full advantage of GTT’s advanced functionalities to deliver optimized performance and enhanced audio output.
The center pane of the “Device Designer” tab in GTT is the “Device View” where the audio processing pipeline is built. Refer to the “Importing The Example Project” section in Getting Started with the Example Project for a detailed explanation of the device level abstractions in the “Device View”.
The “Toolbox” pane on the left-side provides a set of objects that can be dragged, dropped, and interconnected to complete the audio processing pipeline.
The following steps show how a simple audio processing pipeline can be developed:
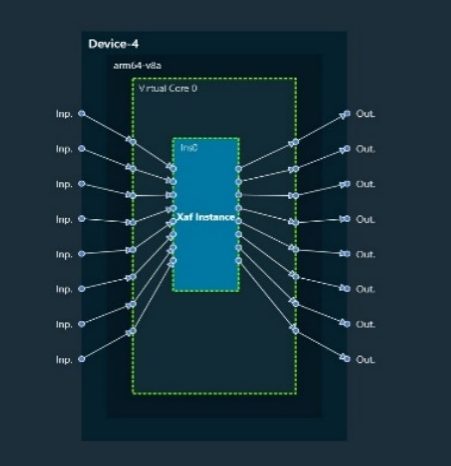
- Connect the pins in physical core (block named “Device-4”) and virtual core (block named “Virtual Core 0”).
- Drag and drop an “Xaf Instance” from the left-side “Toolbox” pane to “Virtual Core 0” and set input and output channels as 8 and 8 (illustrative only), respectively.
- Now, connect the pins on the added “Xaf Instance” and “Virtual Core 0”.
- Double-click the Xaf Instance to edit/add the AOs and define a signal flow.
- Drag and drop the required AOs into the designer and connect them as needed. The below figure shows a Gain object of 8 channels that is added to the signal flow.
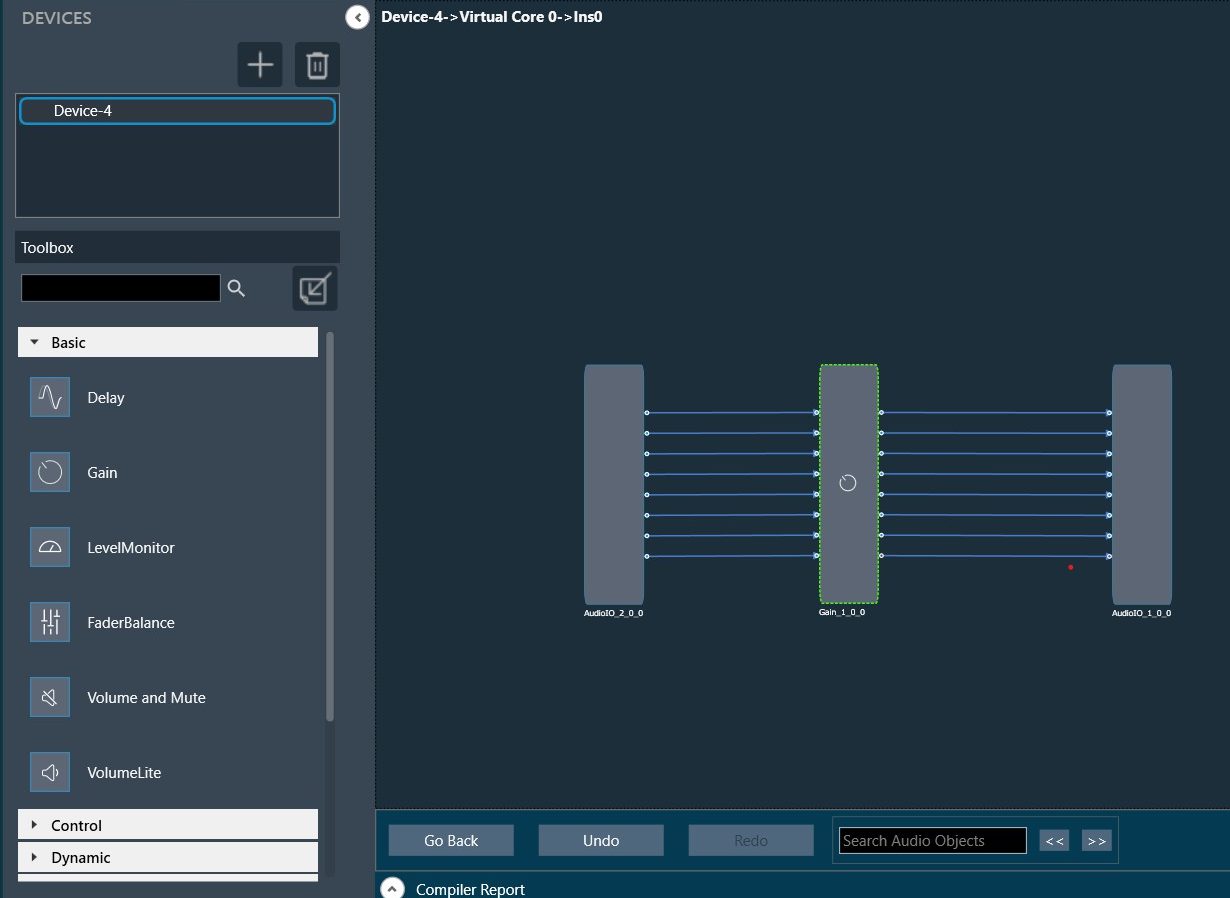
- Once the connections have been made as required, click Save to save the signal flow design and click Go Back to return to the “Device view”.
- The audio processing pipeline or the signal flow can now be sent to the Starter Kit as described in the “Sending the Device Configuration to the AudioworX Starter Kit” section of Getting Started with the Example Project and can be tuned thereafter as described in the “Connecting to the AudioworX Starter Kit for Tuning” section of Getting Started with the Example Project.