The SKUtility Tool has a command-line interface (CLI) that is included in the GTT installation. It is a Python script (SKUtility.py) that enables users to programmatically control the Starter Kit for advanced use-cases that may require rebooting, resetting, etc., without human intervention. This page describes the CLI tool and its usage in detail. Common useful commands are given in Useful SKUtility Commands.
- Installing the Python Pre-Requisite Packages
- SKUtility.py Usage
- SKUtility Diagnostics
- SKUtility Remote Control
- SKUtility Configuration
The SKUtility.py script is not “installed” in the PC environment along with GTT and requires to be run from the GTT installation directory where it is stored.
Installing the Python Pre-Requisite Packages
The SKUtility.py is a Python script and requires Python 3.12 to be installed on the PC to be able to run. Download Python 3.12 and install it on the PC before proceeding.
The SKUtility.py script can be found in the default GTT installation directory “C:\Program Files\Harman\HarmanAudioworX\StarterKit\StarterKitUtility”. This directory has a requirements.txt file that lists all the python dependencies needed to run the script and remotely operate the Starter Kit hardware. To install the Python dependencies:
- Open a Command Prompt window (or any terminal of choice of the user, for example, PowerShell, MSYS2 or git bash) from the start-menu,
- Change directory to the location of the SKUtility.py script in the GTT installation directory as follows:
cd C:\Program Files\Harman\HarmanAudioworX\StarterKit\StarterKitUtility - Run the following command to install the python pre-requisites as shown below:
python3 -m pip install -r requirements.txt
SKUtility.py Usage
The “SKUtility.py” script takes command-line arguments as shown in the help text, which can be displayed by running the following command:
python3 SKUtility.py -h
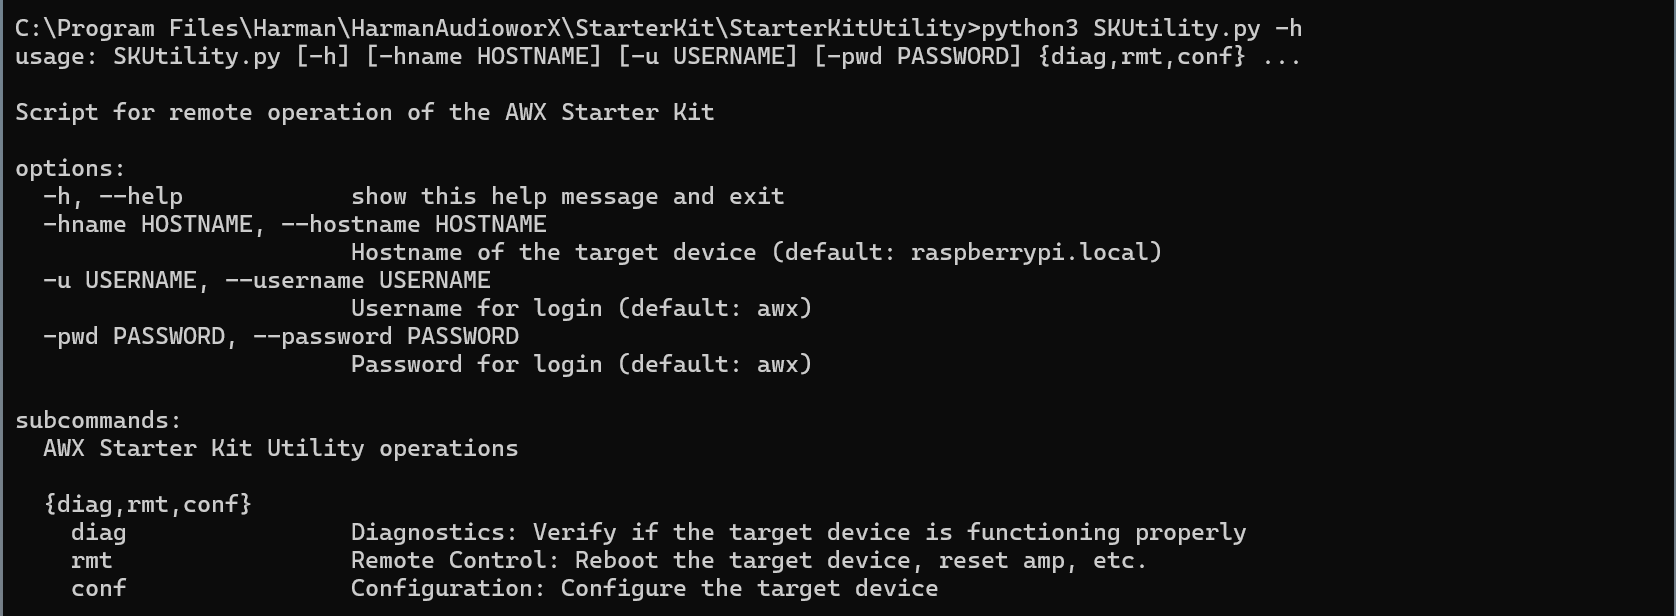
The script, by default, connects to a target with the hostname “raspberrypi.local” and the username and password as “awx” (default credentials for the Starter Kit). This can be changed using the “-hname” argument for the hostname, “-u” argument for the username and “-pwd” argument for the password, if they are different from the default.
The Utility tool supports operations/actions that are classified into 3 functions or sub-commands:
| Sub-command | Function | Description |
| diag | Diagnostics | Verify if the target device is connected and is functioning as expected |
| rmt | Remote Control | Perform actions such as rebooting the Raspberry Pi, resetting the AWX amp application, etc. |
| conf | Configuration | Configure the audio device to use and Wi-Fi to connect to |
The following sub-sections describe each function in detail along with the usage.
SKUtility Diagnostics
This function runs a series of checks to verify if the Starter Kit hardware is functioning as expected. The diagnostics report can be generated by running the command:
python3 SKUtility.py diag
Following is an example report that shows a working Starter Kit setup.
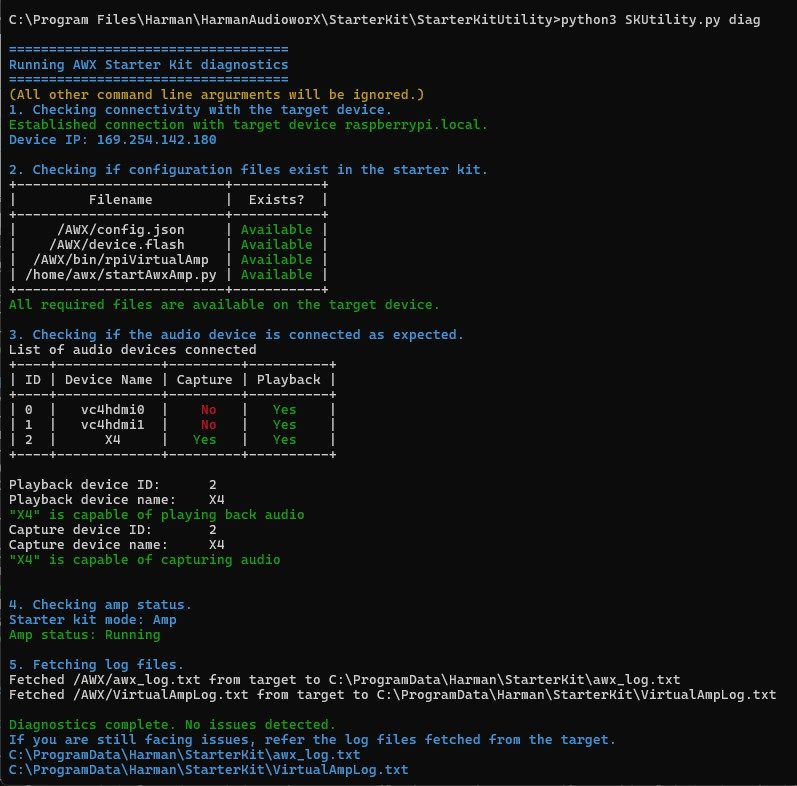
The diagnostics only finds issues in the configurations of the hardware that may be preventing proper operation of the AWX Amp application. If the Starter Kit is not functioning properly despite the diagnostics report showing no issues, refer to the log files fetched during the diagnostics to debug. The details on debugging using the Amp log file are given in the “AWX Amp Application Logs” section of Starter Kit Troubleshooting.
The “SKUtility Diagnostics Report” section in Starter Kit Troubleshooting describes the steps in the diagnostics in detail and highlights troubleshooting steps for resolving issues detected.
SKUtility Remote Control
This function/sub-command provides actions such as rebooting the Raspberry Pi, resetting the AWX Amp application, fetching log files and taking a snapshot of the Starter Kit data files.
The following image shows the help text for this function.
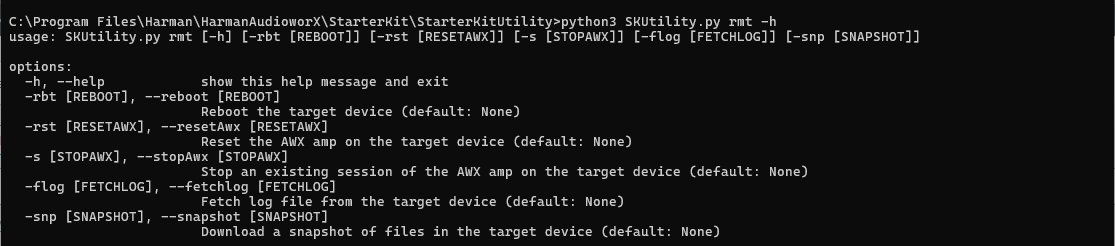
The following are the actions that can be executed under the Remote-Control function:
| Remote-Control Function | Command |
| Reboot the Raspberry Pi | To reboot the Raspberry Pi remotely, run the commandpython3 SKUtility.py rmt -rbtThe utility tool will then trigger reboot and wait until the Raspberry Pi is booted up and reachable by the PC. This command may take about a minute. |
| Reset the AWX Amp Application running in the Starter Kit Hardware | To reset the AWX Amp application (needed when updating the device definition on GTT), run the commandpython3 SKUtility.py rmt -rst |
| Stop the AWX Amp Application | To stop the AWX Amp application, run the commandpython3 SKUtility.py rmt -s |
| Fetch Log Files | To fetch the log files from target, run the command
This will fetch two log files from the target Starter Kit hardware and open the file location with the following files:
|
| Take a Snapshot of the Data Files on the Starter Kit Hardware | The SKUtility.py can be used to take a snapshot of the data files in the Starter Kit hardware, either for saving the state of the Starter Kit or to send Harman AudioworX support for debugging, run the command:python3 SKUtility.py rmt -snp
This will take a snapshot, fetch a .zip file from the Starter Kit, and open the file location. |
SKUtility Configuration
This function provides configuration options for the user to configure the behavior of the Starter Kit hardware, and the audio interface connected. The following is the help text for this function.
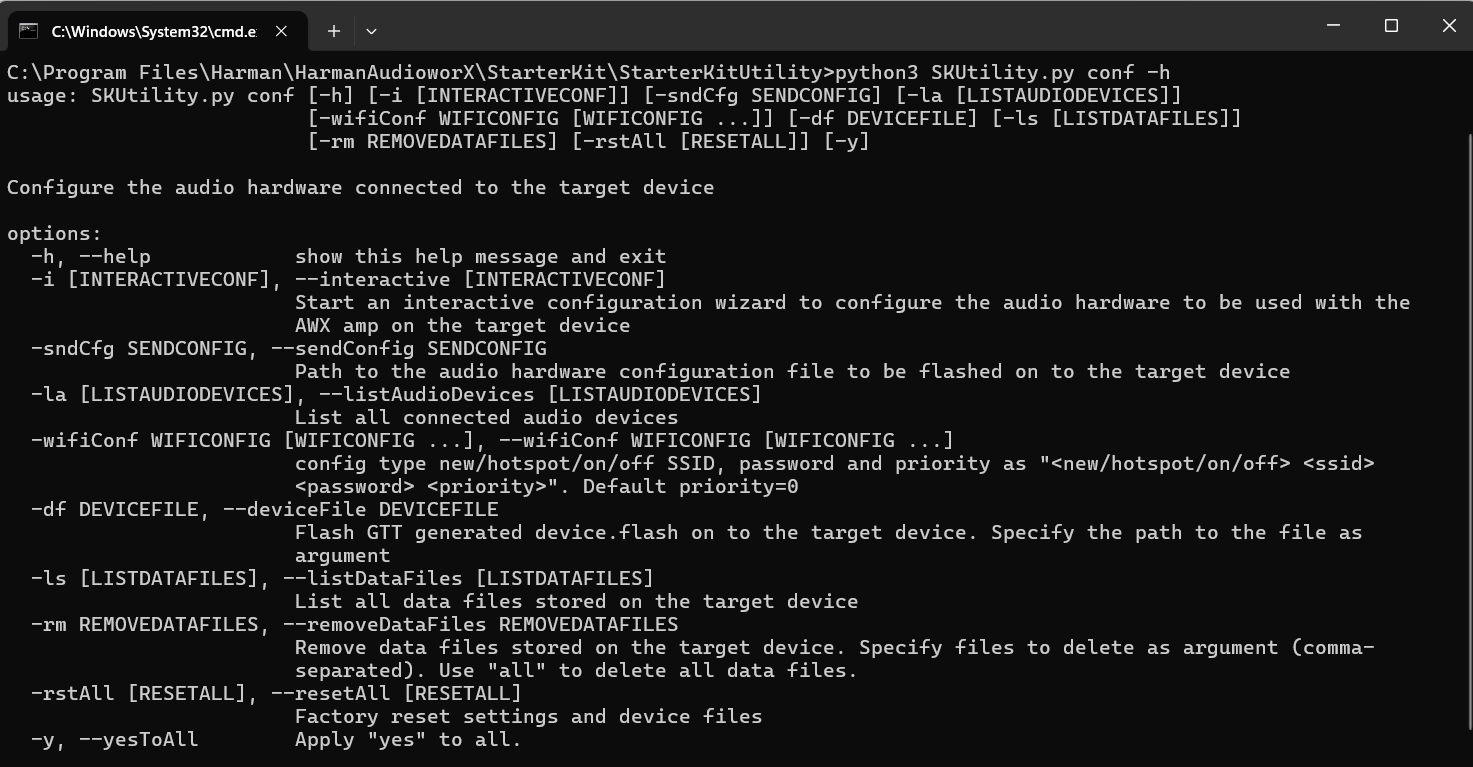
The following are the actions that can be executed under the Configuration function:
| SKUtility Configuration | Descriptions |
| Interactive Audio Device Configuration | The utility tool provides an interactive setup wizard for configuring the audio device to be used by the AWX Amp application. This is necessary when using a different audio interface than the Creative Sound Blaster X4.
To start the interactive setup wizard, run the command The wizard takes the user through the following steps:
The below figure shows the interactive configuration menu where the no input is provided for the filename and the Starter Kit modes, and the sound card named “X4” (Creative Sound Blaster X4) is chosen as the device for both input and output.
|
| Send a Previously Saved Audio Device Configuration | This is used to send a previously saved audio device configuration file generated by the interactive wizard. run the command: |
| List Audio Devices Connected to Raspberry Pi | To list the audio device connected to Raspberry Pi, run the command.python3 SKUtility.py conf -laThis command will display all the connected audio capable devices along with their capture and playback capabilities. |
| Set a Wi-Fi for Raspberry Pi to Connect | This command is used to configure a new Wi-Fi for the Starter Kit to connect to, by specifying the ssid (Wi-Fi name), password and optionally, the auto-connect priority for the Wi-Fi. Run the command:python3 SKUtility.py conf -wifiConf new <SSID> <password> <priority>The below figure shows how to configure a Wi-Fi named “awx_wifi” with the password “awx_wifi_password” and an auto-connect priority of 10. The optional “priority” parameter can be used to set the priority of the Wi-Fi connection for the Starter Kit to auto-connect on boot-up in the range (-999, 999), where higher the number, higher the priority. By default, the priority is set to 0. This parameter is useful when there are multiple Wi-Fi connections available and to prioritize them as required. The user can choose to reboot the Starter Kit to save changes and connect to the Wi-Fi network based on priority. The above figure shows that the Starter Kit has successfully connected to the new Wi-Fi on reboot. The user can also configure the Raspberry Pi 5 to behave as a Wi-Fi hotspot for the PC to connect to, using the following command: python3 SKUtility.py conf -wifiConf hotspot <SSID> <password> <priority> To turn off the Wi-Fi on Raspberry Pi, use below command: python3 SKUtility.py conf -wifiConf off
To turn on the Wi-Fi on Raspberry Pi, use below command:
|
| Flash a Device File | To flash a device file generated from GTT on to the Starter Kit hardware, run the command:
The “device.flash” is necessary for a signal flow to run on the AWX Amp application. The steps for generating the “device.flash” file on GTT are illustrated in “Configuring a Custom Device Compatible with the AudioworX Starter Kit” in the “Adding a Device to the Project” section of Creating a New Project on GTT. |
| List Data Files on the Starter Kit | To list the data files that are currently stored in the Starter Kit, run the command:
The AWX Amp application makes use of data files with the extensions “.flash”, “.set” or “.info” sent from GTT for initializing the device, signal flow, presets, etc. |
| Remove Data Files from the Starter Kit | To delete data files (“.flash”, “.set”, “.info”) from the Starter Kit hardware, run the command:
It may be required by a user to delete some or all the data files to roll back actions or start afresh before flashing a new project with device definition being different than the project that the Starter Kit hardware is currently flashed with. For example, the new project may have a different number of audio inputs, outputs, xAF instances, virtual cores, etc. In such cases, the user may need to wipe out the data files from the Starter Kit and flash new data files from GTT. The files that are stored in the Starter Kit hardware can be listed by using the “-ls” argument. Alternatively, to remove all data files from the Starter Kit hardware, run the command: Running the “conf -rm a” command will all data files command will also delete the “device.flash” file which will have to be restored as directed in Flash a Device File or by resetting configuration (given below). |
| Reset All Configurations to Default | To reset the Starter Kit hardware to its default state, run the command:
The reset all action goes through the following steps:
|
