External Endpoints

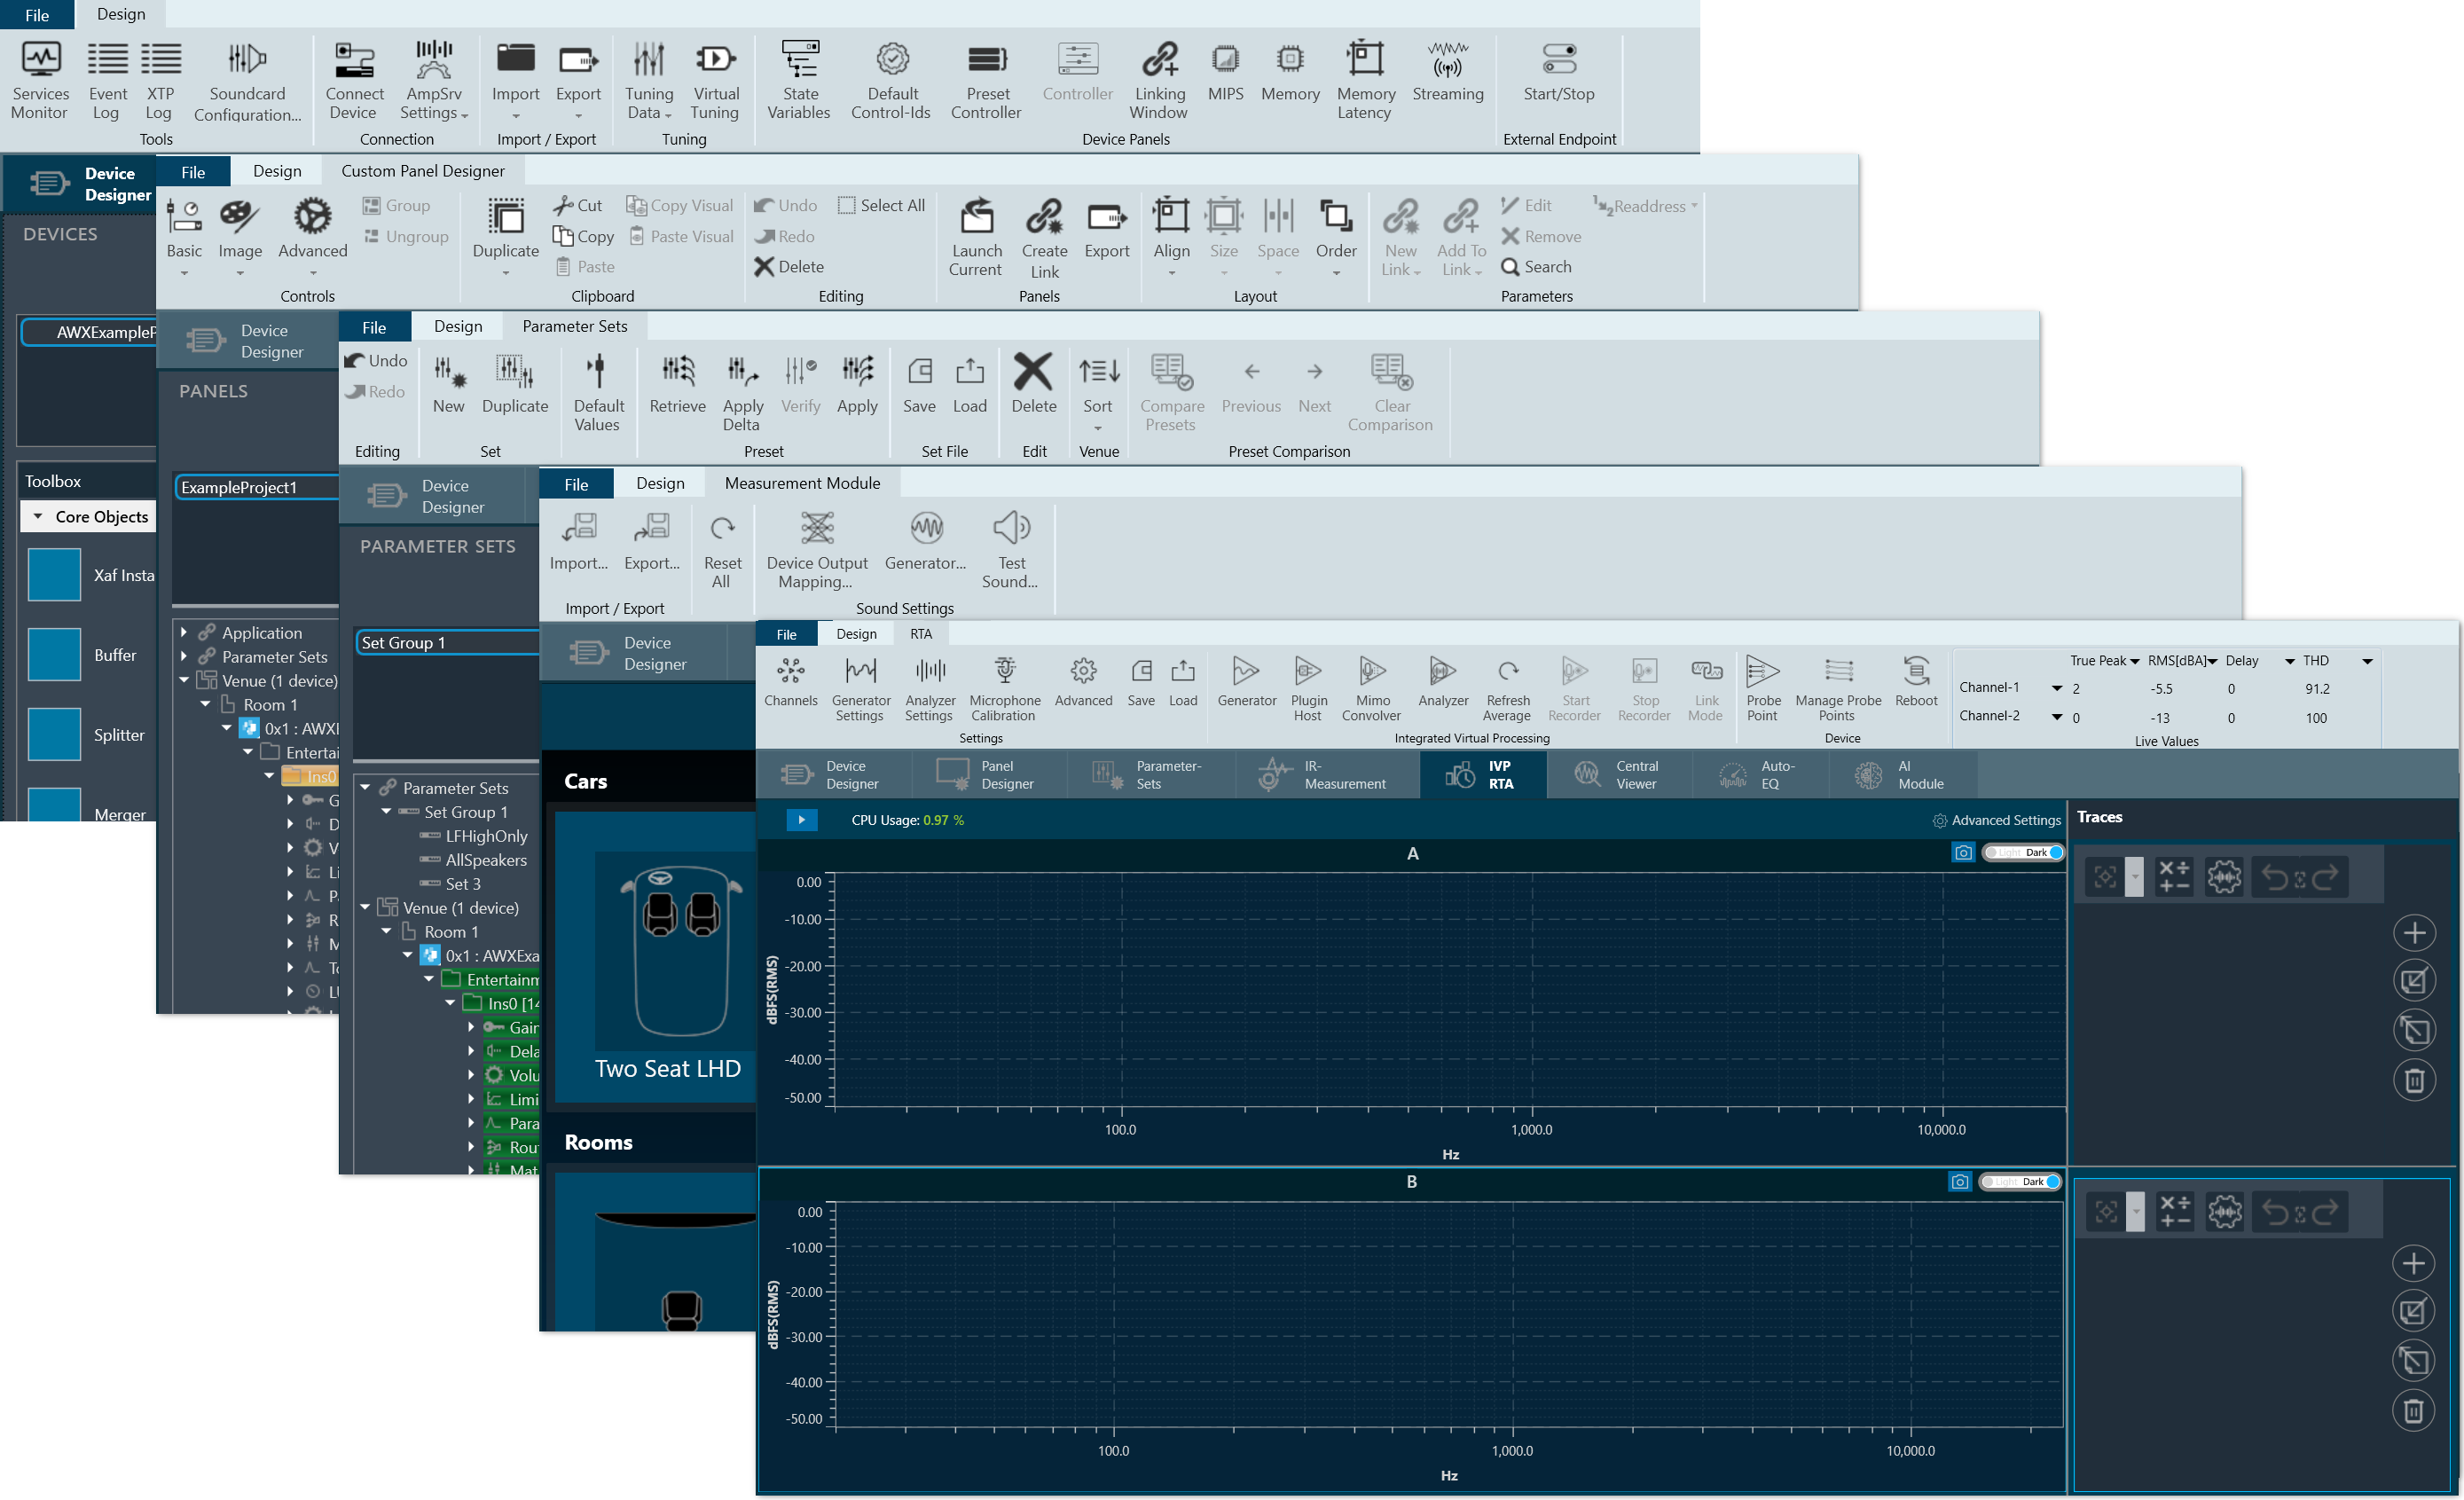
GTT allows external tools to interact with devices. The tuning of 3rd  party audio objects can be done directly in GTT, or it can also be done from an external tool.

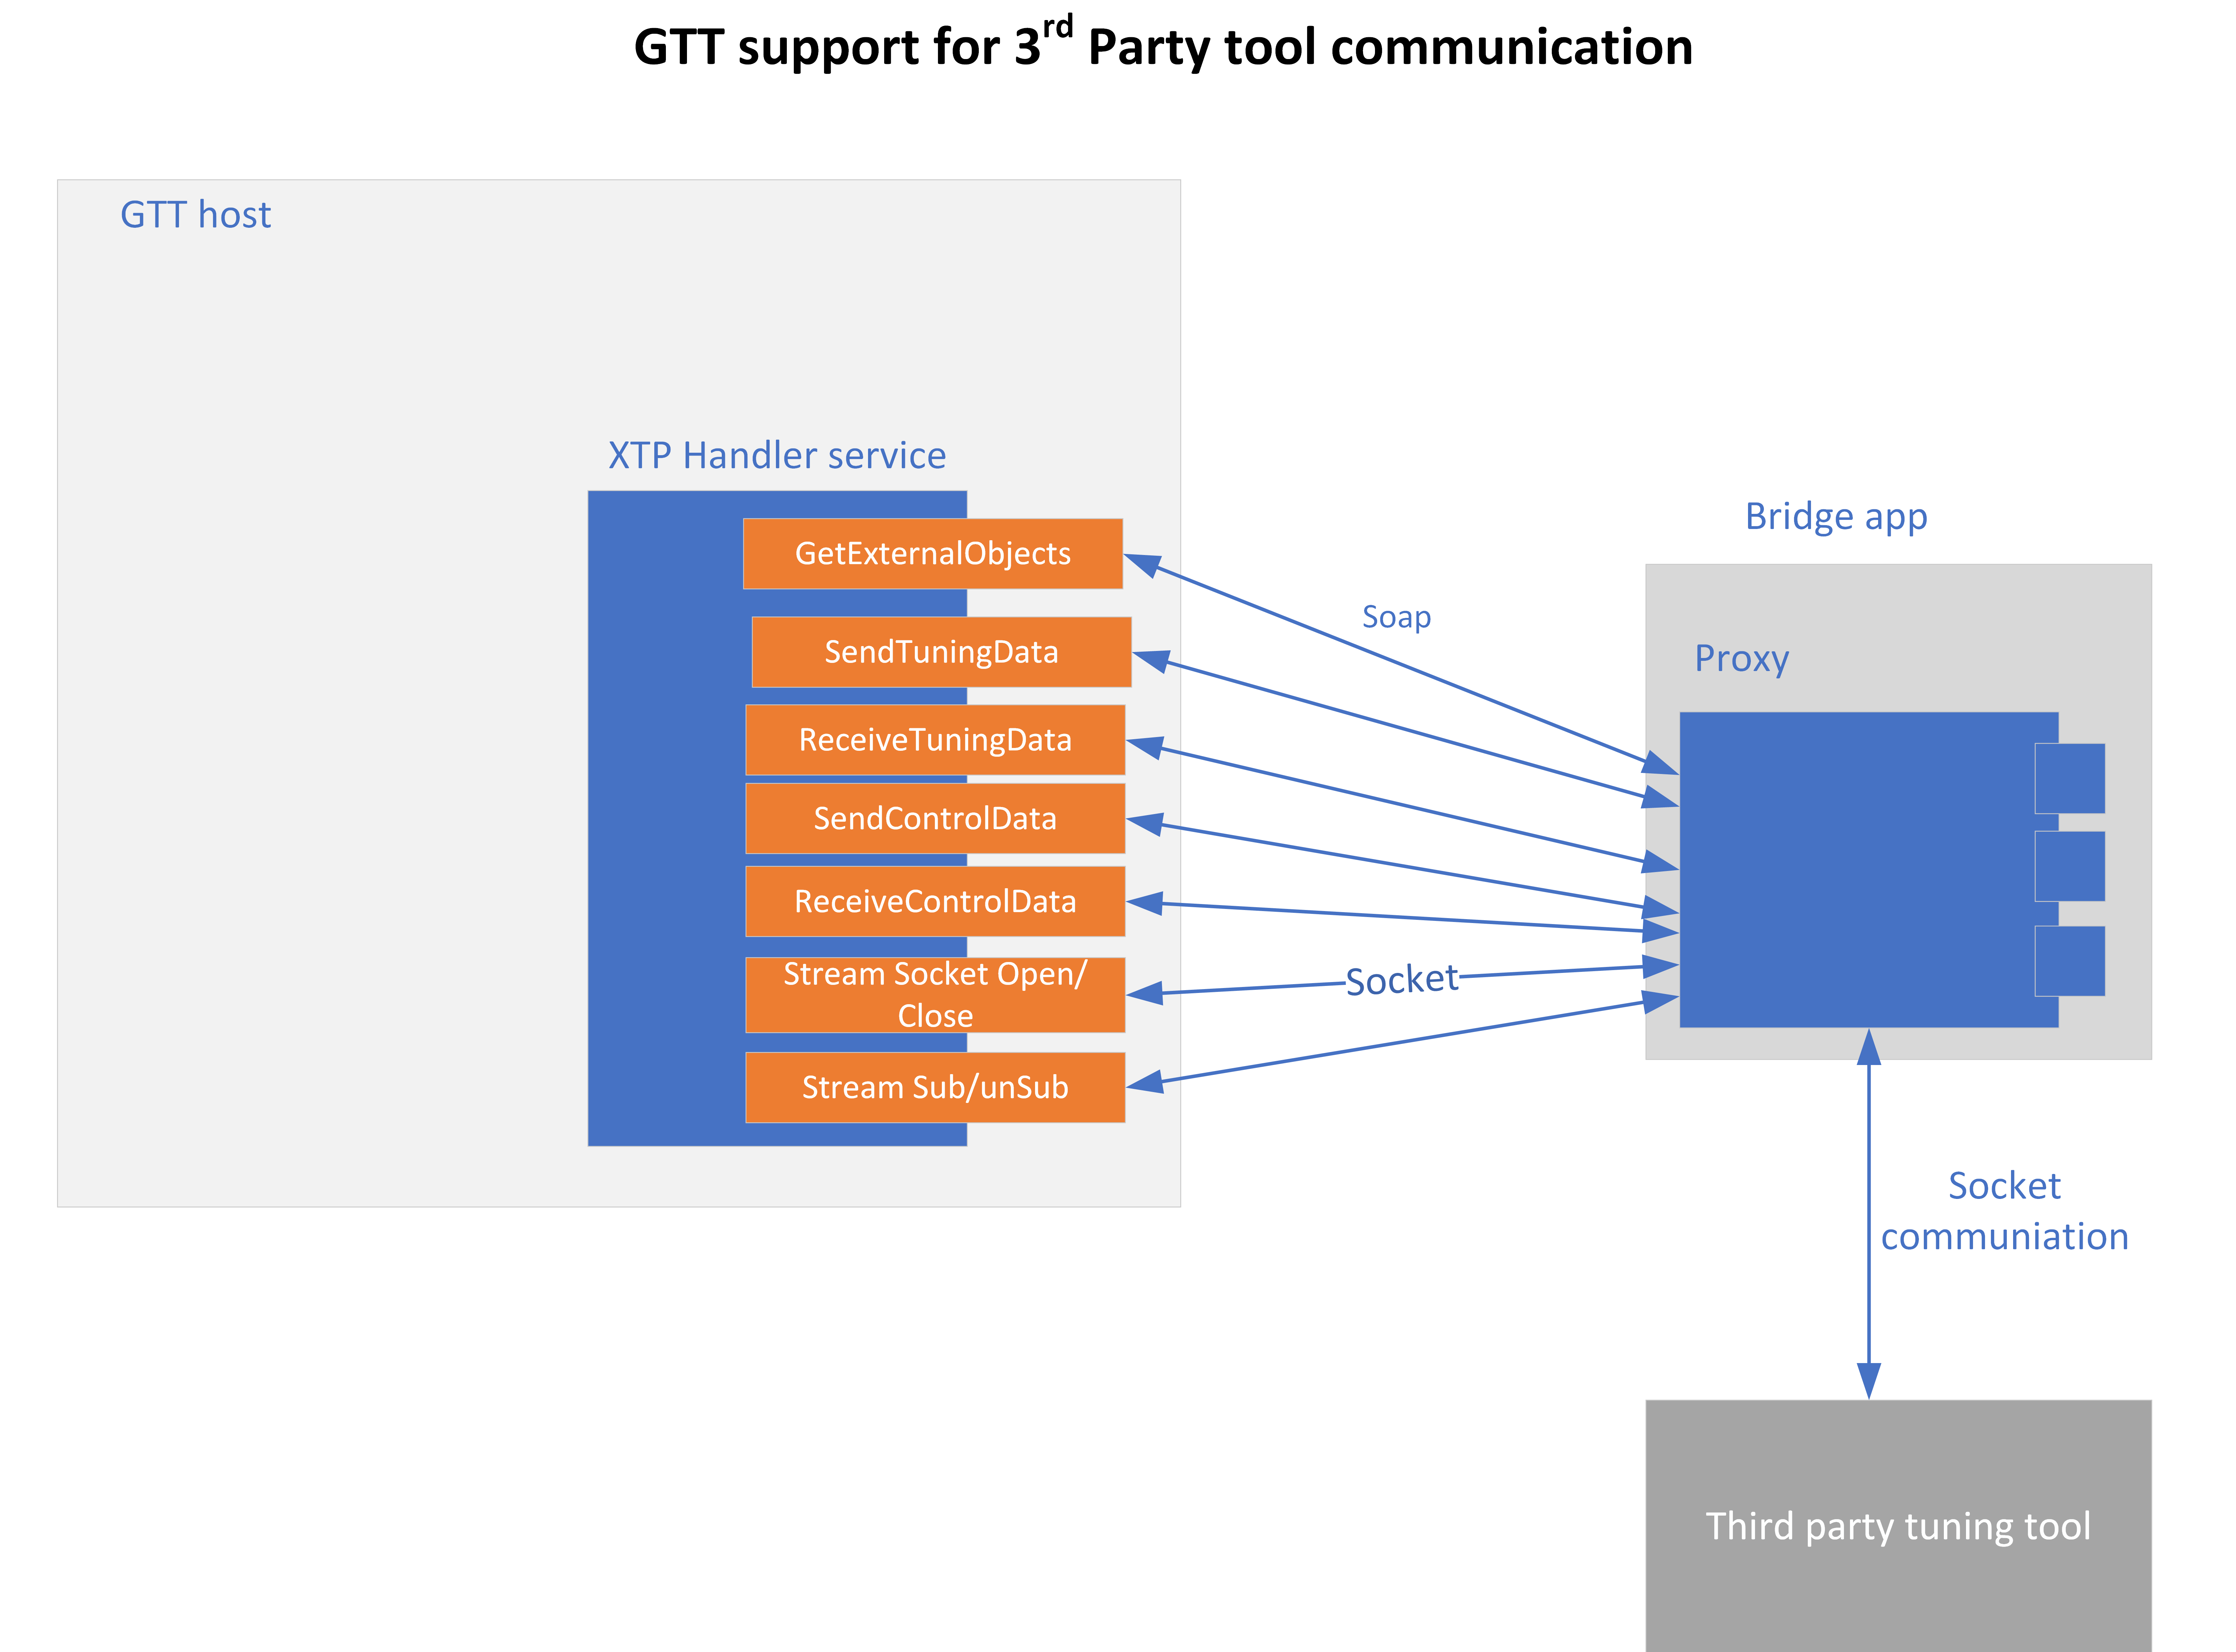
The requests from external tuning tools will come to GTT and GTT will forward these requests to the device. This is enabled through a WCF service endpoint that external tools can tap into.
To help external tools integrate with GTT, the GTT process hosts a WCF endpoint; external tools can connect to that endpoint and use the exposed APIs.

Refer the contact information mentioned in the latest release notes to get more details on “External third party tool” documentation and package.

By default External Endpoints will use port 8080 for the communication.

Before proceeding with the following sections, it is understood that you have received 3 compressed zip files. It is recommended that you use these for integration purposes.

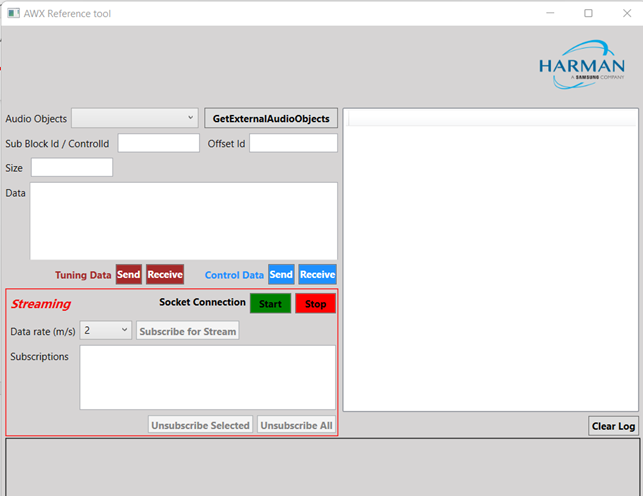
  • HarmanReferenceTool.zip: This compressed folder contains an executable sample tool that you can run and verify the endpoint functionality. Unzip the HarmanReferenceTool.zip file, go to the HarmanReferenceToolReleasenet6.0-windows folder, and locate the ExternalTuningTool.exe. Run the exe to open Harman Reference Tool.
  • ExternalToolCode.zip: This compressed folder contains visual studio solution for the sample tool. One can refer to this code to understand how the endpoint is accessed. Unzip the ExternalToolCode.zip file and locate the file under ExternalToolCodeExternalTool.
  • WcfServiceProxyLib.zip: This compressed folder contains a proxy library dll that should be referenced for integration with the GTT endpoint.

The “WcfServiceProxy.dll” is a .net dll which has the implementation of the client code for the endpoint hosted in the GTT.

By default Third Party tuning tool will use port 8080 for the communication.

Setup

GTT needs a minimum setup for external endpoints to function.

  1. Right-click on GTT launcher and click on the “Run as administrator” option.

    For the external endpoint feature to work correctly, it is necessary to run GTT as an administrator.

  2. GTT should have an open project. Only external audio objects can be accessed from external tools.
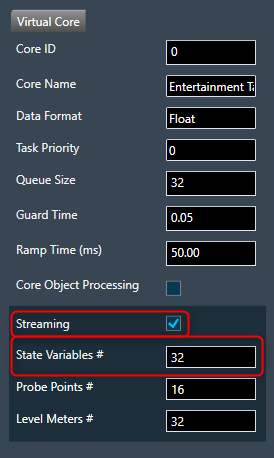
    Accordingly, the project must contain at least one external audio object within the signal flow. An external audio object is defined as an object with Class ID between 9000 and 9999.
  3. GTT should be connected to the device. The device can be a virtual device or a physical board.
  4. Click on the Start/Stop button to start the External Endpoint. The same button works as a toggle switch to start and stop the endpoint.

    A license is required to use this feature. Contact the solution management team to enable the feature.

  5. Once the endpoint is hosted,  the 3rd party applications can use the proxy dll or write their own proxy to access the WCF endpoint. For more details about WCF proxy, refer to “About WcfServiceProxy.dll in the GTT Third Party Tool Integration User Guide. 

Supported Features

Sending and Receiving Tuning Data

To support sending and receiving tuning data, the following methods are exposed.

  • GetExternalAudioObjects: This method will return all the 3rd party audio objects in the device.
  • SendTuningDataAsync: This method is used to send tuning data to audio object.
  • ReceiveTuningDataAsync: This method is used for receiving tuning data from an audio object.

Sending and Receiving Control Data

To support sending and receiving control data, the following methods are exposed.

  • SendControlDataAsync: This method should be used to send control data by mentioning the control id and control data.

    The control data supports 16.16 format.

  • ReceiveControlDataAsync: This method can be used for retrieving control data by providing the control id to the control elements to be read back.

Streaming Methods

GTT also supports streaming with the following methods.

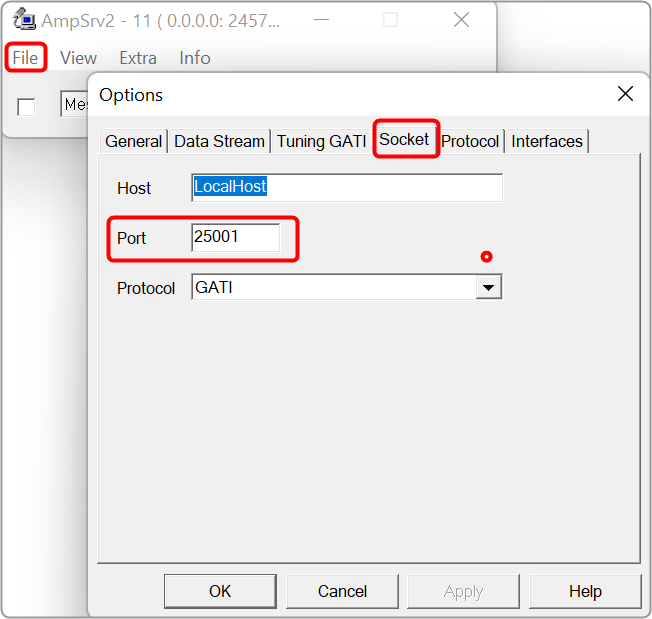
  • EstablishSocketConnection: This method must be called first in order for streaming to work. The third-party tool should first establish a socket connection and then make a call to the port number where it is listening. GTT will connect to that port. This is a socket connection.
  • DisconnectSocketConnection: This method is used to unsubscribe all the subscriptions and close the socket connection.
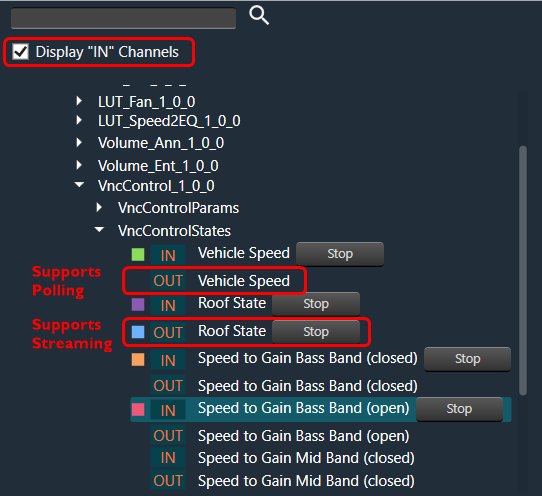
  • SubscribeForStreamDataAsync: This method is used to subscribe for stream data for an audio object.
  • UnSubscribeForStreamData: This method is used to stop or unsubscribes the stream data.

To know more about all the API methods described above, refer to the API Reference section in the GTT Third Party Tool Integration User Guide. 

External Tool Interaction

The following are the steps to integrate with GTT.

By default GTT will host the WCF endpoint on this URL (http://localhost:8080/XtpHandlerService).

Steps to get started with the WCF service.

  1. Discover the service using this URL. Use the known tools like visual studio service reference tool or any 3rd party tools.
  2. Create a service reference for the same.
  3. Then using the service reference call the APIs for different operations.

Otherwise, developers can follow the “Third Party Tool Tuning Sequence Workflow” and  “Third Party Tool Streaming Sequence Workflow”  to write code to consume the endpoint hosted by GTT using the proxy library (WcfServiceProxy.dll) shared and explained in the GTT Third Party Tool Integration User Guide. 

API References

GTT endpoint APIs definition and parameter details are provided in the GTT Third Party Tool Integration User Guide. 

API: ExternalAudioObject

API Function:

ExternalAudioObjectResponse GetExternalAudioObjects();

Description: This function will return all the audio objects that are used in the currently open signal flow in GTT. It returns only those audio objects which have Class ID between 9000 and 9999. Also, any audio objects that are listed in external category.

API: SendTuningDataAsync

API Function:

Task SendTuningDataAsync(ExternalAudioObject audioObject, int subBlock, int offset, byte[] data);

Description: This function will apply the data payload to the ExternalAudioObject  passed into the function.

API: ReceiveTuningDataAsync

API Function:

Task< XtpEndpointResponse > ReceiveTuningDataAsync(ExternalAudioObject audioObject, int subBlock, int offset, byte[] size);

Description: This function will retrieve tuning data from the ExternalAudioObject.

API: SendControlDataAsync

API Function: 

XtpEndpointResponse SendControlDataAsync(int controlId, byte[] data);

Description: This function will send control data to the control id mentioned in the function.

API: ReceiveControlDataAsync

API Function:

XtpEndpointResponse ReceiveControlDataAsync(int controlId, byte[] data);

Description: This function will get the control data from the control id that is passed into the function.

API: EstablishSocketConnection

API Function: 

XtpEndpointSocketResponse EstablishSocketConnection(int port);

Description: This function will instruct GTT to connect to the socket connection listening at the port passed as parameter. The integrating application will create a socket connection and listen at a port and send this port id to GTT, so GTT can establish a connection and send stream data through the socket.

API: DisconnectSocketConnection

API Function: 

XtpEndpointSocketResponse DisconnectSocketConnection(int port);

Description: This function will instruct GTT to disconnect the previously established connection. The integrating application will close the socket connection.

API: SubscribeForStreamDataAsync

API Function:

Task SubscribeForStreamDataAsync(ExternalAudioObject audioObject, int subBlock, int messagesPerSecond, bool beforeCalc);

Description: This function will create a subscription for data streaming of a particular state variable of the audio object mentioned at subblock/offset.

This function can be used to subscribe for streaming of a particular data from audio object. Parameters include audio object, its subblock. There is an option to send the number of messages to be streamed per second and if the streaming data is to be retrieved before calc or after calc.

All this needs to be supported by the audio object. Once the subscription is complete, the subscription id and status are returned to the object.

API: UnSubscribeForStreamData

API Function: 

SubscriptionResponse UnSubscribeForStreamData(Guid subscriptionId);

Description: This function will terminate the subscription that is currently running. GTT will stop the subscription that is started with the subscritionId passed as parameter.

Use Cases and Workarounds

Use Case Workarounds
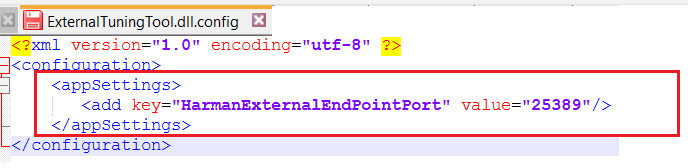
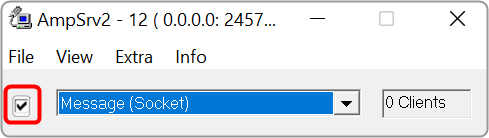
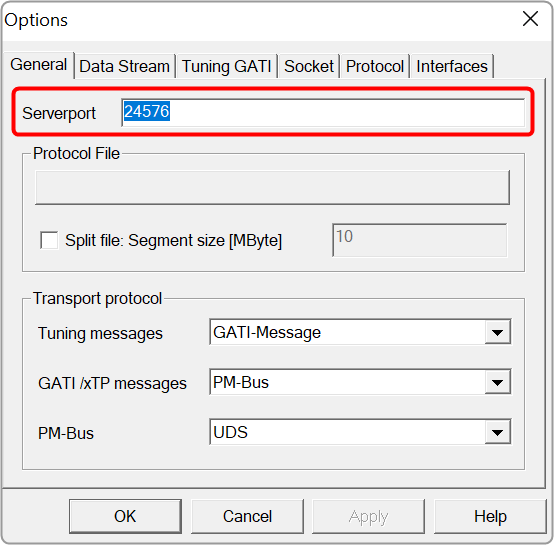
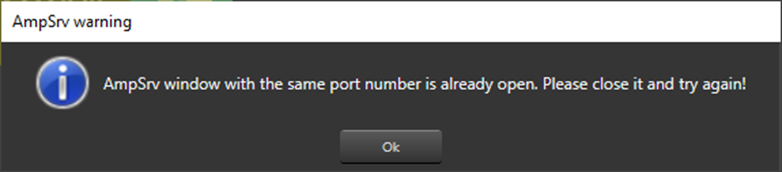
Use Case 1: While starting External Endpoints from GTT, if you gets notification of port already being used.
Then you need to perform configuration in GTT as well as in ExternalTuningTool.
Close the GTT application and perform the below configurations:

By default the key does not exists in the config file. When configuring the config file, you need to add the key and the required port number.

GTT configuration settings:

  1. Open config ‘GlobalTuningTool.exe.Config‘ from install path ‘..HarmanHarmanAudioworXtoolsGTT’.
  2. Under “appSettings” section, add a key ‘HarmanExternalEndPointPort‘ and provide any value from range from 8081 to 65535.
    This key and value will be used to host the service on provided port for the communication.
  3. Launch the GTT application.

ExternalTuningTool configuration settings:

  1. Open config ‘ExternalTuningTool.dll.config‘ from path ‘…….ExternalToolExternalTuningToolbinDebugnet6.0-windows’ or from ‘…….Releasenet6.0-windows’.
  2. Under “configuration” section, add appSettings section, add key ‘HarmanExternalEndPointPort‘ and provide any value from range 8081 to 65535.
    This key and value will be used for communication.

Key name must be ‘HarmanExternalEndPointPort’ and value must be same in GTT config as well as in ExternalTuningTool config.

Memory

The Memory window presents the CPU memory of cores, core objects and audio objects of the device in a single multi-level grid.

Memory profiling data of cores and core object is fetched from the device (hardware) using xTP Commands, and the memory of the audio object is fetched based on its memory latency configurations.

Overhead Memory consumed by core and instance is calculated and displayed as ‘Framework Memory’. You can optimize signal flow or adjust latency based on this information.

Apart from memory profiling data, the class size of each audio object is also fetched from the device using xTP commands and displayed in the memory window from the X release(24.x.x.xxxx) audio library onwards.

Memory window is only enabled if the device xAF dll version is 18.x.x.xxx or higher.

Before starting the Memory window, the signal flow should be flashed.

If the memory latency configuration is updated, the signal flow should be flashed again and the memory window should be restarted.

Memory profiling data of non-xAF instance core objects (Buffer,Splitter…etc) is available only from the X release(24.x.x.xxxx) audio library onwards.

Launch Memory Profiling

Steps to launch Memory profiling:

  1. Select the device node and click Memory. This opens the Memory window for the selected device.

When the Memory window opens, it will show a collapsible grid with core, instance, and audio objects.

  • The physical core memory values displayed are the sum of its virtual cores.
  • xTP Commands retrieve virtual core and core object memory from the device.
  • Memory latency configurations are used to fetch audio-object memory.
  • Overhead Memory consumed by the core and instance is calculated and displayed as ‘Framework Memory’.
  • xTP Commands are used to retrieve audio object class size based on the block ID of the audio object.

  • Expand All: Expands all rows of the collapsible grid.
  • Collapse All: Collapses all rows of the collapsible grid.
  • Export to CSV: Click on the Export option to export the memory data of the device in a CSV file.  The exported file will have a row for Framework Memory for Virtual core, Instance, Audio Objects, and Physical core along with columns PhysicalCoreName, VirtualCoreName, CoreObjectName, ObjectType, ObjectName, BlockId, AO Class Size and Level1 to Level 16 as per the below image.

Memory Latency

Memory latency shows the amount of time taken by the CPU from initiating a request for assessing memory to actual reading or writing data at the requested memory.

In AudioworX, the latency of the memory request is abstracted and only measured in relative levels.

  • Level 1 – fastest memory available in the platform.
  • Level 16 – slowest.

The Memory Latency Editor provides a way to configure latency levels for individual audio object memory records from GTT.

During design time, GTT retrieves memory records for audio objects from the audio library in the following cases:

  • While adding an audio object.
  • Modifying audio object i.e changing the number of inputs, outputs, number of elements, or selected mode.
  • Modifying additional parameter value.
  • Upgrading audio object.
  • Import of project which defaults to a different dll other than the created one.
  • Upgrading device framework to version 17 dll or above.
  • The changing target type of Core.
  • Changing Sample Rate or Block Length of instance.

GTT supports Memory Latency feature only if the xAF dll version is 17.x.x.xxx or above.

Editing Memory Latency

Memory records will have default latency selected by the Audio Object developer. GTT provides the option to set the latency for every memory record of the audio object in the Memory Latency Editor.

  1. Select the device node and click Memory Latency. This opens the Memory Latency window for the selected device. When the Memory window is launched, a multi-level collapsible grid with core, instance, and audio objects will be displayed.

1 – Header, 2 – Column Filter, 3 – Header, 4 – Latency Sector

  • Multiple memory latency record selection: You can select multiple records in the memory latency window.
    • To select the specific rows – Hold Ctrl and click on the required rows. This method is useful when you want to preform action on specifics rows.
    • To select a set of row – Click on the first row of the set, hold Shift, and then select last row of the set. This method is most useful when selecting a large number of rows in a range.

Sum of all the selected memory latency record size will be shown as “Total size of the selected records in bytes” in the memory latency window.

“Total size of the selected records in bytes” will be visible only on selecting any memory latency record in the window.

  • Reset to default latency level: You can reset the selected records to its default latency level.  Right click on selected records or anywhere on latency grid. A context menu “Reset to default” option will be displayed. Click on the “Reset to default” option, all the selected records of the latency level will be set to default value which is “LEVEL5”. Click on “Save” button and it will be saved into database.
    • To reset records to default latency level for the specific rows – Hold Ctrl, select on the required rows, and then right-click on selected records. A context menu “Reset to default” option will be displayed. Click on the “Reset to default” option.
    • To reset records to default latency level for a set of row – Click on the first row of the set, hold Shift, select last row of the set, and then right-click on selected records. A context menu “Reset to default” option will be displayed. Click on the “Reset to default” option.

  • Saving Latency memory: Only Latency can be selected. Other attributes of memory records are read-only. When you click on Save, the Latency for the memory record will be saved.

The Save Button is disabled until a change in latency is detected.

  • Send Memory Records to Device: Send Signal Flow will handle sending Memory records to the Device with a specified latency. When the signal flow send is successful, the device will boot up with the memory latency specified.
  • Import Export of Project having Memory Record: Memory latency is preserved if the export and import occur on the same xAF dll by version.
    If the dll version changes, Import will generate a new memory record based on the new target xAF dll version.
  • Copy Paste of Audio Object or Core Object Containing Memory Latency: If the properties of the source and targets are the same, memory latency is retained in the pasted object.
  • CSV Import/Export: You can export and import of memory map to CSV files. The primary operation of this feature is to export memory latency to CSV, adjust memory levels, and then import the updated memory levels back into the GTT. When the memory map form file does not match the one in GTT, GTT will request permission to import only the items that match.

Streaming

You can stream live data from the device. The state variables which support streaming and polling are displayed in the state variable explorer tree with “Category” other than “Tuning”.
The streaming and polling are used to monitor the signal flow of different parameters in a Signal Flow Designer.

Streaming can be beneficial when you need to constantly monitor a signal for a specific channel. If any changes are made to the signal flow design, the updated values will automatically be displayed through streaming. However, for non-streamable parameters, GTT will transmit a single command and receive the corresponding value from the device in response.

To access this feature, you will need a license for unlocking. Kindly contact the license administrator to obtain the necessary license.

The object tree displays filtered state variables that support streaming and polling.

Streaming state variables are highlighted in white, while polling state variables are highlighted in orange.

The default display of state variables in the object tree is set to show “after calculation” data for streaming out. However, if you want to display “before calculation” state variables, select the “Display IN Channels” option. The IN state variables indicated with a blue color and OUT state variables indicated with a red color, with keywords denoting their specified type.

Below table describes the audio objects that support streaming.

Audio Object Parameter Name State Variable Streamable
Level Monitor Level_Value Yes True
Compressor Attenuation Yes True
VNC Control VNCControlStates Yes True
NoiseESt StreamingParam Yes True
AlaControl AlaControlStates Yes True
FFTCalc FFTCalcState Yes True
Ducker State params Yes True
dbXLimiter States Yes True
AudioToControl AudioToControlState Yes True
Limiter Attenuation Yes True

Configure Streaming

If you want to stream streamable state variable, then you can enable Streaming option.

To enable Streaming per core:

  1. Open the Device View and select the Virtual core layer of the device.
  2. Go the Virtual core properties, select the Streaming checkbox, and set a number of State Variables per core.

Maximum 32 state variables can be configured for streaming.

If you want to perform the operation using non-streamable state variables, then there is no need to enable these options

Device Panels

The Device Panel group offers a set of tools that lets you perform various functions on a device.

The following tools are available on the Device panel.

  • State Variables:  To view the memory layout of each device instance
  • Default Control-Ids: To specify which default control ids should appear in the “Control In” control list.
  • Preset Controller: The preset controller is the central place for managing and organizing how you will load presets in your signal flow.
  • Controller:  To send instance commands.
  • Link Window:  To assist you by reducing the number of audio parameter configurations.
  • MIPS: To view the CPU load of cores, instances, and audio objects of the connected device.
  • Memory:To the CPU memory of cores, instances, and audio objects of the device in a single multi-level grid.
  • Memory Latency: To shows the amount of time taken by the CPU from initiating a request for assessing memory to actual reading or writing data at the requested memory.
  • Streaming: To stream live data from the device.
  • File Controller:  To send audio files from GTT to device.

Connection

You must connect the device instance containing the tuning data to the physical/virtual device to send tuning data to the physical device.

Connect Device

Use the Connect Device option to connect to a device.

To connect a device, select the device from the device list, and then click Connect Device.

If there is no instance of AmpSrv2 running with the required port, then a new instance of AmpSrv2 will start. Otherwise, it will use the current AmpSrv2 instance.

The communication port between GTT and AmpSrv2 is calculated automatically on the GTT side: 24575 + HiQnet node address of the device instance.

If AmpSrv2 is started by GTT, then AmpSrv2 settings will not be stored.

If AmpSrv2 settings change permanently, then a manual start of AmpSrv2 is required.

The automatic startup of AmpSrv2 only works for single-device instances. If you want to connect to multiple device instances in parallel, you will need to manually start multiple AmpSrv2 instances (running on the requested port addresses).

From Herbie Hancock release onward, the default port of the virtual device has changed. The default port is now 25001 (before it was 8080).
If an old audio library is used, the settings should be adapted manually. In AmpSrv2 > File > Options > click Socket.
Graphical user interface, application Description automatically generated

Disconnect Device: Click the Disconnect Device button in the ribbon bar.

If AmpSrv2 was launched by GTT, AmpSrv2 will be closed. Otherwise, AmpSrv2 will keep on running.

AmpSrv2 Settings

AmpSrv2 is software to connect the tuning tool to either a physical target device or a virtual amplifier.

The AmpSrv2 shows the following menus:

  • File: Click on the File menu to open the Options window or close the AmpSrv2.
  • View: Click on the View menu to open dialogues and protocols functionalities.
  • Extra: Click on the Extra menu to import CAN SID, OS-Msg Description, GATI/xTP Description, and Protocol file.
    Graphical user interface, text, application, chat or text message Description automatically generated
  • Info: To get the AmpSrv2 version and license details.

AmpSrv2 License

The AmpSrv2 dialogues and protocols functionalities are licensed-based. If any dialog or protocol is grayed out or not available, this means you have a limited license.

The AmpSrv2 is shipped with a limited license (Customer.lic).

Graphical user interface, application Description automatically generated

To check AmpSrv2 license:

  1. On the AmpSrv2 window, click Info, and then click About. This displays the AmpSrv2 info screen. Verify the license information.
    Graphical user interface, application Description automatically generated

To activate the new AmpSrv2 license:

  1. Navigate to the C:Program FilesHarmanHarmanAudioworXtoolsAmpSrv2.
  2. Locate the Customer.lic file (license file) and delete the existing license file.
  3. Copy and paste the new license file (xxx.lic) into the same AmpSrv2 directory.

To changing AmpSrv2 Settings:

  1. On the AmpSrv2 window, click File, and then click the option. This opens the Options window.
  2. On the Socket tab, set the protocol to GATI.
    Graphical user interface, application Description automatically generated

If you experience network conflicts, choose a different port above 50000 because port 8080 is very popular. Your selection must appear in the VST client (probably AudioMulch).

  1. On the Tuning GATI tab, set the Databytes per to 192, and click Ok.
  2. On the AmpSrv2 window, check the checkbox.
    Graphical user interface, application Description automatically generated

When you start GTT and connect to AmpSrv2, the AmpSrv2 window will show the number of connected clients.

Once you have completed the necessary Ampsrv2 modifications, go to AmpSrv2 Settings and save the Ampsrv2 modifications.

This saved configuration will now be used for this specific device on Connect Device. The saved configuration will also be exported/imported using the GTT project Export/Import functionality.

If no AmpSrv2 settings are connected with the device, the default settings will be used. You can modify the GTT default AmpSrv2 settings. Follow the steps mentioned in the above topic “To changing AmpSrv2 Settings”.

The AmpSrv2 window will appear, and the user can modify the settings, which will be considered the Default Settings for GTT.

In the case of a Discover device, you should first open AmpSrv2 Settings, modify settings as needed, and then click on Discover Device. This modified configuration will be used to discover the device.

In the AmpSrv2 window, the port number of the server is not saved in the General tab.
Graphical user interface, text, application, email Description automatically generated

Two AmpSrv2 windows with the same port number cannot be opened or an error message will be displayed.
Graphical user interface Description automatically generated

Import and Export

Import

  • Tuning Data: Use this option to import an existing tuning file (*.set or *.setr).

Users can use the following hints to see if the “imported tuning file” has made any changes to the device:

  • Check the State Variable Explorer to see if the values of the corresponding state variables have changed.
  • If the device and GTT are in sync, sending tuning data should cause the frequency response to change.
  • The user can manually create a set column to obtain the current state of the state variables after importing the tuning data file on the device.
  • The user can use the set column that is already present after importing the tuning data file on the device and pressing the “store” button. If the set column in the set file contains state variables, the user can view the modifications.

Export

  • Tuning Data: Use this option to export a tuning file (*.set or *.setr).

This method creates a .set file which contains all the object tuning data, that includes all of the device’s state variables. For example, if certain objects are not tuned, their default tuning values will be exported to the set file.

  • Export DDF Data: Use this option to export a device description data file (*.ddf ).
  • Export Control Pin Data: Use this option to export Control Pin Data (*.csv).

If no configured control pin data is available its shows the message “Control pin not configured for device”.

  • Device Template: Use this option to save device template file  (*.flash).

Important

The Device File option is hidden by default.

Steps to make Device File option visible under in Import/Export option:

1. Go to GTT installation path and locate GlobalTuningTool.exe.Config file.

Location: C:Program FilesHarmanHarmanAudioworXtoolsGTT

2. Open the file in any text editor (notepad) and update “AudioObjectDeveloperMode” attribute under “appSettings” node as shown below.

3. Set Value = true to enable Device File option. Similarly, set Value = false to disable Device File option.

Restart the GTT to take effect of updated setting.

Home Screen

The Home Screen enables various operations, including creating a project, importing projects, opening pre-configured templates, and launching default features.
When you launch GTT, the home screen appears, which includes the following tabs:

Also, the Home screen contains various options like export/import, renewing license, and configuring GTT settings. refer Homescreen options.

Projects

In the Project tab, you can create new projects, edit existing ones, and import or delete projects.

On the Project tab, you can perform the following operations:

Create a Project

Use the create option to create a new project. Icon Description automatically generated

On the Create Project window, you can choose the Empty Template or One Core Template option to create a project.
The project name will be automatically filled when selecting any template. You can manually change the project name by editing the default project name.
By default, empty projects do not contain a description; you have to enter the details manually.

  • Empty Template: Select the Empty Template, enter the project name and project description, and click Create. This creates a new project. Now you can add a device or discover a device to the project.
  • One Core Template: Select the One Core Template, edit the project name and description as per requirement, and click Create. A new project is created with pre-configured template settings.

Import a Project

Use the import option to import a project.

The Import Project window contains a browse option to open the gttd file. Additionally, you have options to exclude or include the Project dependencies like Audio Library and Measurement Data in the imported project.

Steps to import a project:

  1. Click on Import Project.
  2. On the Import Project window, click on the browse button, select the project file (gttd), and click Open.
  3. Select the project dependencies(Audio library, Measurement data) options if you want to include them in the project and click Ok. The project import will start.
  4. Once the project is imported successfully, the project will open.

A warning will appear if the Audio Library option is selected and a version already exists in the GTT application.
If you click “OK,” the existing audio library will be replaced with the associated audio library. If you click “No,” the existing audio library will remain unchanged. The project will be imported along with the selected project dependencies.

While importing, if you select dependencies (Audio Library or Measurement Data) that are not available in the project file, a popup message will display indicating that these dependencies are not associated with the project.

Make sure to provide the path before clicking OK, as this will help avoid any errors and ensure a successful process.

Delete Project

Use the delete option to remove a project.  Icon Description automatically generated
You can delete multiple projects as well as a single project.

  • Select the checkbox and click Delete. This will delete all the available projects from GTT.
  • Select the required checkbox present in each row of the project and click Delete. This will delete the specific projects from the project list.
  • Use this delete option to delete the respective project.

Edit Project

Use the edit option to change the project name and description.

On the Project tab, navigate to the respective project, and click the Edit option. Modify the name and description as required and click Update.

Sort Projects

Use the sort option to reorder projects.
Projects can be sorted by Project Name, Last Edited, or Description columns in ascending or descending order.
The sort icons are displayed alongside column headers.  Click these icons to sort the projects in ascending or descending order based on the data in the selected column. The icon’s appearance also signifies the current sorting state of the column.

  • Click on the unsorted sort icon to sort the projects in descending order of that particular column and the sort order will be indicated by a descending icon.
  • Click on the descending sort icon will sort projects in ascending order of that particular column and the sort order will be indicated by an ascending icon.
  • When projects are sorted by a particular column, the remaining columns reset with the unsorted icon.

On performing actions like Create Project / Import Project / Clone Project / Delete projects, the sort icons will reset to unsorted icons for all three columns. 

By default, projects are sorted by the last edited column.

Audio Library Manager

The GTT interacts with the audio library service, which is a Windows service. This service hosts the C++ dynamic linked library xAFVirtualAmp.dll. This DLL exposes several methods that GTT calls from the managed environment, to determine what audio algorithms and memory layouts are available in the DLL.

Every audio library has a version, and GTT stores this information alongside the data received from the xAF service.

GTT requires an audio library to perform operations required for tuning amplifiers. It obtains audio objects, their properties, memory layout, and so on from the audio library. This library is hosted in a Windows service and communicates with it via IPC. The Windows service is called Harman audio library. The block diagram below shows high-level communication between GTT and an audio library service.

Text Description automatically generated with low confidence

Column Description
Default This column shows which DLL has been set as the default.
Audio Library Version This column displays the version of the DLL.
Audio Library Name This column displays the Audio Library file name (DLL name).
Description This column displays the description of the DLL. By default, the description will be taken from the file description property of the DLL metadata.
Audio Library Path (DLL Path) This column displays the source path of the DLL.

You can perform the following actions on the Audio Library Manager tab.

  • Select the checkbox in the default column to set the audio library as default.
  • Click on the edit icon to edit the audio library description.
  • Click on the Delete option to delete the audio library.

Load Audio Library

On the Audio Library Manager tab, click on the Load Audio Library icon. You can load multiple xAF libraries.

If the same xAF library version is already present in GTT, a prompt will appear before overwriting the DLL.

When a new audio library is loaded, it will not set to default automatically; instead, you need to select the checkbox to make it default.

After extending support for multiple libraries, each version of xAF libraries will be separately stored for simultaneous use in GTT. Before this, existing xAF dlls were overwritten when another DLL file was loaded, and GTT could only work with one xAF dll version at a time.

Set Default Audio Library

Installed audio library will be set to default when first time launch of the GTT application. You can change the default audio library by checking the checkbox in the Default column and the same will be updated and notified to the user.

The default audio library version set from this screen would be used for basic GTT operations – Add Device/ Discover Device/Project import (if the last saved audio library is not loaded in GTT).

  • Set the default audio library version by selecting the checkbox.
  • Only one audio library version can be set as default.
  • Settings shall be saved once check the selected audio library.

On GTT installation, the latest audio library will be loaded automatically and set as default.

Edit Audio Library Description

You can modify the description of the audio library DLL by clicking on the Edit Description option. After changing the description, click on Update to save the changes.

By default, the Description is taken from the file description of DLL metadata until the user manually updates it by clicking the Edit icon.

Delete Audio Library

Click on the Delete icon to delete an audio library.

Audio Library can be loaded/deleted, even if GTT is launched in normal mode.

Audio libraries can be deleted only when associated devices and compound audio objects are deleted.

Audio library which is set as default cannot be deleted.

Any unsaved settings should be saved before the audio library is deleted.

Feature

The Feature tab allows you to directly access the MM-IR (Measurement Module for synchronous and asynchronous impulse response measurement, and recording) and MM-RTA (Measurement Module for Real Time Analyzer) features without having to go through the entire process of creating a regular GTT project.

If a project is in the open state and you double-click on the MM-IR or MM-RTA features, a feature window will open, and the relevant data will be updated and stored in the project.

If you double-click on the MM-IR or MM-RTA features from the home screen, a dummy project will be created in the background and you will be directed to the feature window. However, it is not possible to export the dummy project.

MM-IR

The MM-IR defines the Measurement Module for synchronous and asynchronous impulse response measurement and recording. A device is not necessary for the Measurement Module to function in the project. The Measurement Module enables direct sound card measurements without an intermediate device, whereas tests controlled by gain channels can be carried out via a device.

To open the Measurement Module dashboard, double-click on MM-IR.

For more information, refer to the Measurement Module 2.0 User Guide.

MM-RTA

The MM-RTA defines the Measurement Module for multi-channel Real-Time analyzers for audio signals.

It provides time and frequency domain analysis tools for measuring RMS/peak levels, frequencies, THD, delays, magnitude, and phase responses. In addition, a built-in signal generator provides sine tones, sweeps, pulses, and various noise signals. Analyzing recorded signals is possible with a file player.

To open the Measurement Module dashboard, double-click on MM-RTA.

For more information, refer to the Real Time Analyzer User Guide.

Sample Projects

The Sample Projects tab allows you to get access to the example projects. This will help you to understand how various audio objects are configured in the Signal Flow Designer.

Double-click on any of the example project, this will create a copy of the example project. You can modify the newly created example project. Similarly, you can create any number of copies of an example project.

Additional Options

On the right side of the GTT home screen, you will find an ellipsis menu that contains additional options.

Additionally, there is the “Current Project” option, which allows you easy navigation to the existing project window. You must have a project open in order to use the ” Current Project” option; otherwise, the feature will be inactive.

  • About Global Tuning Tool: Displays software version of Global Tuning Tool, release type, and license status.
  • Thumbnail View: To display all items on the home page in thumbnails. The Thumbnail option is only available in the Feature and Sample Projects tab.
  • List View: To display all items on the home page in the list.
    Graphical user interface, application Description automatically generated
  • AudioworX Documentation:  To open the AudioworX documentation page.
  • Know your GTT license status: Displays GTT license status. Also, you can renew your GTT license.

Exploring GTT Workspace

The GTT workspace consists of several tabs, including the Home screen, Device Designer, Panel Designer, and Parameter Sets. Additionally, there are specialized tabs for tasks such as IR Measurements, IVP RTA, Central Viewer, Auto EQ, and AI Module. This guide focuses on providing information about the Home screen, Device Designer, Panel Designer, and Parameter Sets tabs.

Related Topics