The AWX Starter Kit has two mechanisms for diagnosing and debugging issues.
The following sections explains them and how to troubleshoot problems.
SKUtility Diagnostics Report
The Starter Kit diagnostics, goes through a series of steps to verify the hardware connections and configuration of the Starter Kit.
Following are the different stages:
- Verify that the Starter Kit hardware is reachable by the PC over the LAN.
- Verify that the configuration files and AWX Amp application are present in the target Starter Kit hardware.
- Verify that the audio hardware required by the set audio configuration are connected and verify their playback and capture capabilities.
- Verify that the AWX Amp application is running if the Starter Kit hardware is set to “Amp” mode.
- Fetch log files for further diagnosis.
The diagnostics only verifies and flags issues related to connectivity between the PC and the Starter Kit, configuration files on the Starter Kit, audio hardware connected and configured for the AWX Amp application and the status of the amp application. Harman AudioworX Support can be contacted to diagnose issues outside of these.
The following sub-sections provide instructions on how to fix the issues identified in the diagnostics report.
Issues in Connectivity
If there is a connectivity issue between the PC and the Starter Kit, it will be identified in the very first step of the diagnostics. In such cases, the diagnostics will exit soon after as shown below:
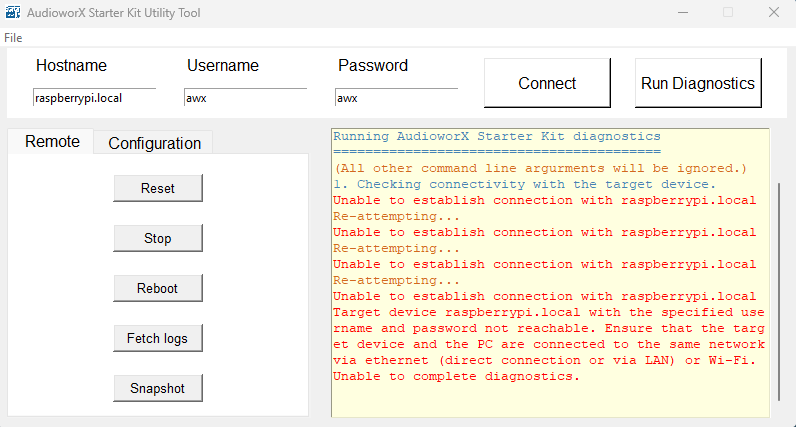
To fix this issue, ensure that the Starter Kit and the PC are both on the same network. As mentioned in Hardware Components Setup of this document, direct connection between the PC and the Starter Kit over ethernet is preferred due to zero network traffic. However, there may be situations where a direct connection is not possible, for example, if the PC’s ethernet port is already in use or the PC does not have an ethernet port at all.
In such cases, the Starter Kit’s hotspot feature may be used to establish connection between the PC and the Starter Kit. The Starter Kit is configured to automatically start a Wi-Fi hotspot with the following login credentials, when it is not connected to any known Wi-Fi network:
- SSID: AP_AWXStarterKit
- Password: starterkithotspot
Connect to this hotspot from the PC to first establish direct Wi-Fi connection to the Starter Kit and then run the diagnostics again. Step one of the diagnostics should be successful, indicating that the Starter Kit is accessible from the PC.
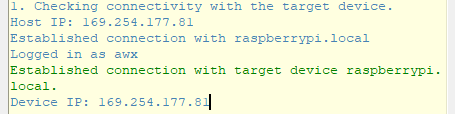
The IP address of the Starter Kit starts with a number other than ”192“or ”169“, which indicates that the PC is connected to the Starter Kit’s Wi-Fi hotspot. The user must be warned that in this setup, the PC will no longer have access to the internet via Wi-Fi. For convenience, it is recommended that the Starter Kit is configured to connect to a common Wi-Fi network using the instructions in “Starter Kit Configuration > Wi-Fi Config” in SKUtility Tool – Graphical Application after connecting to the Starter Kit hotspot.
Issues with Configuration Files
The second step of the diagnostics verifies if all the files that are required for functioning of the Starter Kit are present in the file system of the Starter Kit. If the diagnostic report indicates missing files, a simple brute-force solution would be to reset all files to their original states using the Configuration > Factory Reset button in the Starter Kit Utility, which is described in SKUtility Tool – Graphical Application.
All the data files in the Starter Kit will also be restored to their original states (corresponding to the example project), which means that any changes made to the audio hardware configurations or the signal flow flashed on the device (.flash files) will be lost, and need to be reconfigured.
It is recommended to take a snapshot for back up using the SKUtility UI Tool before resetting all the configurations.
The following table shows the solution to restore individual files:
| Missing File | Solution |
| /home/<user>/HarmanAudioworX/config.json | Reconfigure the audio device using Audio Config in SK Utility tool. |
| /home/<user>/HarmanAudioworX/device.flash | Export device file and send it to the device (refer to Configuring a Custom Device) using the Send Device File option in the SKUtility tool. |
| All other files | Restore all files using Factory Reset option in the SK Utility tool. |
Issues with the Audio Device
The Starter Kit diagnostics verifies if the audio input and output devices set in the audio device configuration are connected. Below is an example diagnostic report showing an error with the audio device:
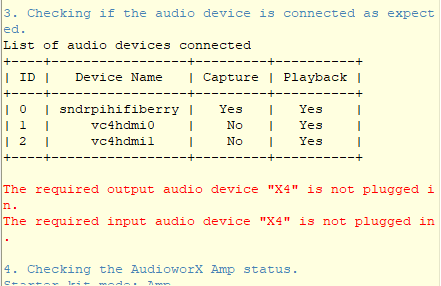
If such an error is shown, verify if the required audio device is physically connected is powered on.
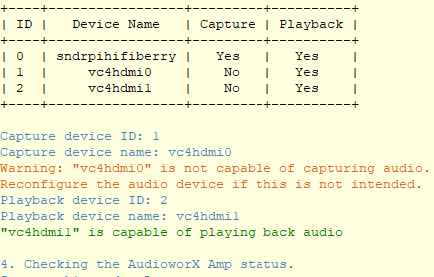
Two separate audio devices, one for input and the other for output, may be used simultaneously. If the input or output device is not capable of capture or playback, respectively, the diagnostic report will show a warning (in yellow).
If this is not intended, reconfigure the audio device using the SKUtility Tool.
Issues in the AWX Amp Application
The AWX Starter Kit has two start up modes set via the interactive config menu described under “Configuration > Audio Config” in SKUtility Tool – Graphical Application.
- Amp mode
- Dev mode
Step 4 in the diagnostics verifies the status of the AWX Amp application based on the mode that is configured. If the Starter Kit hardware is set to “Amp” mode, the AWX Amp application is expected to be running.
An error may be reported in this step for the following reasons:
- Failure in any of the previous steps.
- The expected audio interface is not available at the time of amp start-up. Ensure that the audio device is plugged in and powered on (if the interface has dedicated power) before powering-on the Raspberry Pi 5 (not required for the HiFiBerry HATs).
- Problem in starting the AWX Amp application due to audio device setup or framework initialization, refer to AWX Amp Application Logs section.
Once the issues detected are rectified, reset the AWX Amp application from Remote > Reset in the SKUtilityGUI, or using the python3 SKUtility.py rmt -rst command and re-run the diagnostics. If problems persist, contact Harman AudioworX support by following the information given in Reporting Issues section.
AWX Amp Application Logs
The Starter Kit produces logs at different points showing information on boot times, the AWX Amp application start and stop times and includes logs from the AWX Amp application showing initialization and configuration statuses during the audio driver setup and writes them into a file named awx_log.txt in the Starter Kit. This file can be fetched from the Starter Kit using Remote > Fetch Logs in the SKUtilityGUI, or by running the command python3 SKUtility.py rmt -flog.
Following figure shows an example log file in the Starter Kit.
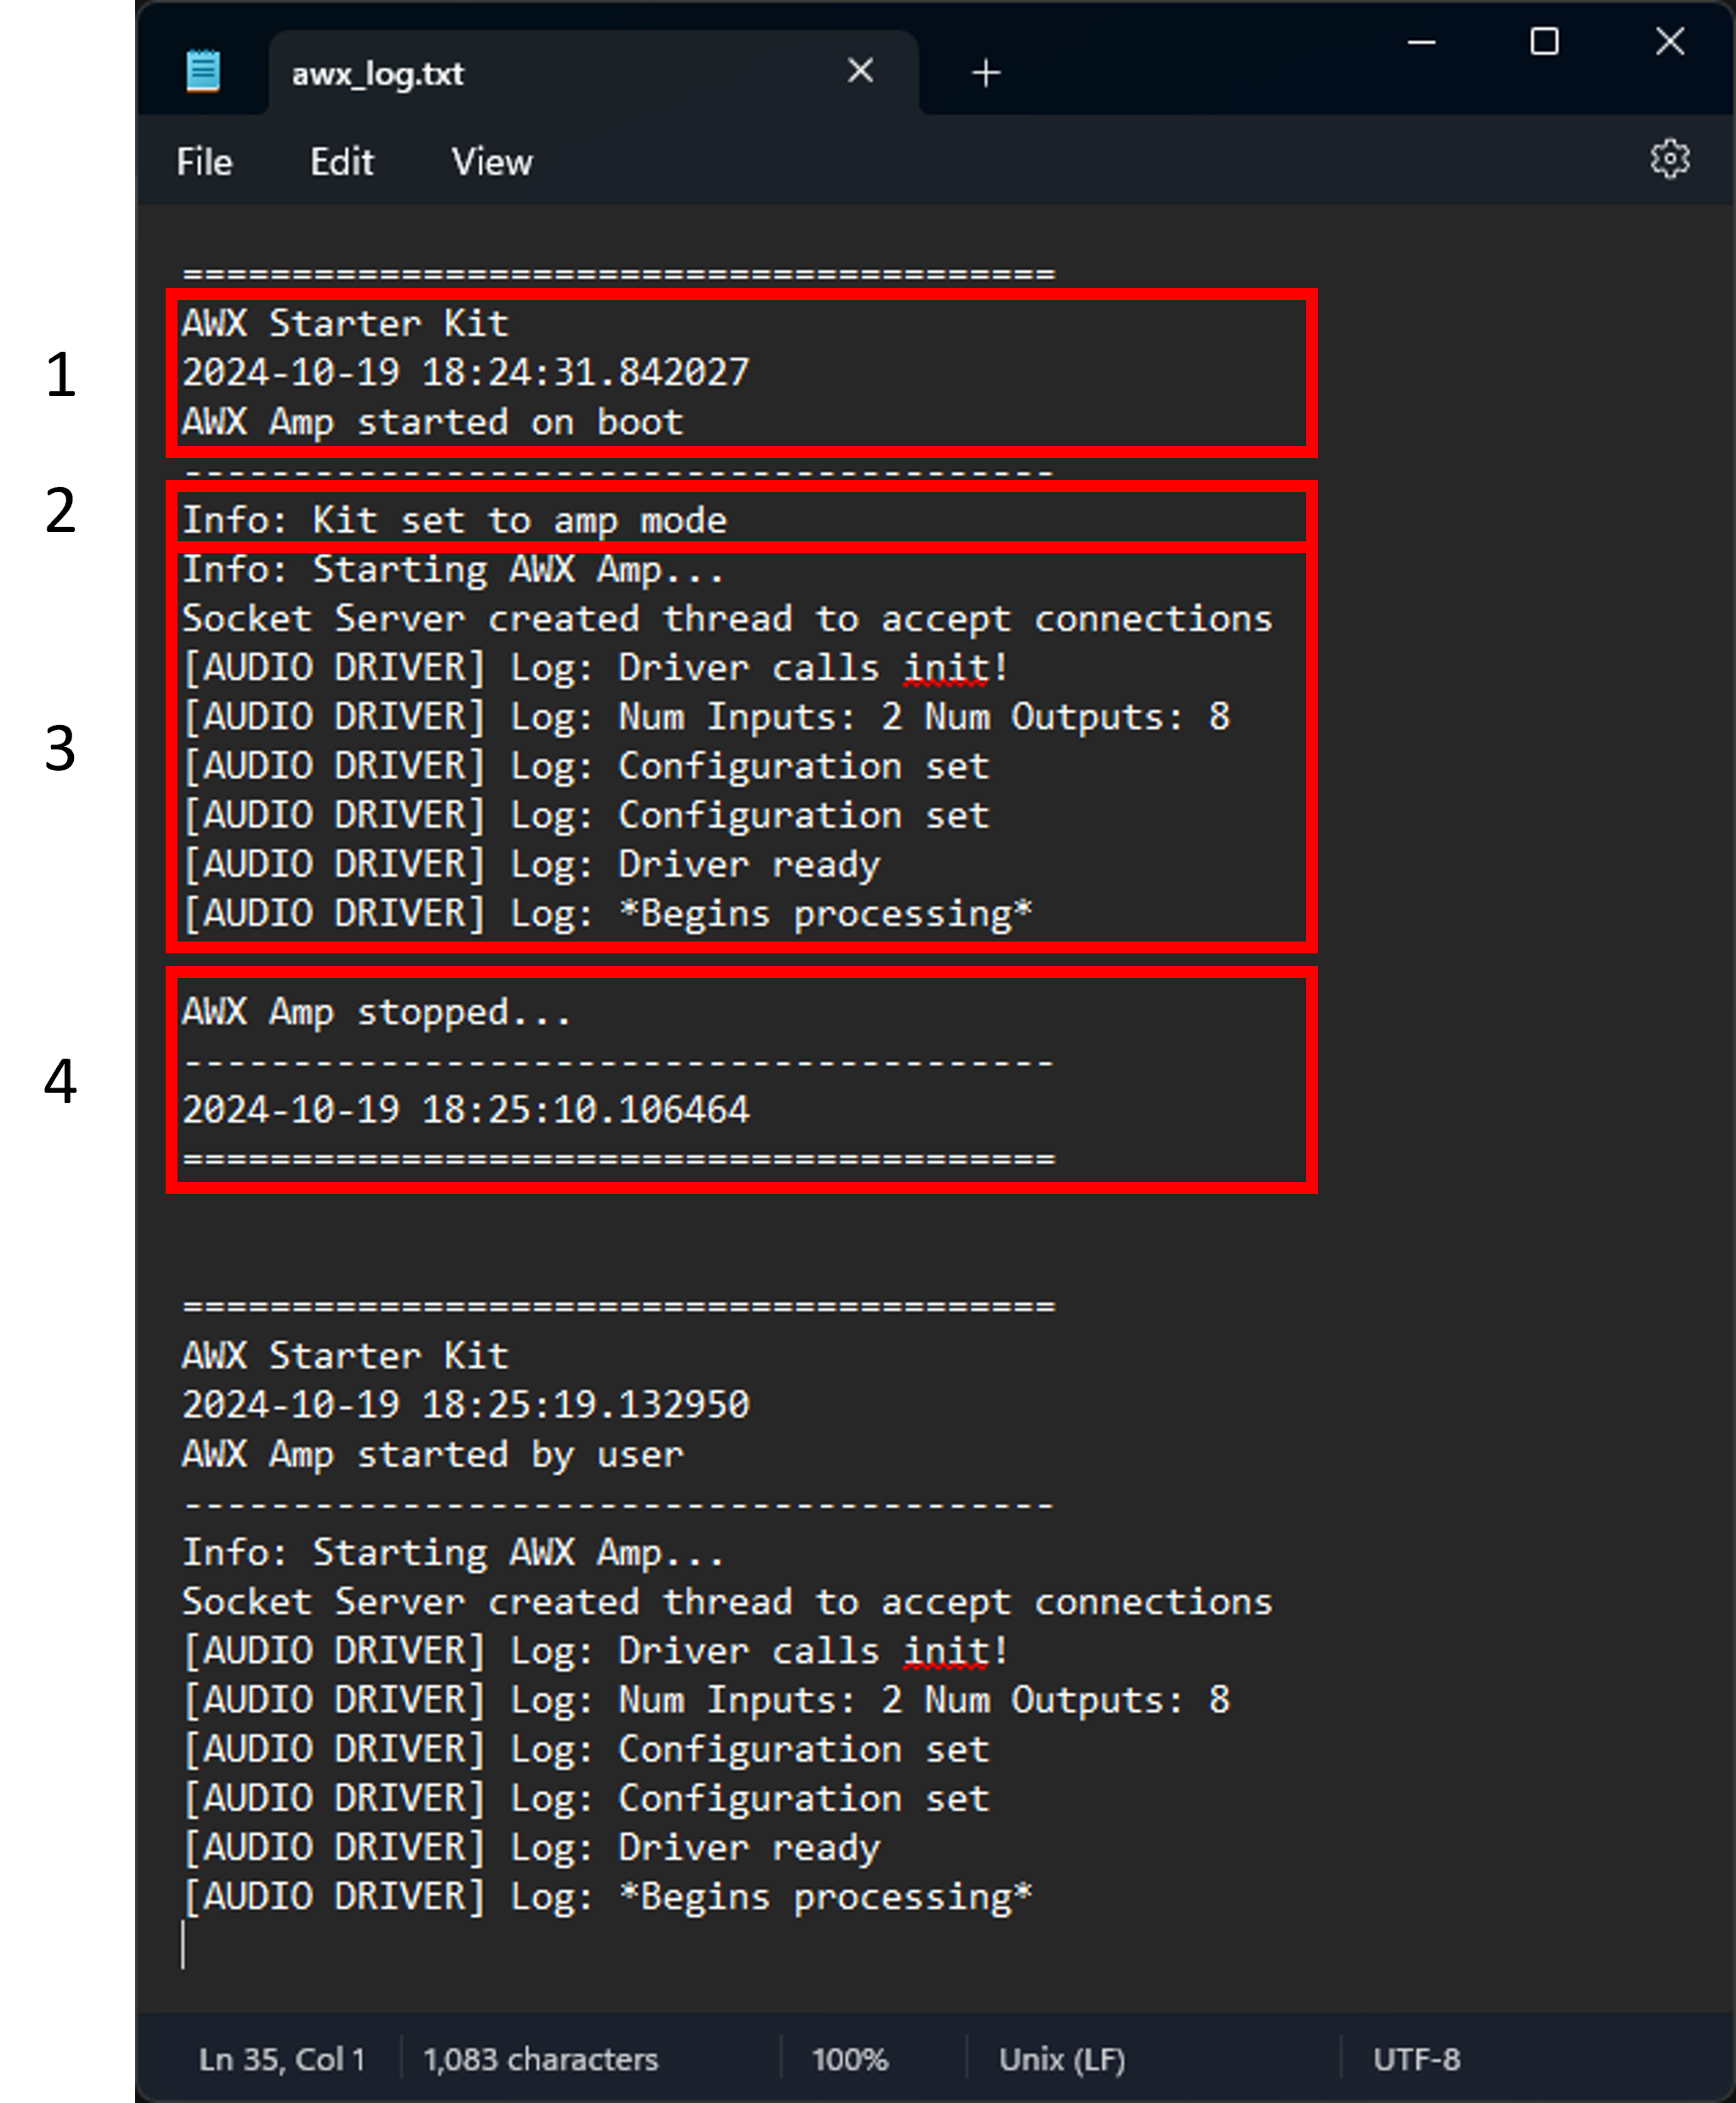
The above figure shows 4 parts in a log:
- Start Time: This part of the log shows the boot time and date if the log was generated at boot time, or the start time and date of the AWX Amp application if the amp was reset or started using the Starter Kit Utility. The first half (highlighted text) shows logs generated on boot, and the second half shows logs generated at amp reset by the user (notice the text “AWX Amp starter by user”).
- Amp Mode: This part shows the mode in which the Starter Kit is configured. This text is only shown at boot time and not when the amp is started using the Start Kit Utility, as shown in the second half of the figure.
- AWX Amp Application Logs: This part of the log shows logs generated by the AWX Amp application, which includes logs from the amp front-end, audio driver, etc. Logs related to SFD initialization from the xAF framework can be found in the other log file (VirtualAmpLog.txt), which is downloaded along with the awx_log.txt file.
- AWX Amp Stop Time: Finally, the last part of the log indicates the stop time of the AWX Amp application. Note that this part of the log will not be printed if the Starter Kit is abruptly powered off or shutdown while the AWX Amp application is still running.
The latest logs are written to the end of the file. The above figure shows that the amp may be running since the end of the log file has logs from the AWX Amp application and not the stop time.
Running the “Reset All Configurations” command will remove all log files on the Starter Kit hardware. Before resetting configurations, it is recommended that a snapshot is taken using Remote > Snapshot in the SKUtilityGUI or fetch the log files using Remote > Fetch Logs.
Reporting Issues
For reporting issues related to the AudioworX Starter Kit, write to AudioworXSupport@harman.com with the following information:
- Subject line — “AudioworX Starter Kit – short description of the issue faced”
- Detailed description of the issue.
- Attach the following files (if any).
- The GTT project file (.gttd) used, which can be exported from GTT (File > Export Project).
- Snapshot of the flash files on the Starter Kit hardware which can be generated using Remote > Snapshot in the SKUtilityGUI, or the command
python3 SKUtility.py rmt -snp. The snapshot will be downloaded to “C:\ProgramData\Harman\StarterKit”.
- Steps for reproducing the issue.