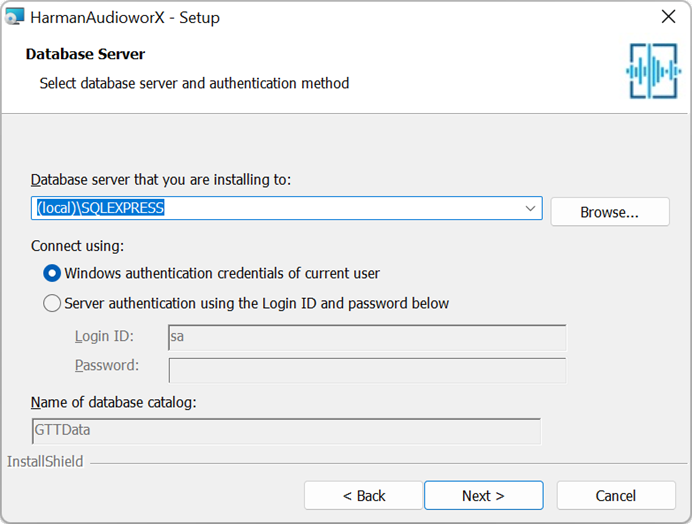
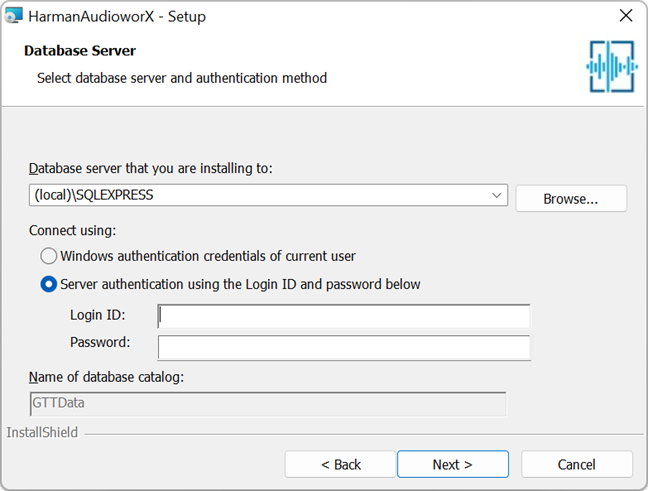
Exploring GTT Workspace

The GTT workspace consists of several tabs, including the Home screen, Device Designer, Panel Designer, and Parameter Sets. Additionally, there are specialized tabs for tasks such as IR Measurements, IVP RTA, Central Viewer, Auto EQ, and AI Module. This guide focuses on providing information about the Home screen, Device Designer, Panel Designer, and Parameter Sets tabs.

Related Topics

Device Designer Overview

The Device Designer comprises of various tools and interfaces that are used to create and run audio processing systems on hardware. The Device Designer contains the canvas and modules needed to create the signal processing template, while the SFD interface handles most of the target and audio object interactions.

When you launch a project in GTT, the Device Designer screen appears, which includes the following elements:

  1. Ribbon and Group: The ribbon is composed of six groups, each of which represents a subset of program functionality. In addition to these programs, there are also additional contextual programs that automatically appear depending on what is currently selected.
    The GTT ribbon comprises six groups: Tools, Connection, File, Tuning, Device Panels, and External Endpoints. Each group has specific tools of related functions. It gives you quick access to the tools and functions you need to complete a task.

    • Tools: This group includes three tools: Services Monitor, Event Log, and xTP Log. The event log and xTP log in GTT can both be checked and monitored using all these tools.
    • Connection: This group includes tools to set up the connection between the physical or virtual device, such as configuring socket connections and port settings. Additionally, it facilitates you to establish the connection once it has been configured.
    • Import/Export: This group allows you to import and export device files, tuning data files, device description data files, and corporate pin data.
    • Tuning: This group includes Tuning Data and Virtual Tuning. Using Tuning Data, you can open and tune the audio files. Virtual Tuning enables the measurement of impulse responses of an acoustic environment using the AudioworX measurement Module.
    • Device Panels: This group includes the following tools: State Variables, Default Control-Ids, Present Controller, Controller, Linking Window, Mips, Memory, Memory Latency, Streaming, and File Controller. Each of these tools is equipped with a unique set of functions.
    • External Endpoints: This feature allows external tuning to communicate with the device. The GTT will receive the requests from external tuning tools and send them to the device via GTT. This is made possible by a WCF service endpoint that third-party tools can access.
  2. Devices List: This section displays the list of projects. In addition, you can add and delete a device.
  3. Toolbox: This section display core levels of processing, such as block length conversion, merger/splitter, and sample rate conversion within the audio processing pipeline.
  4. Device Operations: This section contains several functions related to physical/virtual devices like Load Device Config, Edit Device, Send Device Config, Send Signal Flow, Export SFD, and Control Ids.
  5. Properties Panel: A Device Template is a combination of three layers – Physical Layer, Virtual Core, and Core Object. When you select one of the cores, the properties of the core are displayed on the right side. If required you can modify the core properties.
  6. Device View: The workspace is used to add devices and program the device core. You can use the magnifier function to adjust and change the size of the design workspace.

Tuning

Tuning Data

You need to connect a device to GTT to send/receive tuning or state data.

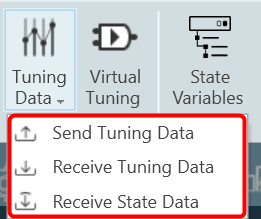
When the device is connected you will get the following options.

  • Send Tuning Data
  • Receive Tuning Data
  • Receive State Data

Virtual Tuning

This feature will be removed in the future Global Tuning Tool release.

Virtual Tuning allows you to measure impulse responses of an acoustic environment using the AudioworX Measurement Module. Based on these measurements, a production signal flow can be virtually tuned.

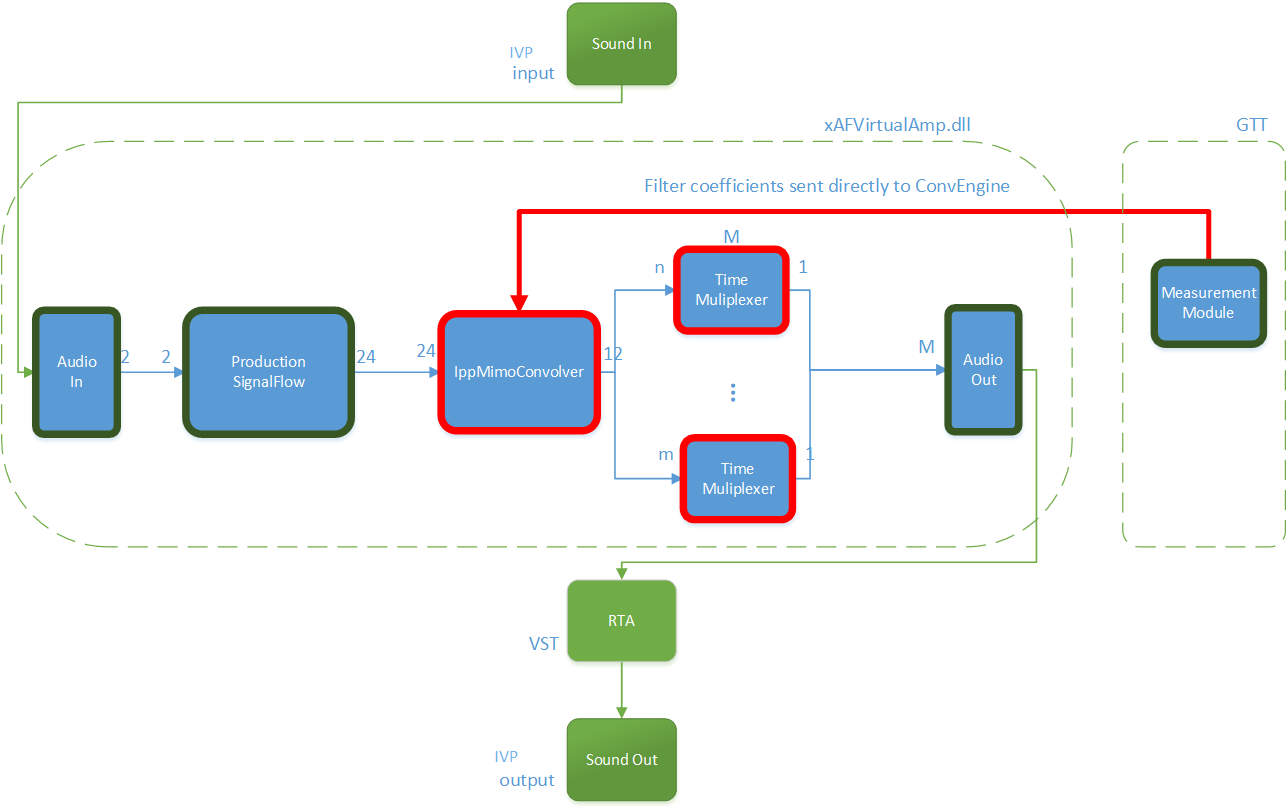
For this purpose, two new audio objects are implemented in AudioworX:

  • IppMimoConvolver
  • Time Multiplexer

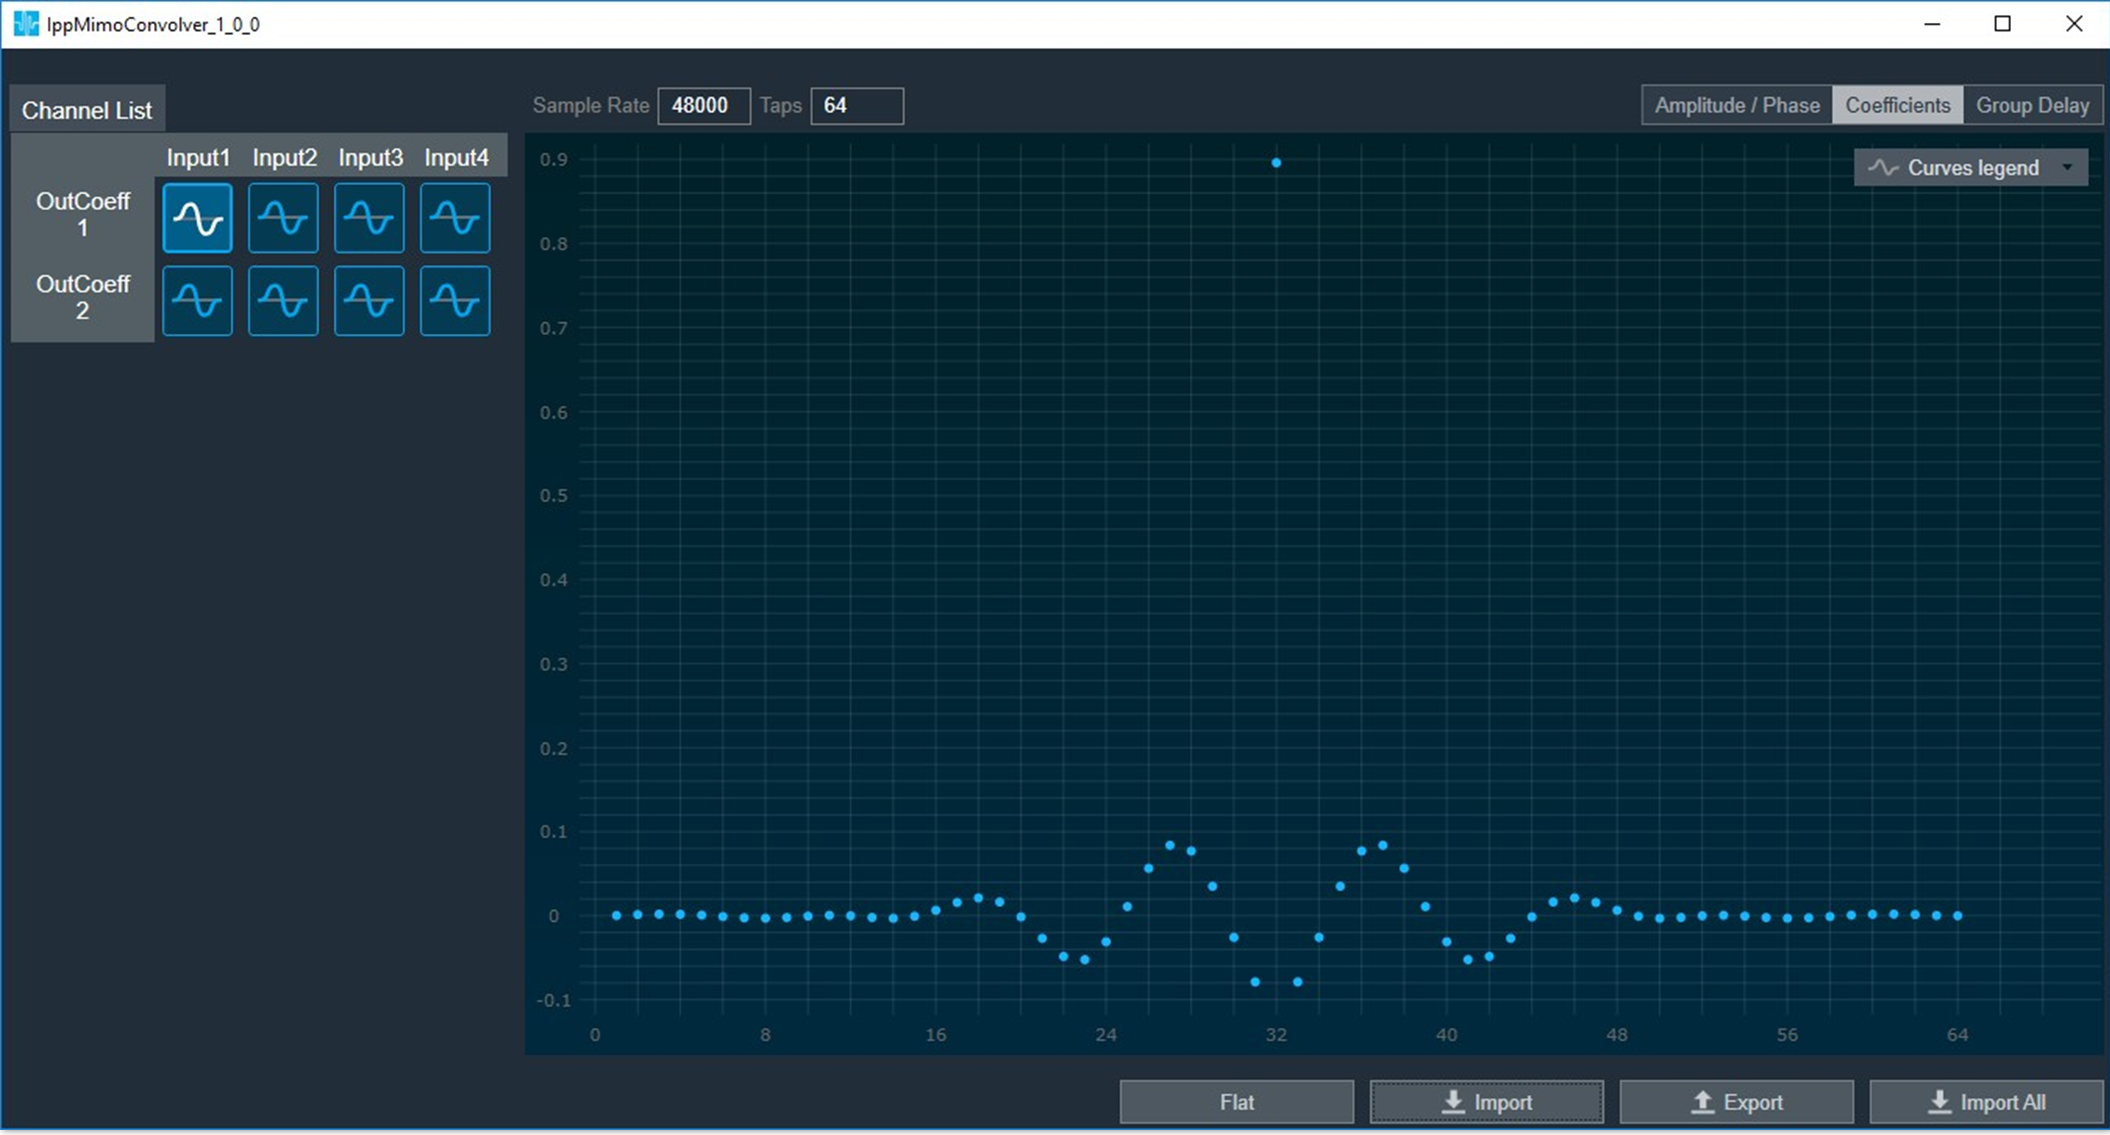
IppMimoConvolver: The IppMimoConvolver audio object provides MIMO convolution with FIR filters using the Intel Integrated Performance Primitives (IPP) library, a multi-threaded software library of multimedia and data processing applications. It is highly optimized for various Intel® architectures and is a comprehensive library of out-of-the-box, domain-specific functions. The library is available for the Linux, MacOS, Windows and Android operating systems.

In the SFD, you can select the following object parameters at design time:

  • Number of input channels
  • Number of output channels
  • Number of taps of filters

Tuning: For each filter combination in IppMimoConvolver, this object exposes these one tuning parameters set to the GTT

  • Coefficients: The coefficients of the filters can be imported from .csv files. The filter taps that are set in the GTT must match the taps of the filter that is imported from the .csv file.

Filter coefficients can also be loaded directly from a Measurement Module session that has been pre-measured in AudioworX.

Time Multiplexer: The Time Multiplexer combines multiple input audio signals into a single audio signal by dividing the input channels into equal fixed length time slots and mixing them into a common output channel with fading between channels.

The length of the time slots and the fading characteristics can be configured at runtime.

The output signal is the signal of one input channel at a time. The next input channel becomes the first input channel again when the last input channel is reached. Depending on the fading mode, there might be a block length of fading between 2 channels.

In the SFD, you can select the following object parameters at design time:

  • Number of input channels

Tuning: This audio object exposes four tuning parameters to the GTT.

  • Mode: The mode can be set to:
    • Normal Mode: Performing multiplexing
    • Active Channel Mode: Single channel passed to the output
    • Off: No output
  • Multiplex number of blocks : Only evaluated in “Normal mode”. It presents a number of blocks (block length) after which to switch to the next input.
  • Fading mode: Only evaluated in “Normal mode”. It sets a type of fading method:
    • Cosine square fading
    • Linear fading
    • No fading (hard switch)
  • Active channel
    • If in mode “Active channel mode” – The channel number of the input channel that will be routed to the output channel.
    • If in mode “Normal mode” – Set the selected channel as current input and continue with the next channel in normal/multiplex mode after the configured number of blocks.

Virtual Tuning Configuration Prerequisites

The steps listed below describe how to configure an IppMimoConvolver object using GTT.

  1. Create a signal flow with the IppMimoConvolver object with m inputs, n outputs, and j number of taps for filters.
  2. Create a measurement with n mics and m speakers.
  3. Adjust measurement length, sample rate, etc to get exactly the required amount of coefficients (ir data points) before starting measurement.

Once the above steps are done, select the device (which contains a mimo object) from the device list to activate the device tab.

Steps to launch Virtual Tuning:

  1. Select a device, and click Virtual Tuning. This opens the Virtual tuning configuration screen.
    Graphical user interface, text Description automatically generated

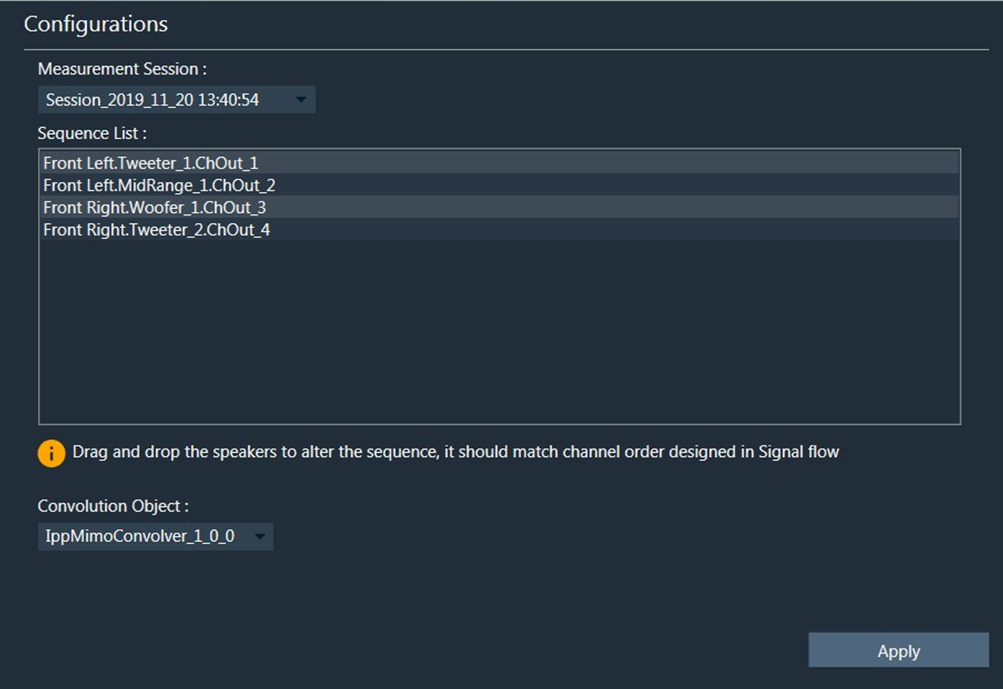
Apply Coefficients to Virtual Tuning

Steps to apply coefficients to Virtual Tuning:

  1. Open Virtual Tuning and select suitable Measurement Session.
  2. Select Convolution Object to which the Coefficients to be applied.
  3. Click Apply.

The selected measurement’s IRData is retrieved and applied to the convolver object. A toast message appears, stating that the coefficients were successfully applied.
Graphical user interface, text, application Description automatically generated

Virtual Tuning Panel: The IppMimoConvolver panel is used to view the coefficients assigned to the object. This panel provides the following functions.

  • Flat
  • Import
  • Export
  • Import All

About Installation Guide

This guide provides instructions for installing the Global Tuning Tool. It also covers system requirements and license activation and renewal procedures.

Terms and Abbreviations

List of technical terms and abbreviations.

  • xAF: Extendable Audio Framework
  • GTT: Global Tuning Tool
  • SFD: Signal Flow Designer
  • BAO: Basic Audio Object

Reference Document

Visit below topics to get more information about AudioworX and various modules. Additionally, you can refer to the following relevant documentation for more detailed information on the Global Tuning Tool.

For technical queries or support, email us at  AudioworXSupport@harman.com.

For new feature or change requests, email us at AudioworXSupport@harman.com.

System Requirements

Your computer must meet the minimum technical specifications outlined below to run and use the Global Tuning Tool.

Table 1: Global Tuning Tool System Requirements

Component Minimum Requirement Recommended Requirement
Processor Intel® Core – i3 processor (4.3GHz) Intel® Core -i5 processor (1.7GHz or above)
Operating System Windows 10 (64-bit support)
Memory 4 GB RAM 8 GB RAM or above
Hard disk 20 GB of available hard disk space; additional space is required for installation 50 GB or above
Display Resolution 800 x 600 display 1920 x 1080 display
Graphics
  • Driver Version – Supported Intel, GPU version greater than 30.0.100.x.
  • 1.5 GB of GPU memory
  • Driver Version – Supported Intel, GPU version greater than 31.0.101.3959.
  • 4 GB of GPU memory for 4k displays and greater
Browser The current version of Microsoft Edge, Internet Explorer, Chrome, or Firefox.

Internet connection is necessary for GTT registration, license activation, membership validation, and access to online services.

Currently, the Global Tuning Tool is not supported on macOS systems.

Install AudioworX Prerequisites

Follow the below steps to install AudioworX prerequisites setup.

  1. Right-click the HarmanAudioworX Pre-req setup file and choose Run as administrator.

    The AudioworX prerequisites setup file must be run as administrator. Certain Global Tuning Tool features may not work properly if you run the AudioworX prerequisites setup file normally.

    If you see the User Account Control prompt that says, Do you want to allow this app to make changes to your device? select Yes.

  2. On the HarmanAwX_Prereq welcome screen, click Next.
  3. Click Install to start the installation.

  4. When all the prerequisites are successfully installed, the installation wizard will display a message, and click OK to continue the installation.

  5. Click Finish to complete the installation.

Install Patch

Install the AudioworX patch file only after completing the AudioworX installation.

Follow the below steps to install the AudioworX patch setup.

  1. Right-click on the AudioworX patch and choose Run as Administrator.
  2. On the AudioworX patch wizard welcome screen, click Update.

    If you see the User Account Control prompt that says, Do you want to allow this app to make changes to your device? select Yes.
    Wait till the installation wizard completes the upgrade.
  3. Click Finish to complete.

Global Tuning Tool Trial License

A trial license gives you full access to the Global Tuning Tool for 90 days. At the end of the trial period, Global Tuning Tool will notify you and you’ll have the option to request a full license to continue using it so that you won’t lose any of your projects or data.

The Global Tuning Tool offers a one-time trial license. Once the trial period ends, you cannot extend or renew it on this machine. You’ll need to purchase a license for continued use.

To request a Global Tuning Tool trail license.

  1. Double-click on the Global Tuning tool to start.
  2. Enter the following user registration details on the User Registration/ License Activation screen.

    • Name: Enter your name.
    • Company Name: Enter your company name.
    • Email: Enter your official email ID.
    • Country: Select your country from the drop-down list.
    • Comments: To add additional requirements or a custom license.

      Fields which are marked with * are mandatory.

      No special characters are allowed in user registration fields.

  3. Click Start Trial.

The Global Tuning Tool will launch. On the home page, you can verify the validity of your license.

Go to the right side of the GTT landing page and click on the ellipsis icon. Click “Know your GTT license status”.

Install AudioworX Installer

Follow the below steps to install the AudioworX setup.

  1. Right-click the AudioworX setup file and choose Run as administrator.

    The AudioworX setup file must be run as administrator. Certain Global Tuning Tool features may not work properly if you run the AudioworX setup file normally.

    If you see the User Account Control prompt that says, Do you want to allow this app to make changes to your device? select Yes.

  2. On the AudioworX welcome screen, click Next.
  3. On the License Agreement screen read the license agreement carefully, accept the terms of the license agreement, and click Next.
  4. On the destination screen, click Next if you accept the default destination folder location.
    The default location is C:Program FilesHarmanHarman AudioworX.
    Or
    click Change to set a different folder.
  5. On the server screen, connect to the server using one of the following options.

    By default, the wizard will connect to your local server.

    Select the Windows Authentication option and click Next.
    In this authentication mode, the wizard will automatically connect to your local server using your Windows authentication.

    Or
    Select the Server Authentication option, enter the Login ID and Password, and click Next.
    Use server authentication mode only if the server is available on the computer. Make sure you have server credentials details with you.

  6. Click Install to start the installation.
  7. Click Finish to complete the installation.

Installing AudioworX Setup

The installation setup windows have the Next, Back, and Cancel control buttons. Click Next to advance to the next step. Click Back to return to a previous window to review or make a change. Click Cancel to abort the installation.

A best practice for installing an upgrade build to any GTT version is to clear your browser cache before installation. This removes any cached web resources that have changed since the previous installation or upgrade.

For successful GTT installation, install all the setups as per the order mentioned below.

  1. Install AudioworX Prerequisites
  2. Install AudioworX Installer (xx.xx.xxxx_x.exe)
  3. Install Patch (xx.xx.xxxx_x.exe)

Prerequisites

For the latest Global Tuning Tool version, see the latest AudioworX release notes.

Visit the AudioworX software release information page and download the following setup files from the Software Downloads section.

File Type File Name
AudioworX prerequisites setup file setup_HarmanAudioworX_PreReq_1.0.0.2024.exe
AudioworX installer file Setup_HarmanAudioworX_S_ext_ x.xx.xx.xxxx_x.exe
Patch installer file Setup_HarmanAudioworX_S_ext_ x.xx.xx.xxxx_x.exe