Once the Starter Kit hardware has been set up and verified using the SKUtility diagnostics, it is ready to interact with the GTT application for implementing and tuning audio processing pipelines.
GTT includes an example project for the AudioworX Starter Kit that can be used a starting point for users to get familiar with the AudioworX workflows. This project implements a simple signal flow, custom tuning panels and some presets to showcase common AudioworX workflows that are explained in the GTT user guide.
The following sections guide first-time users through the initial setup of AudioworX using the Starter Kit.
- Importing The Example Project
- Configuring AmpSrv2 Settings
- Sending the Device Configuration to the AudioworX Starter Kit
- Connecting to the AudioworX Starter Kit for Tuning
- Tuning the Audio Processing Pipeline
- Saving and Recalling Tunings using Parameter Sets
- Managing Presets using the Preset Controller
The Home Screen of GTT provides options for importing a project, creating a new project, opening an existing project, exploring some high-level features of GTT, etc. For more details, refer Home screen options page. To open the Starter Kit example project:
- Go to the Sample Projects tab.
- Double click the “AWXExampleProjectStarterKit” project.

- On opening the example project, the first view that is shown is the Device Designer view. This tab shows a high-level view of the audio system, showing the audio device and its abstractions as shown in the below figure.
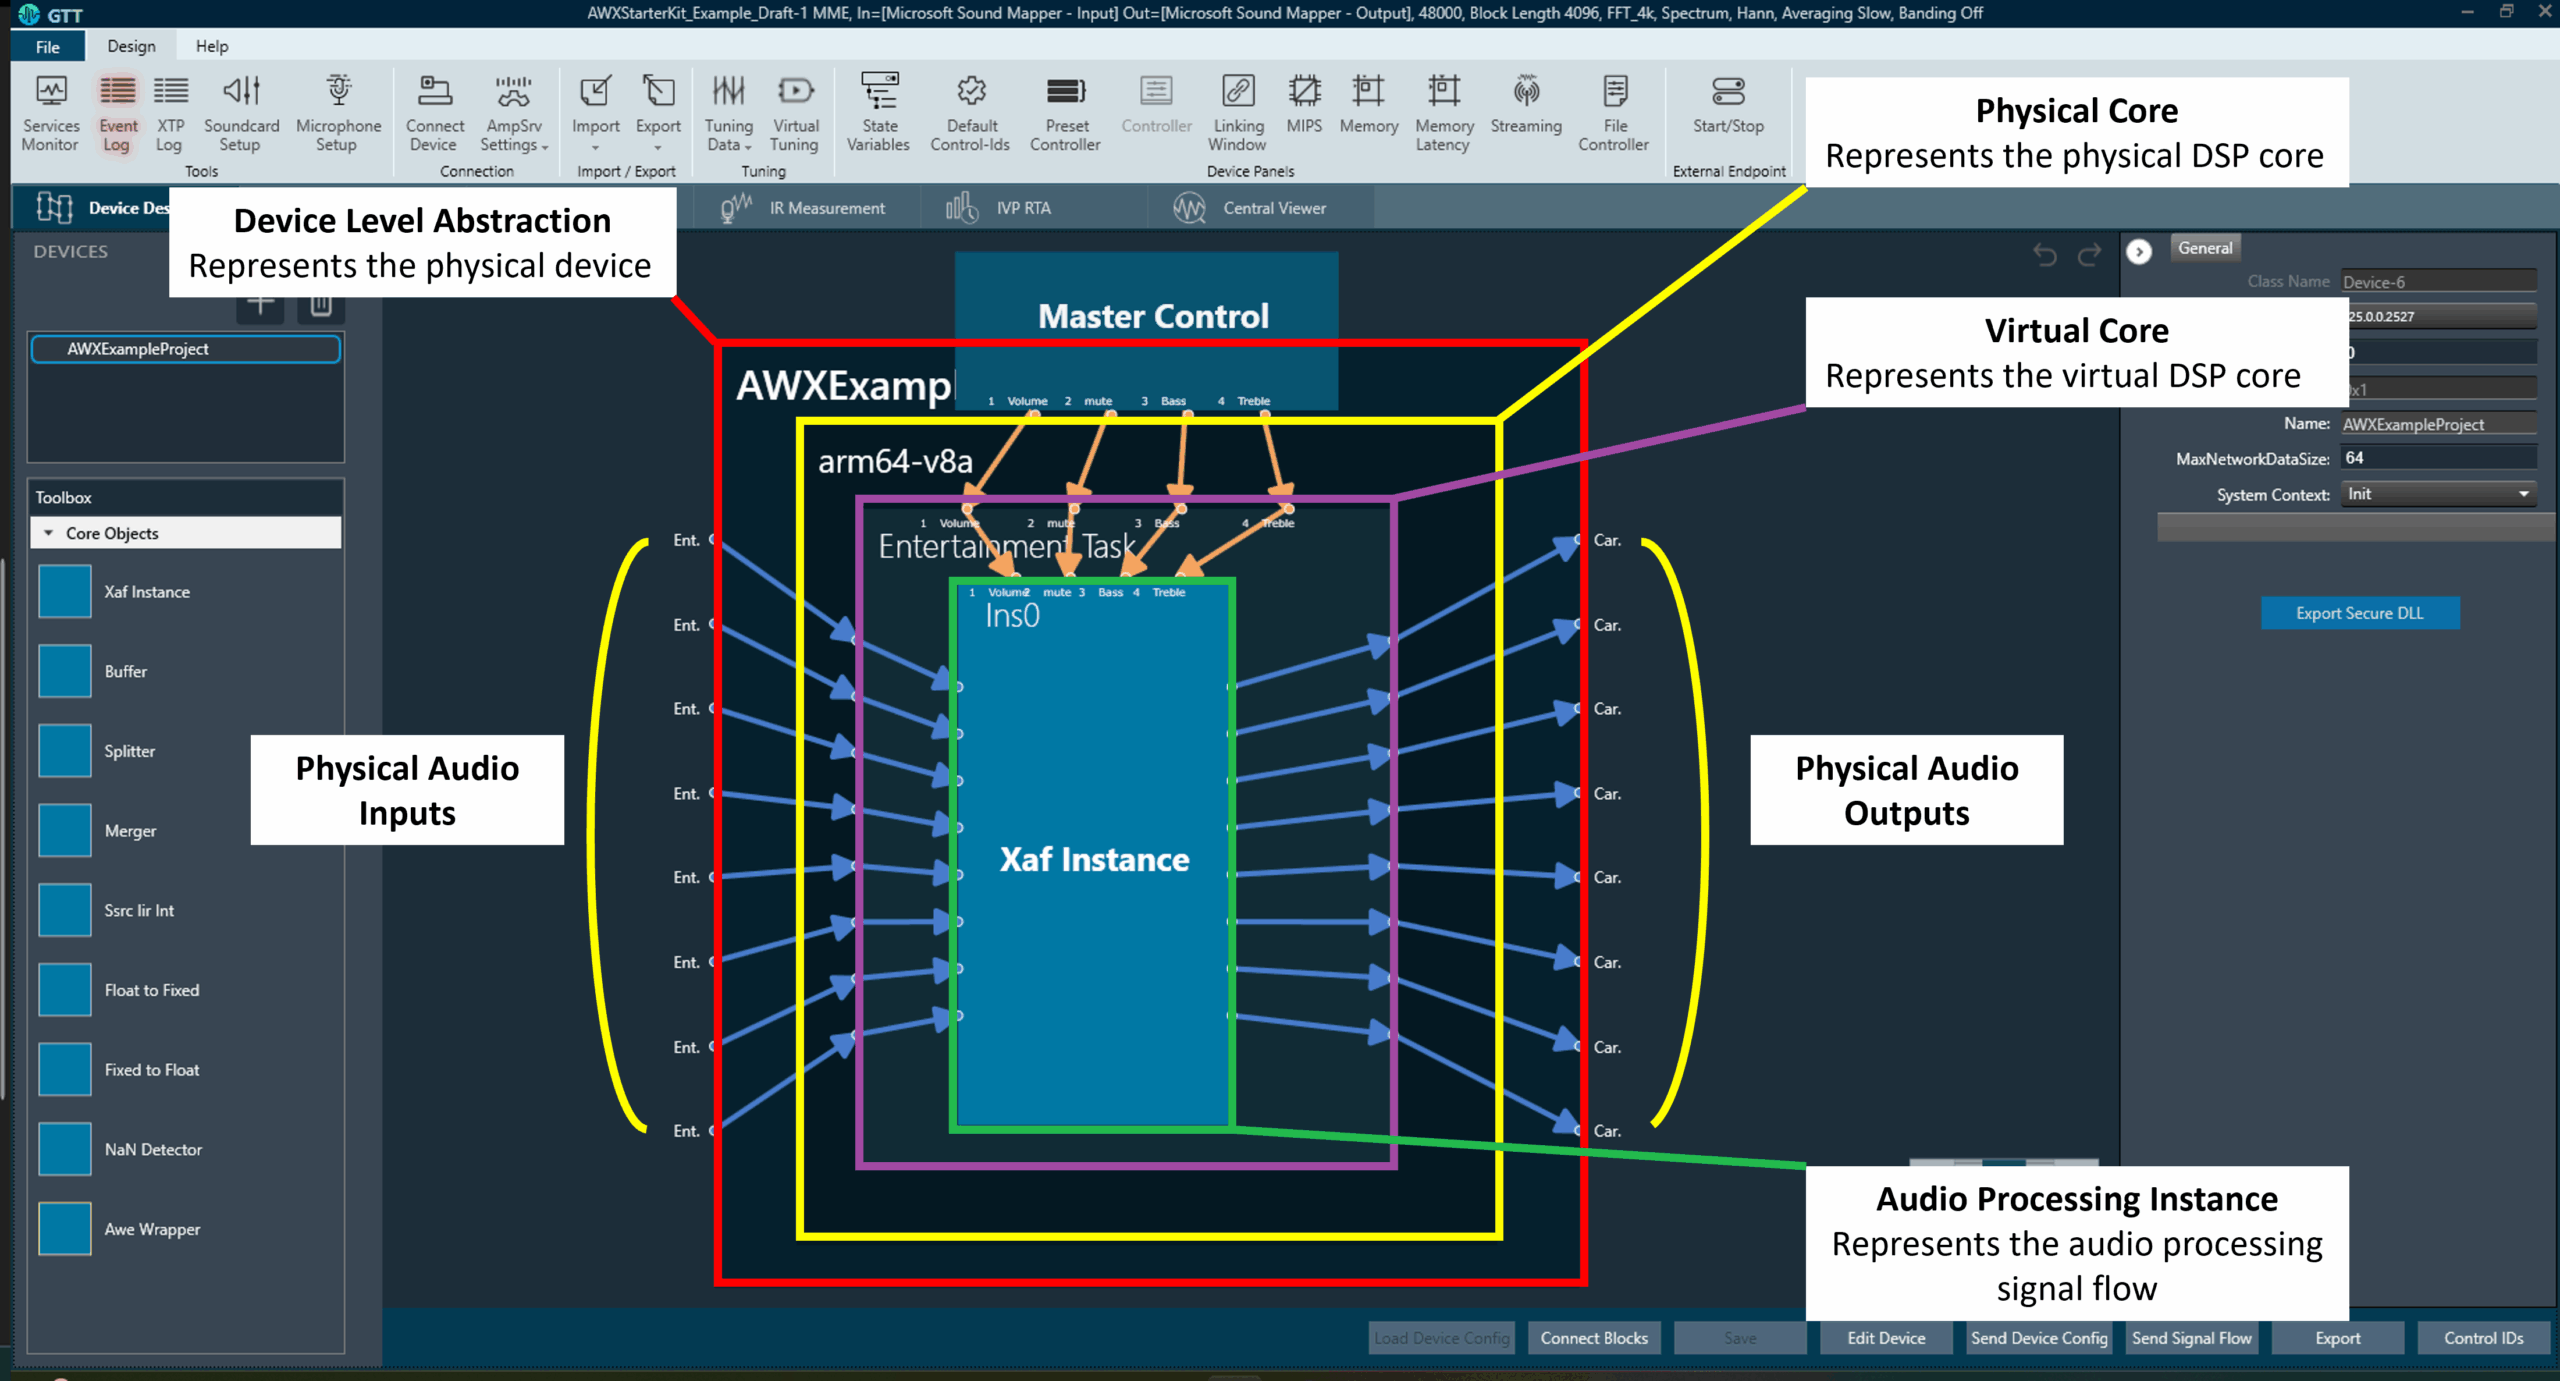
- The Device Level Abstraction (AWXExampleProject1): This represents the physical device or the target device with physical audio inputs and outputs. The Starter Kit supports up to 8 audio output channels and 8 audio input channels which are provided by the HiFiBerry DAC8x and ADC8x add-on HATs. These channels are highlighted as “Physical Audio Inputs/Outputs” in the above image.
- The Physical Core (arm64-v8a): This block represents the Digital Signal Processor (DSP) core that performs the audio processing. Although the Raspberry Pi 5 has four 64-bit Arm v8a Cores, currently, only one of the cores is supported for performing audio processing operations by the AWX Amp application. Other AudioworX amplifiers may have more than one DSP core, each of which will be represented separately in the Device Designer view.
- The Virtual Core (Entertainment Task): This block represents a single virtual core performing a specific audio task. A virtual core processes audio at a user defined sample rate and block length, which can be configured in the “Edit Device” menu at the bottom of the Device Designer tab (also explained in Create Device File).
In this example, the virtual core has 8-channel audio input and gives out a 7.1 channel output (8 channels in total). This block is populated with core objects that can be dragged-and-dropped from the “Toolbox” pane on the left-side of the Device Designer view and interfaced together to perform operations such as sample rate conversion, buffering, routing, that may be required by the main audio processing instances called the “Xaf Instance”. For more details, refer to Core Objects Toolbox.
A physical core may have more than one virtual core, each of which will be handled by a separate OS thread. - The Audio Processing Instance (Xaf Instance): This block represents the core of the audio processing pipeline which is designed using the Signal flow Designer tool to implement a signal flow (Refer to Xaf Instance in Core Objects Toolbox).
The rest of the Starter Kit documentation only briefly explains concepts that are relevant to a first-time user in the context of the AudioworX Starter Kit.
The Starter Kit is pre-configured with all the necessary data files to run the example project on first boot. Users may skip to the Connecting to the AudioworX Starter Kit for Tuning section for establishing connection between GTT and the Starter Kit. However, the following sections highlight important steps that are specific to the Starter Kit and users are encouraged to read them before continuing with tuning the signal flow.
The project’s AmpSrv2 settings must be configured for GTT to be able to communicate with the Starter Kit hardware for operations such as sending the audio processing signal flow and tuning.
Steps to configure AmpSrv2 settings:
- On the Device Designer tab, click on AmpSrv Settings on the top ribbon bar and click Configure.

- In the AmpSrv window, go to File > Options > Socket, and set the hostname to “raspberrypi.local” and the port to “25001”.
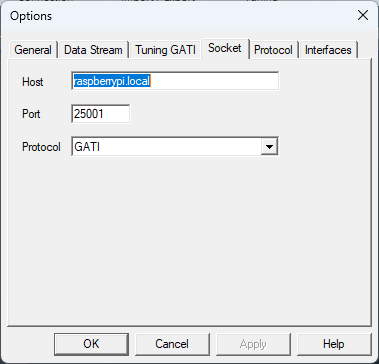
- Click Ok to close the AmpSrv2 settings window and minimize the AmpSrv2 window.
- On the Device Designer tab, click on AmpSrv Settings and click on Save from the drop-down menu to save the settings.
For AmpSrv2 Settings details, refer to the Connection page.
Sending the Device Configuration to the AudioworX Starter Kit
The device configuration has information on how the physical and virtual cores, the Xaf instances (which are the core of the signal processing flows) and other core AOs are interconnected to form the audio processing pipeline. As previously mentioned, the Starter Kit is pre-configured with the required data files, which includes the device configuration to run the example project on first boot.
For a different project or if any changes have been made to the example project, it is important to send the device configuration to the Starter Kit, to ensure the AWX Amp application can set up and execute the audio processing pipeline.
Steps to send the device configuration defined in the GTT project to the Starter Kit hardware:
- On the Device Designer tab, click on Send Device Config.
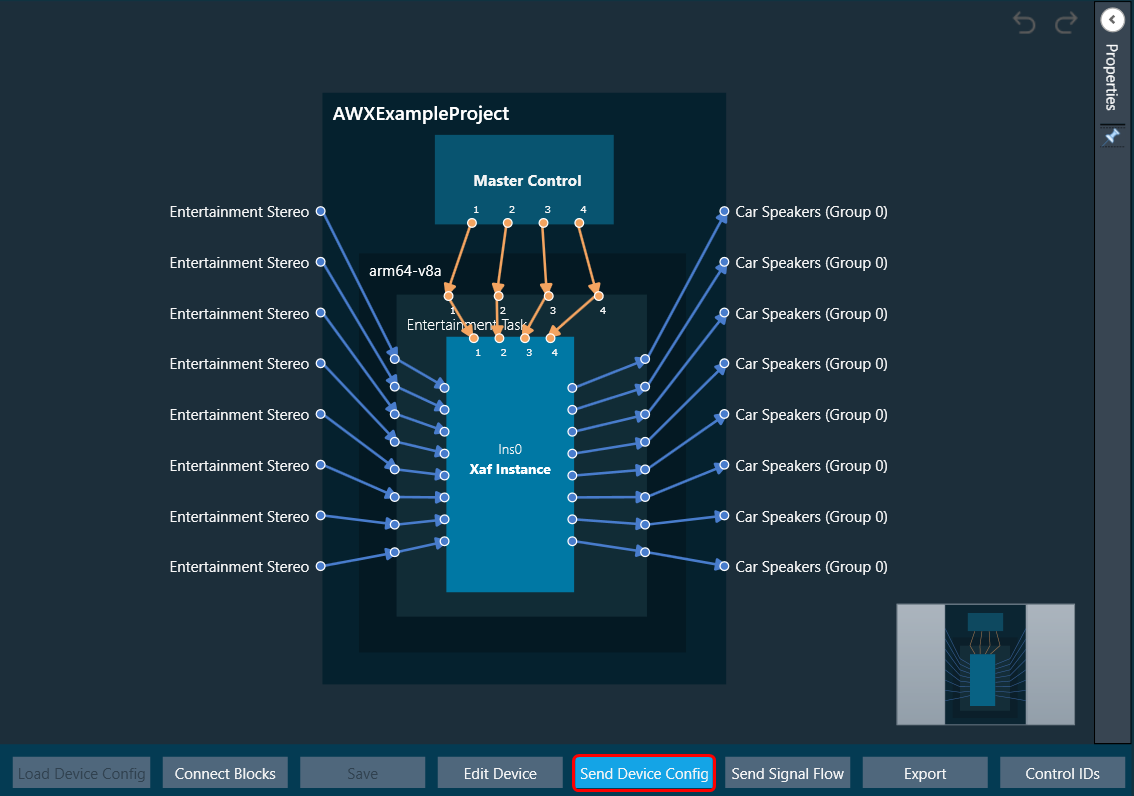
- GTT may prompt the user to reboot the target amplifier (the Starter Kit) on successfully sending the device configuration.
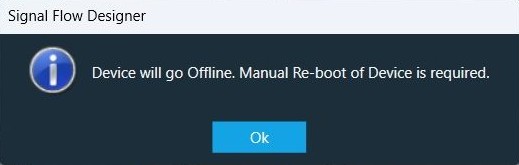
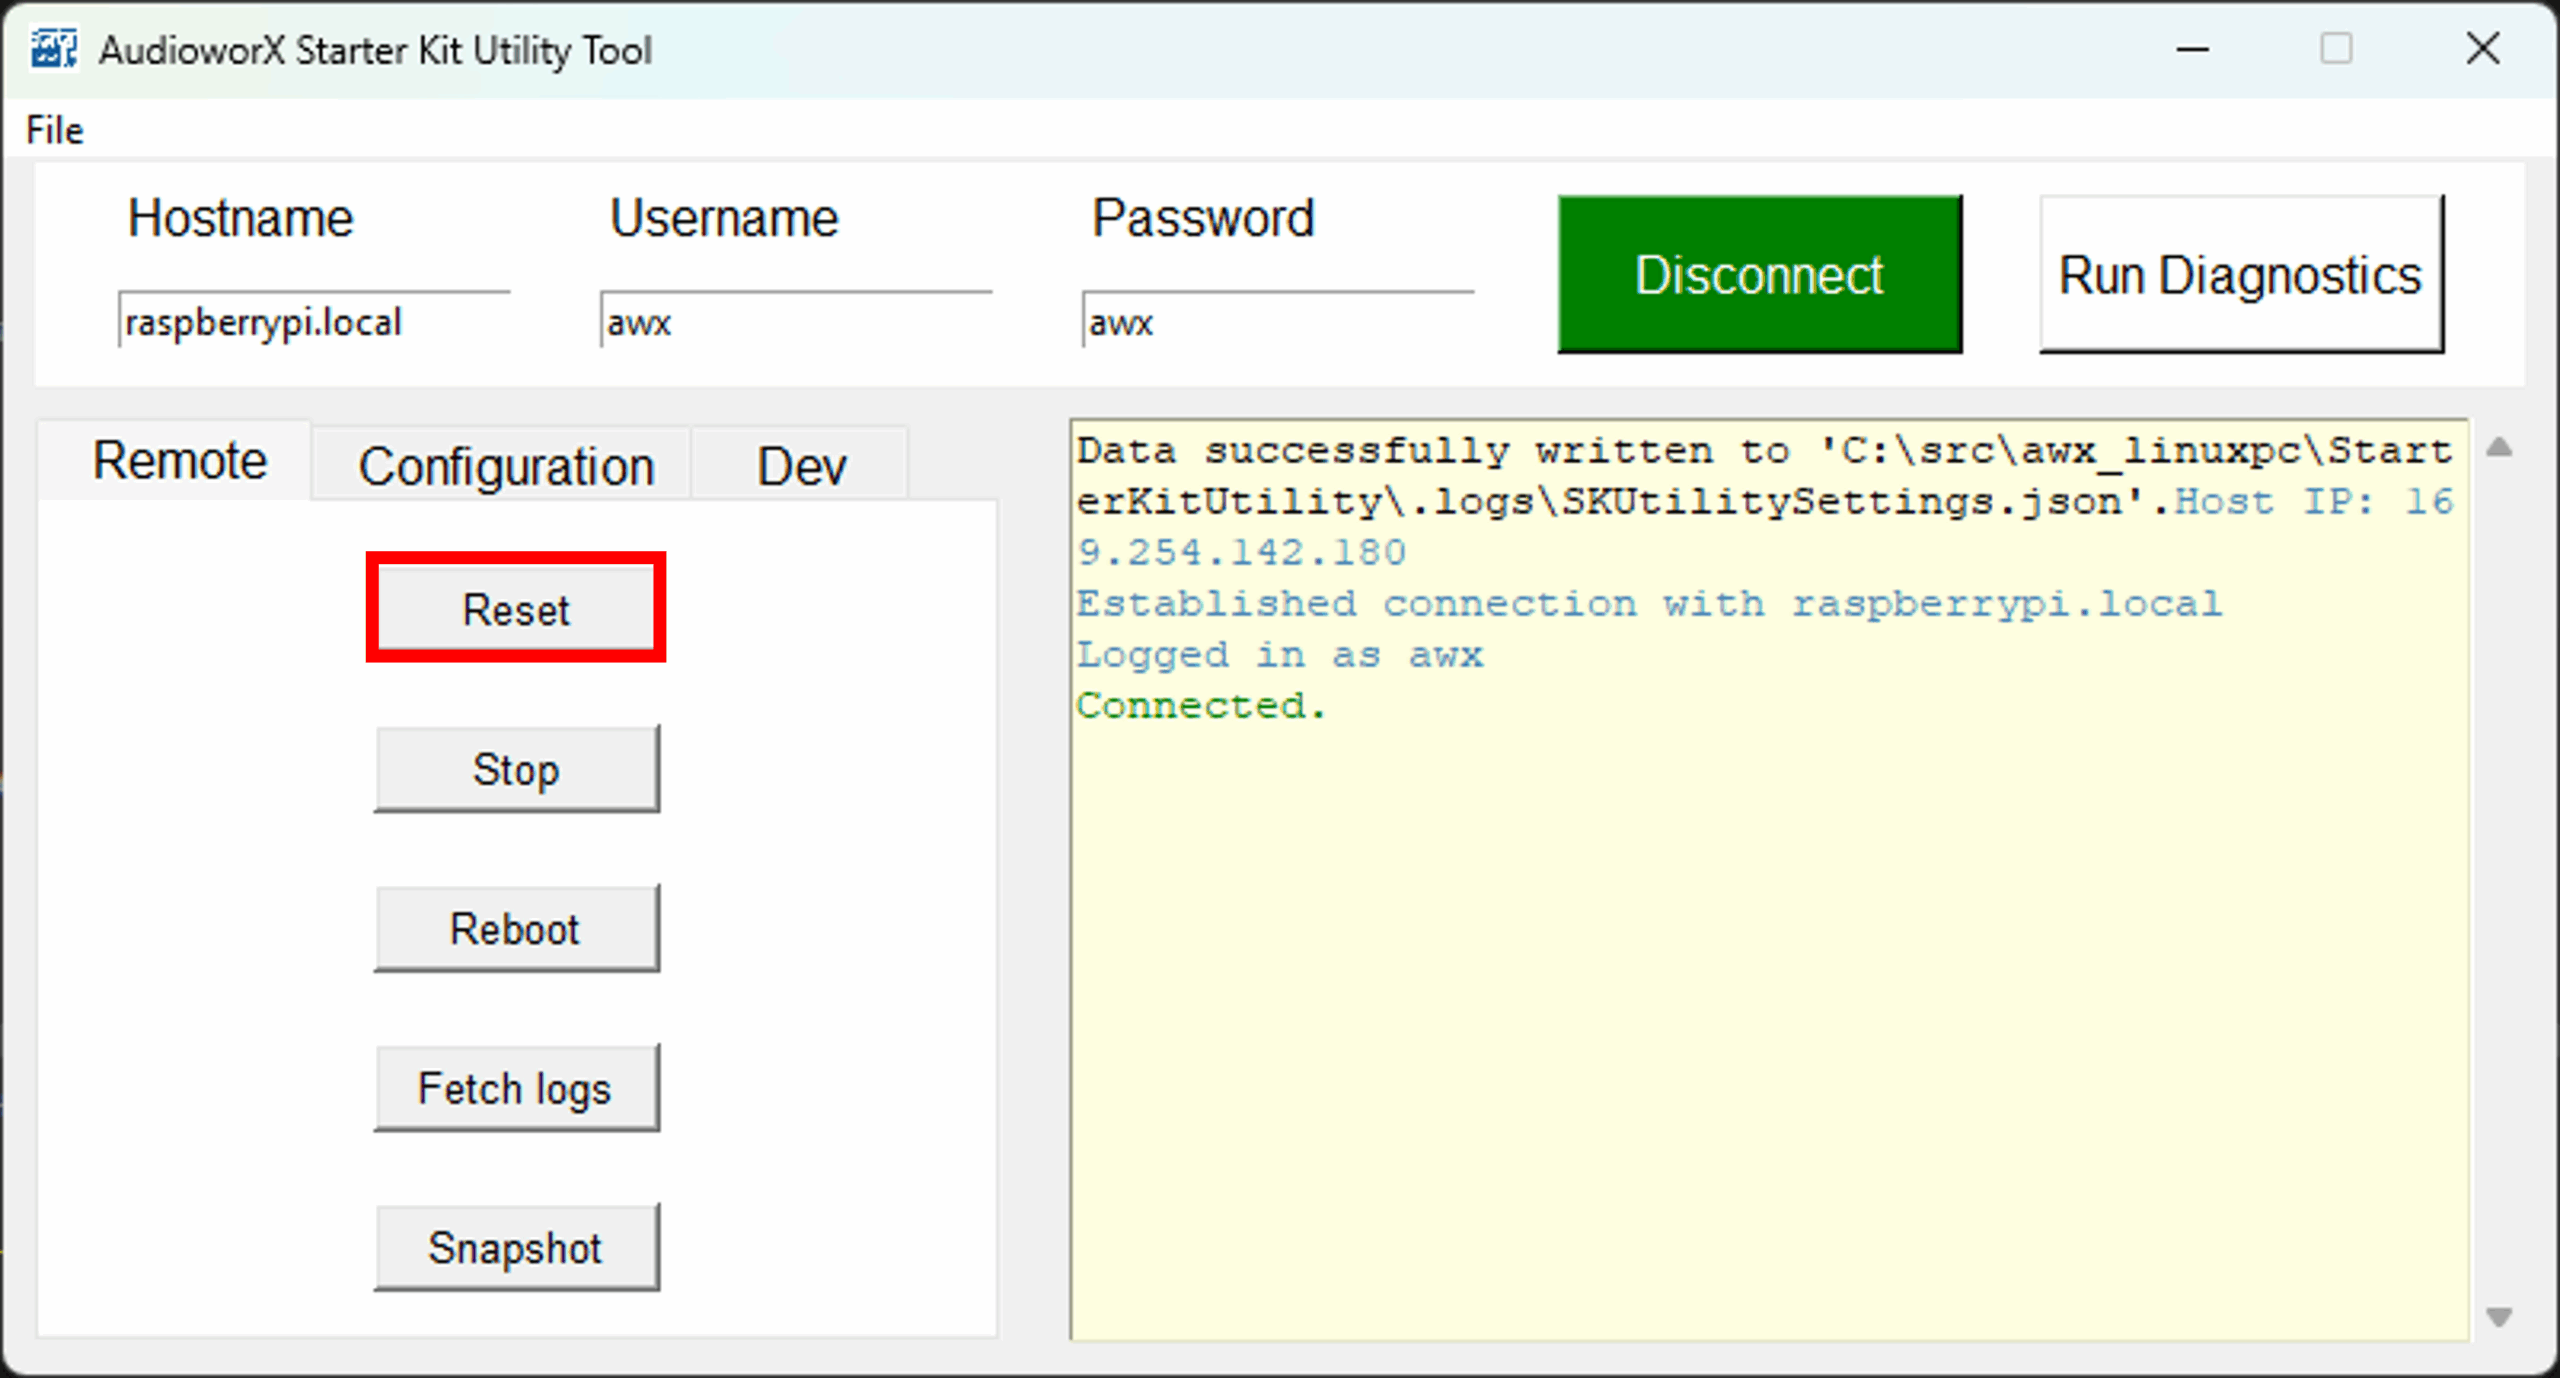
In such cases, the AWX Amp application running in the Starter Kit must be reset from the SKUtility Tool. With the Starter Kit connected on the SKUtility tool, go to the “Remote” tab and click the Reset button.
Other AudioworX-based amplifiers may require a full reboot cycle to properly configure and run the SFD.
Connecting to the AudioworX Starter Kit for Tuning
Once the device configuration has been sent to the Starter Kit hardware and the AWX Amp application has been reset (only needed if prompted by GTT), GTT can connect with the Starter Kit for tuning.
Steps to connect GTT to the Starter Kit:
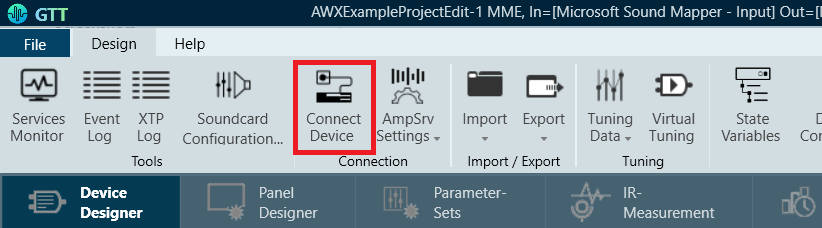
- Click the Connect Device button located in the top ribbon bar to initiate device connection.
- A “Device Synchronization” window will pop up. Click the Send button to send the tuning data. This synchronizes the tuning parameters of the active SFD in the Starter Kit to the states of the parameters as set in the GTT project.

- Once the data has been sent and the device has been connected, the audio processing pipeline and its signal flow can be tuned in real-time.
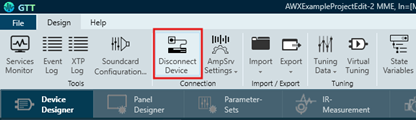
- To stop tuning and disconnect the Starter Kit from GTT, click the Disconnect Device button in the top ribbon bar of the Device Designer tab.
Tuning the Audio Processing Pipeline
The audio processing pipeline can be tuned in two ways: using the State Variables button in the top ribbon bar or by using a custom panel.
Tuning using State Variables
The State Variables explorer can be accessed from the top ribbon bar in the “Device Designer” tab as shown below.
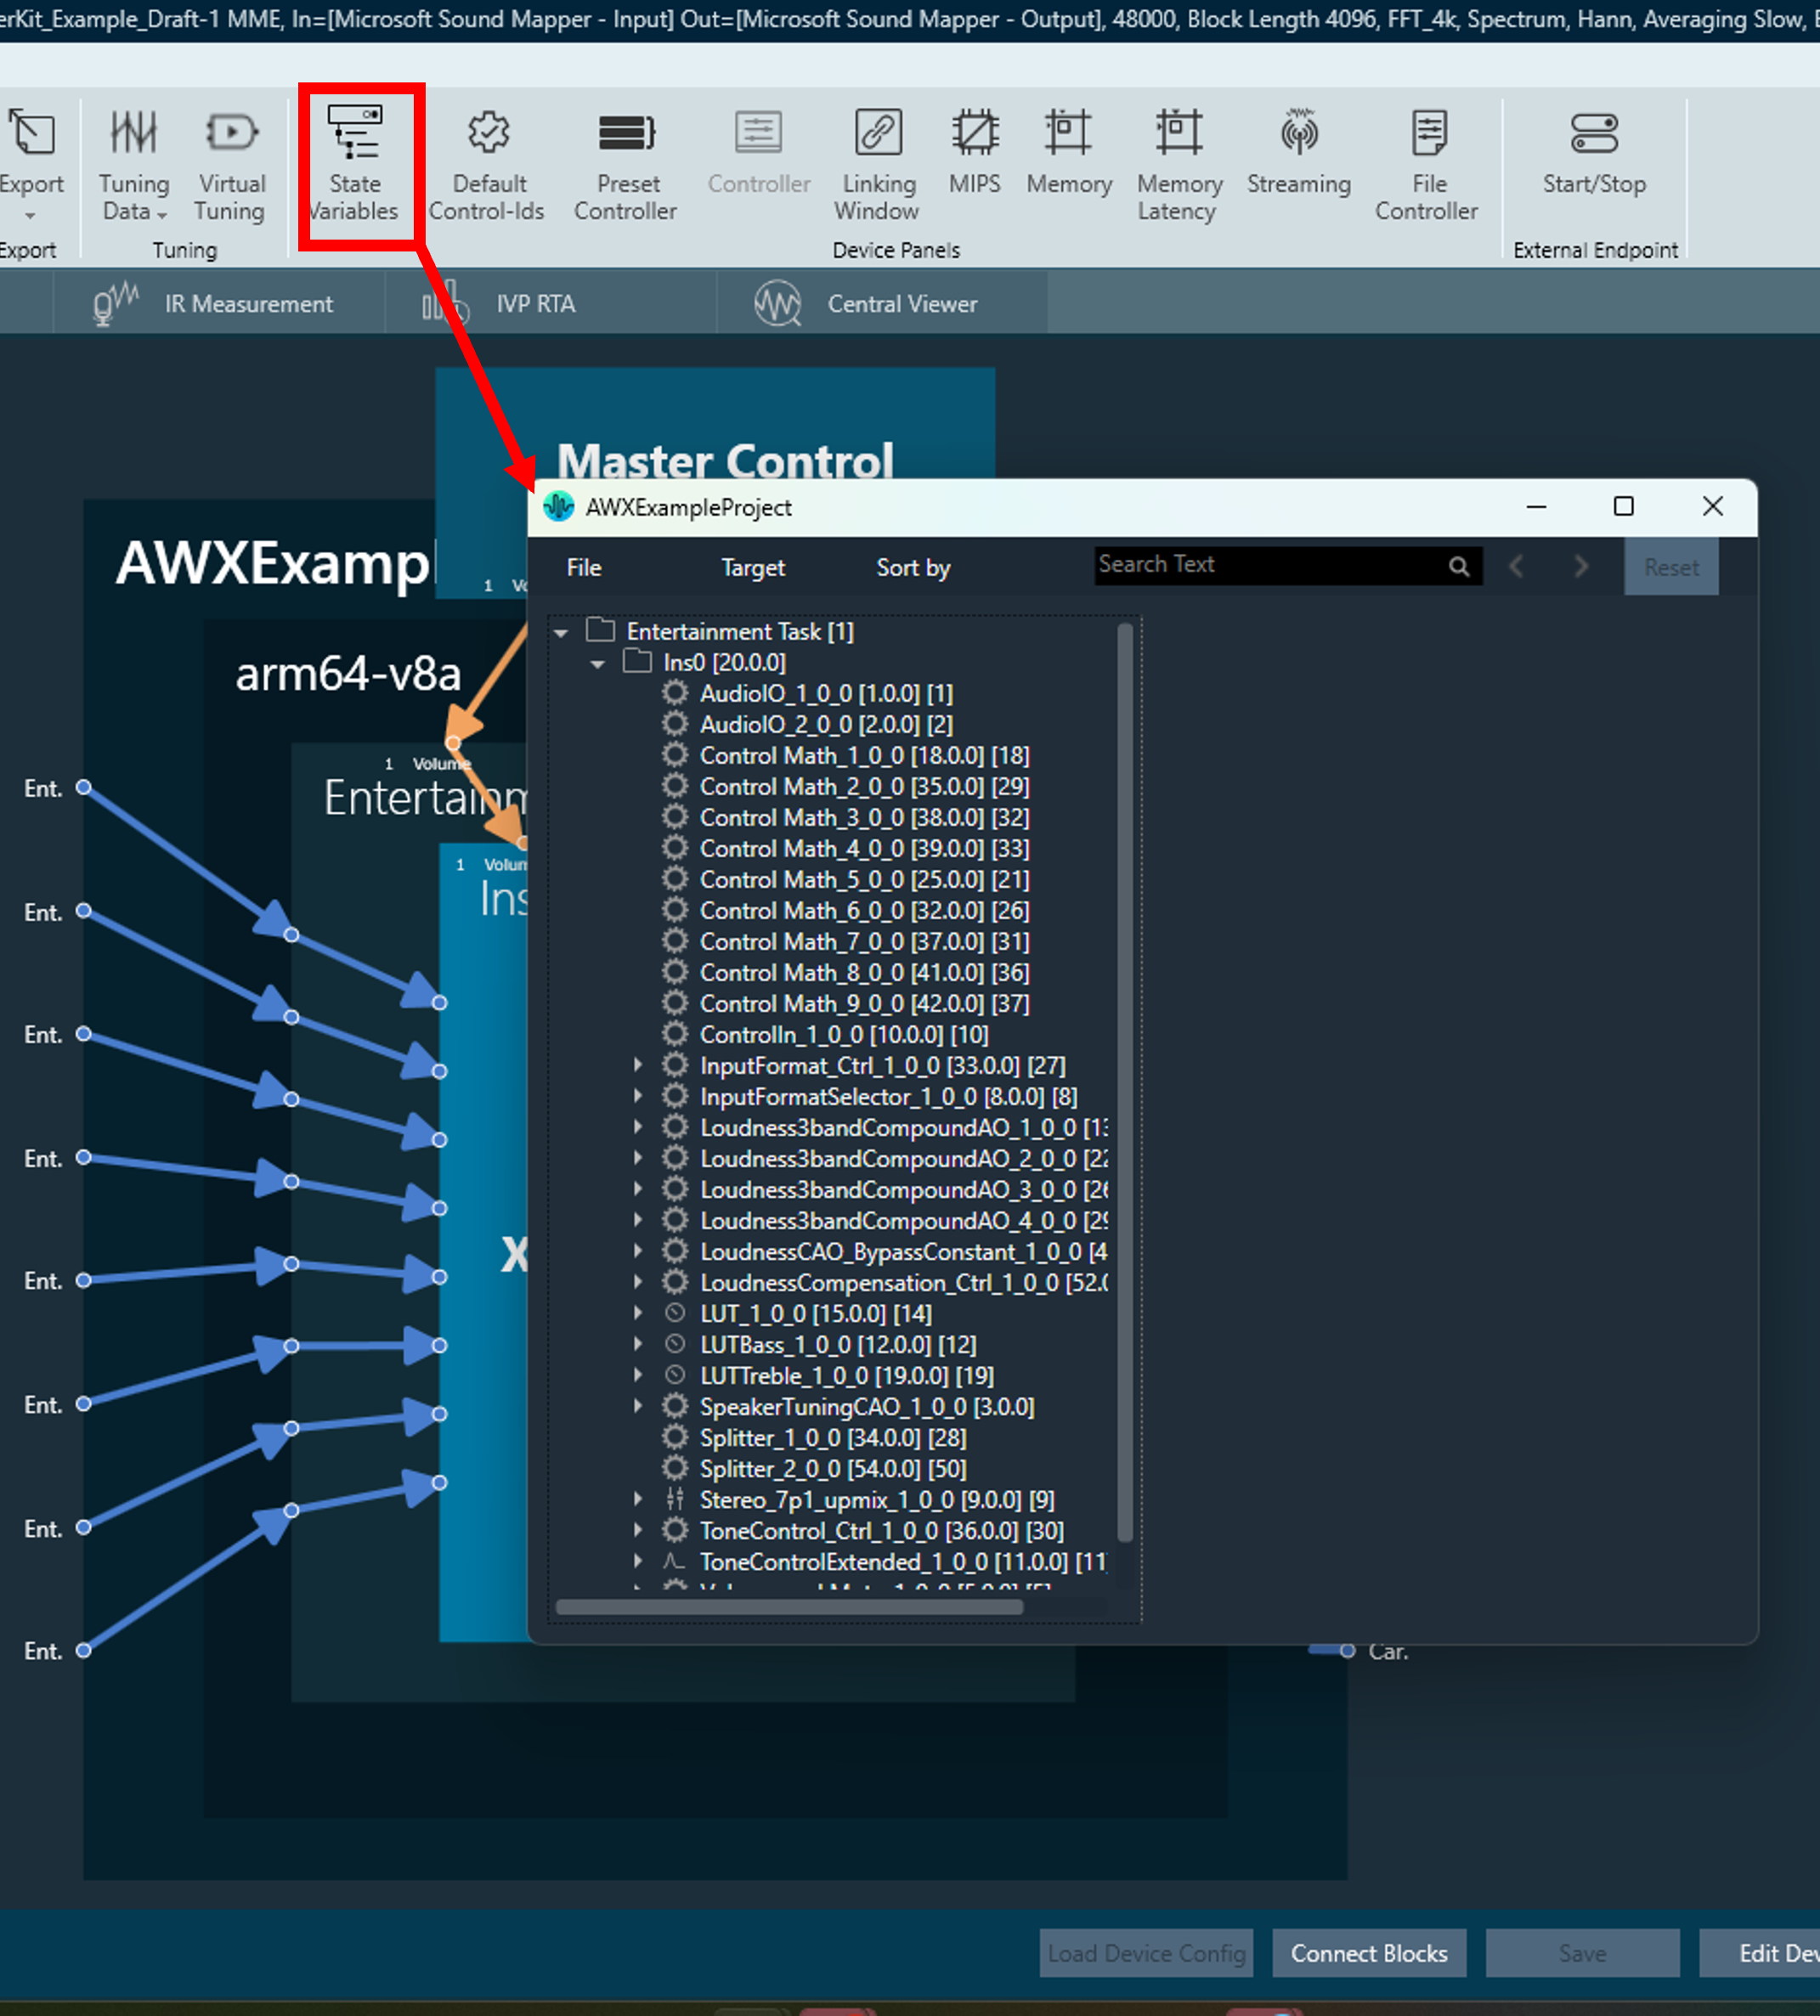
The rows in the State Variable explorer correspond to the names of the specific AOs in the signal flow. Expanding the row items in the tree display the tunable parameters of the AOs can be set in the right-half of the window.
Tuning using the Custom Panel
GTT offers the capability to design custom interface panels specific to the signal flow in the project using drag-and-drop method, allowing the user to define their own tuning interfaces with simple steps from the “Panel Designer” tab. For details on custom panel creation and usage, refer to Create a Custom Panel in GTT.
The AudioworX Starter Kit example project includes three custom tuning panels designed for tuning the audio processing pipeline by exposing essential tuning parameters for the AOs in the signal flow, namely:
- MainPanel – high-level tuning (volume, mute, bass, treble, preset selection and links to other sub-panels),
- CarTuning – car view for system level tuning parameters that depend on locations of the speakers and their spectral characteristics,
- RoomTuning – room view for system level tuning parameters that depend on locations of the speakers and their spectral characteristics for a 7.1 audio system,
To launch the panel, go to the “Panel Designer” tab and double-click the item named MainPanel in the Panels pane on the left-hand side of the view as shown below.
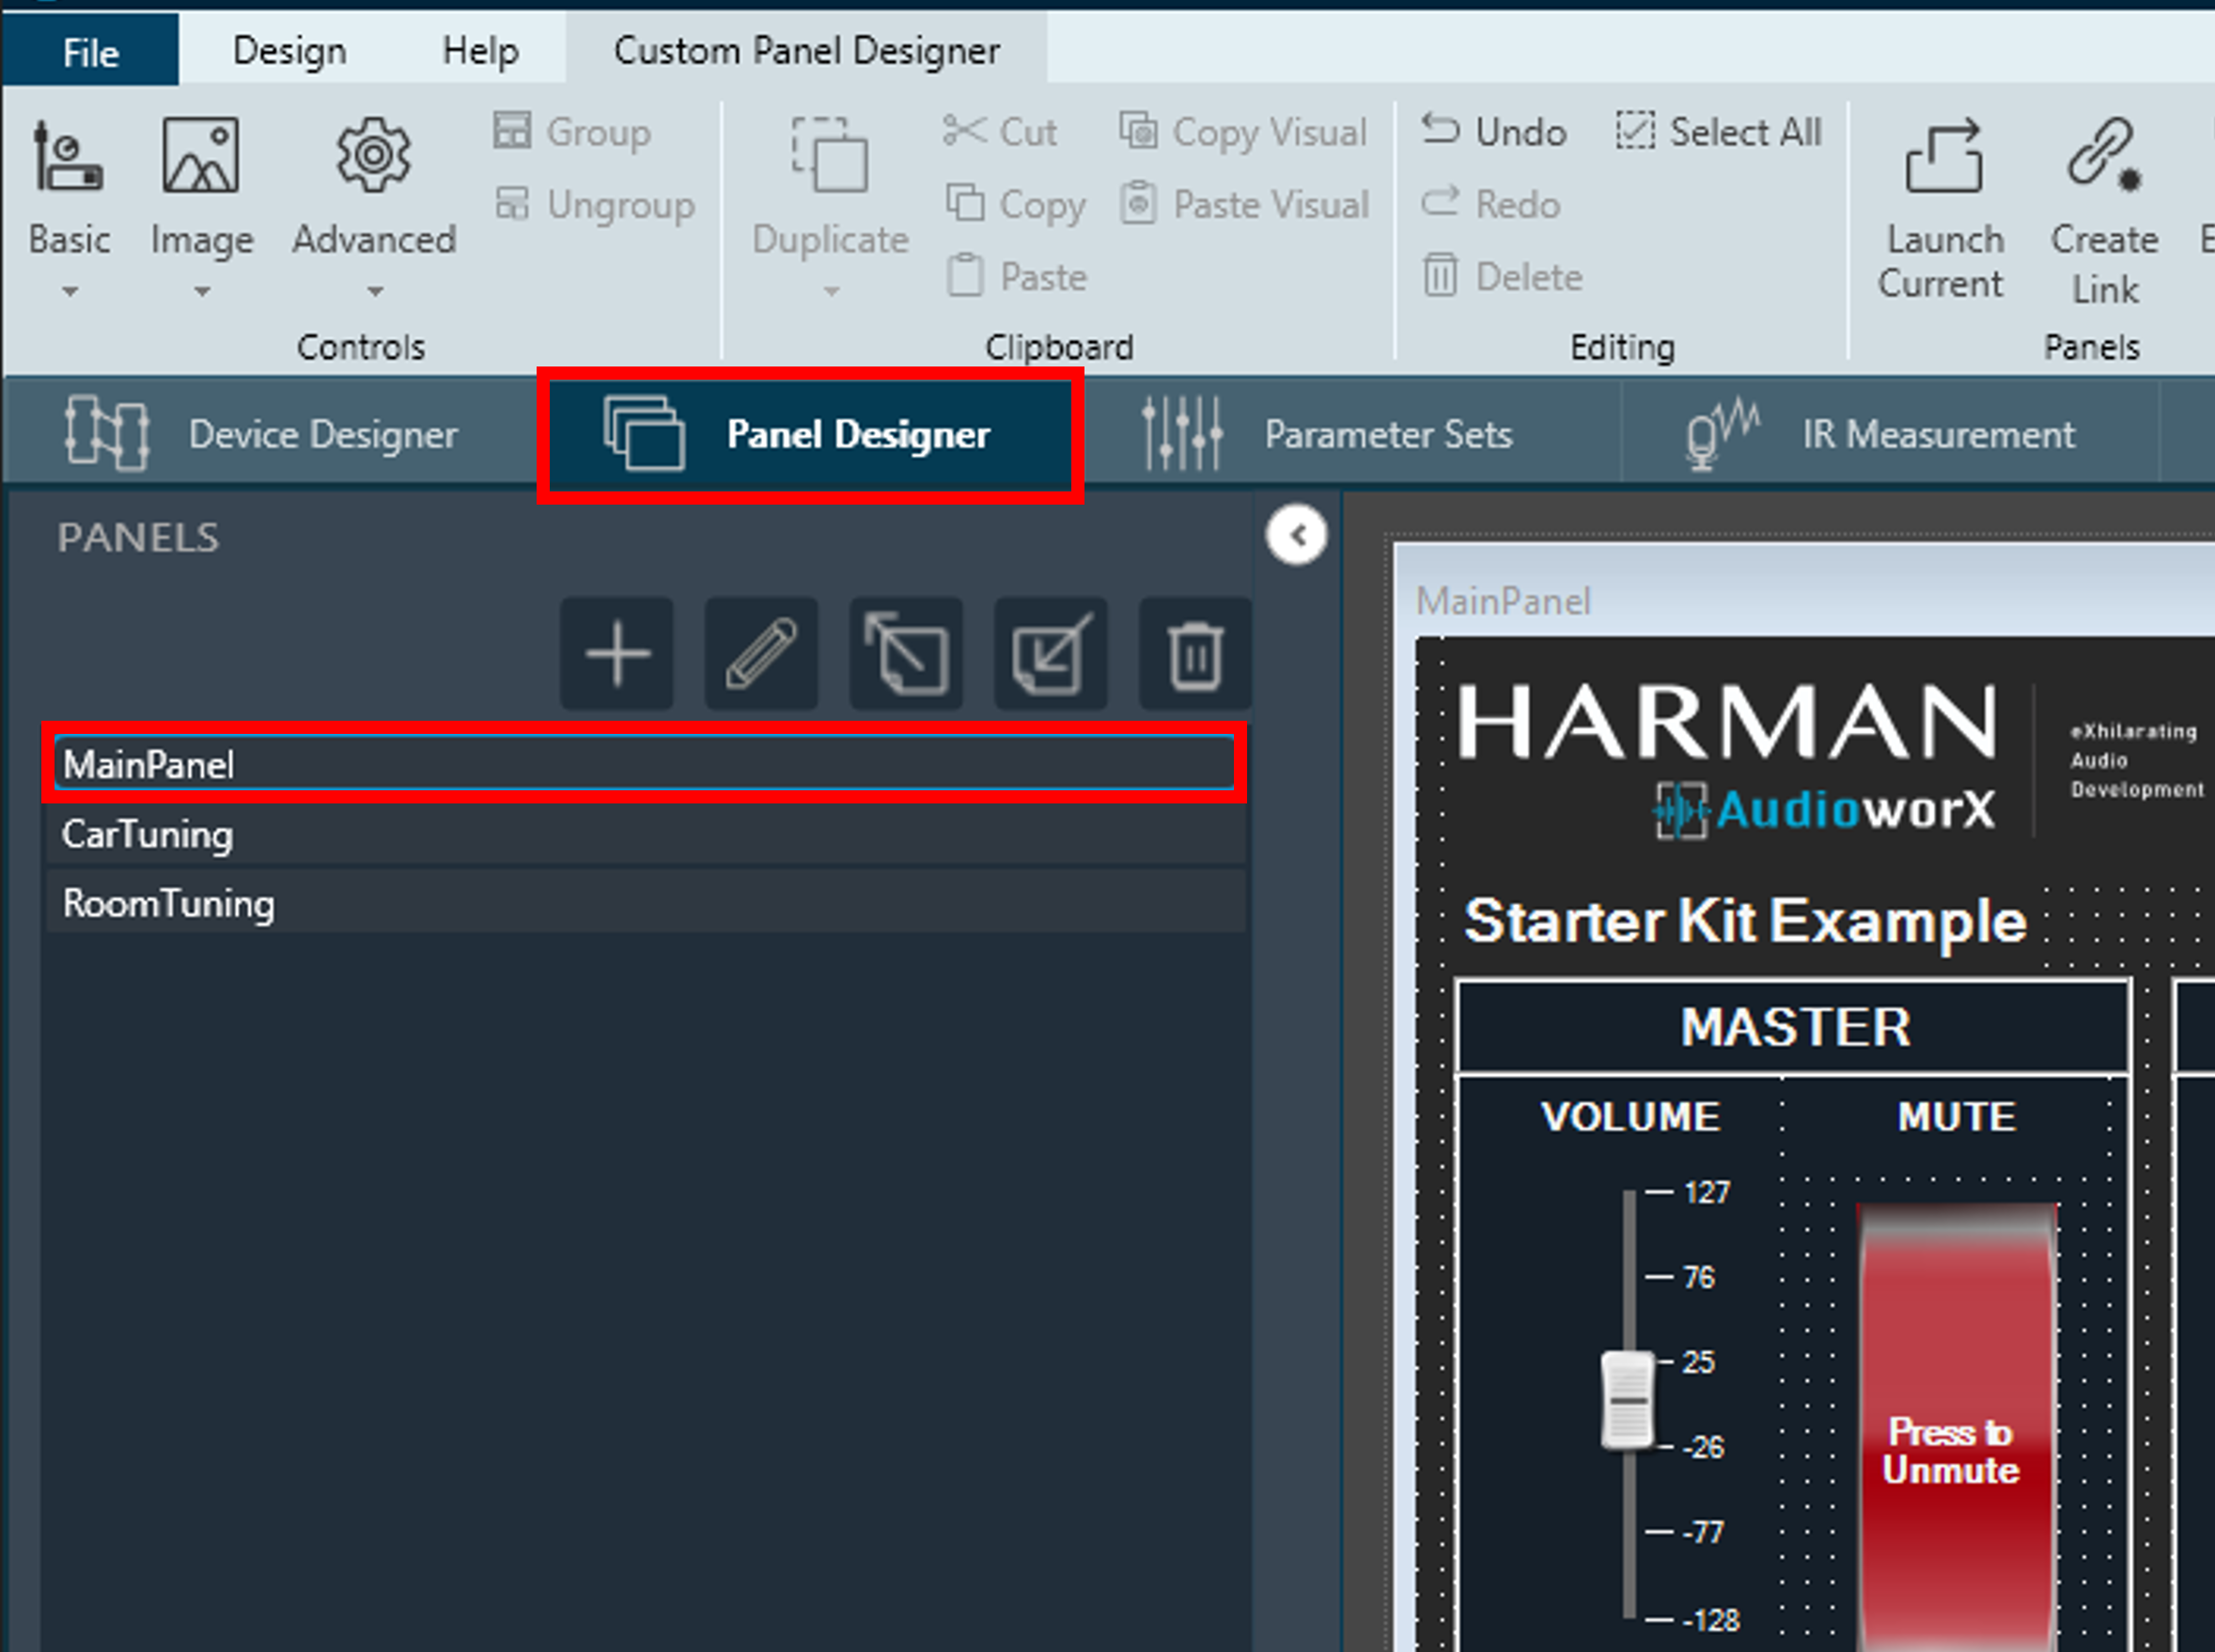
The panels in the Starter Kit example GTT project have “Notes” (yellow icons resembling sticky-notes) that contain special instructions or descriptions of the associated features which can be read by clicking on the icon. Additionally, the UI items, such as faders, buttons, drop-down menus, etc., have tooltips with brief descriptions that are displayed on hovering the mouse pointer over them.
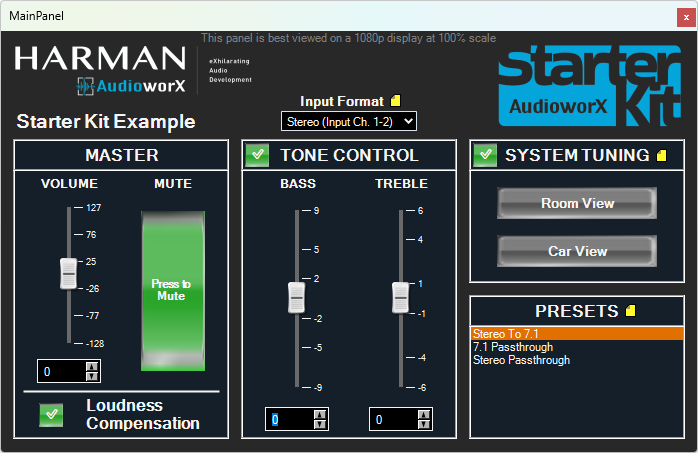
The main panel has high-level tuning parameters such as volume, mute, etc., and offers capabilities to turn on and off features such as Loudness Compensation, Tone Control and System Tuning. Apart from the controls mentioned, this panel also has buttons to open sub-panels for System Tuning interfaces. Below is an image showing the main panel.
With the HiFiBerry ADC8x add-on, up to 8 input channels are supported, allowing for a variety of use cases. In the example project, 2 formats of audio input are supported which are selectable from the Main Panel:
- Stereo Input: In this format, only the input channels 1 and 2 are used and the signal is up-mixed to all 8 output channels. The rest of the input channels (3 to 8) are disregarded.
- 7.1: In this format, the 8 input channels are assumed to be in the 7.1 channel configuration, which are processed and output through the 8 output channels. The input channel configuration is as follows:
- Channel 1 -> Front Left
- Channel 2 -> Front Right
- Channel 3 -> Center
- Channel 4 -> Subwoofer
- Channel 5 -> Surround/Side Left
- Channel 6 -> Surround/Side Right
- Channel 7 -> Rear Left
- Channel 8 -> Rear Right
The example project contains an object named “Speaker Tuning” to enable fine tuning of the audio signals sent to the physical speakers accounting for their locations from the listening position and their spectral characteristics. Two tuning panels have been included in the project, one providing the view of a room with a 7.1 speaker setup and the other providing the view of a car with 8 speakers, which can be opened by clicking the buttons named Room Interface and Car Interface, respectively.

The following are the key features of the two panels:
- Gain, mute and phase invert controls for individual speakers,
- LED indicators to show when audio content is playing through a given speaker (enabled by turning on the Streaming feature in GTT),
- Global mute and bypass functions,
- Signal flow representation at the bottom, showing the audio objects involved, whose native panels can be accessed by clicking their respective boxes for tuning.
Additionally, in the Room View, the speaker icons double-up as mute buttons to mute the individual speakers.
The Main Panel also has a “Presets” pane that lists presets stored in the Parameter Sets tab of GTT. The following section describes how to save and recall tuning presets.
Saving and Recalling Tunings using Parameter Sets
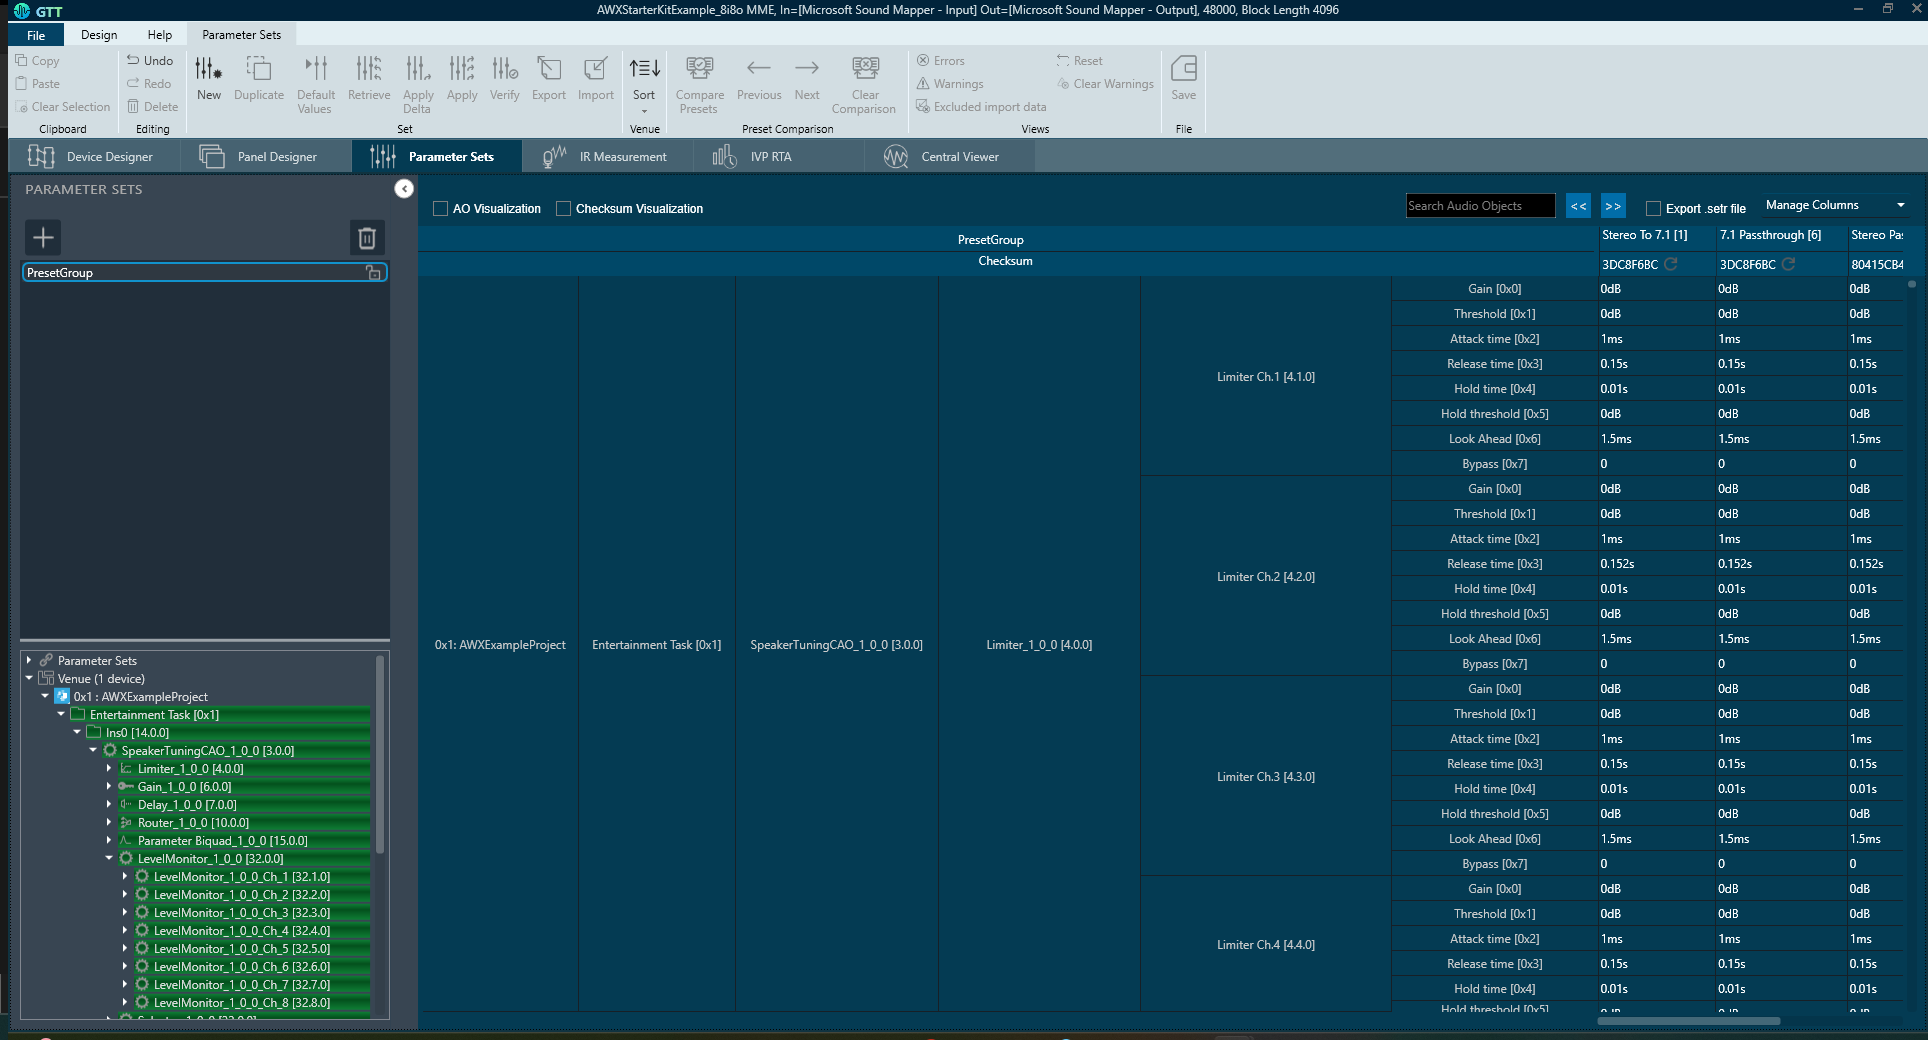
GTT enables users to save and recall tunings as presets from the “Parameter Sets” tab of GTT.
In the Starter Kit example project, 3 presets are created, namely:
- “Stereo To 7.1”: In this preset, all the features are turned on, the input stereo audio is up-mixed to 7.1 channel configurations and specific tunings are applied to the individual output channels to account for the speaker positions as an example. Note that only the first two input channels are active in this preset.
- “7.1 Passthrough”: In this preset, all the processing features are turned off and the 8 input channels are passed through directly to the output channels with only the volume and mute controls.
- “Stereo Passthrough”: In this preset, all the processing features are turned off and the 2 input channels are passed through to the corresponding output channels. Note that although the System Tuning feature may appear to be turned on, internally, there is no gain, delay, EQ, etc., applied to the 2 input channels.
For detailed information on the Parameter Sets tab and its features, refer to Parameter Set Components.
Saving Custom Tunings
To save the values of all the parameters upon tuning into a preset:
- Go to the Parameter Sets tab.
- Select the “PresetGroup” on the left-side pane,
- Click the New button on the top ribbon bar. This will create a new column named “Set<N>”, where N is the index of the new set. This may be overwritten as needed.
- Right-click the new column and select Retrieve to populate it with the current tuning settings.
- To overwrite an existing preset, right-click the preset column to be overwritten and click Retrieve.
In the example project, the presets (described above) store all tuning parameters in the signal flow. However, they may also be customized to store only a sub-set of all the tuning parameters in the signal flow using “Set Group” (left-side pane in the “Parameter Sets” view). For details on creating a new set group with a sub-set of tuning parameters, refer to Create a Parameter Set in GTT.
Applying Tunings from a Saved Preset
A preset can be applied to the target by right clicking the preset name and clicking the Apply button as shown below:
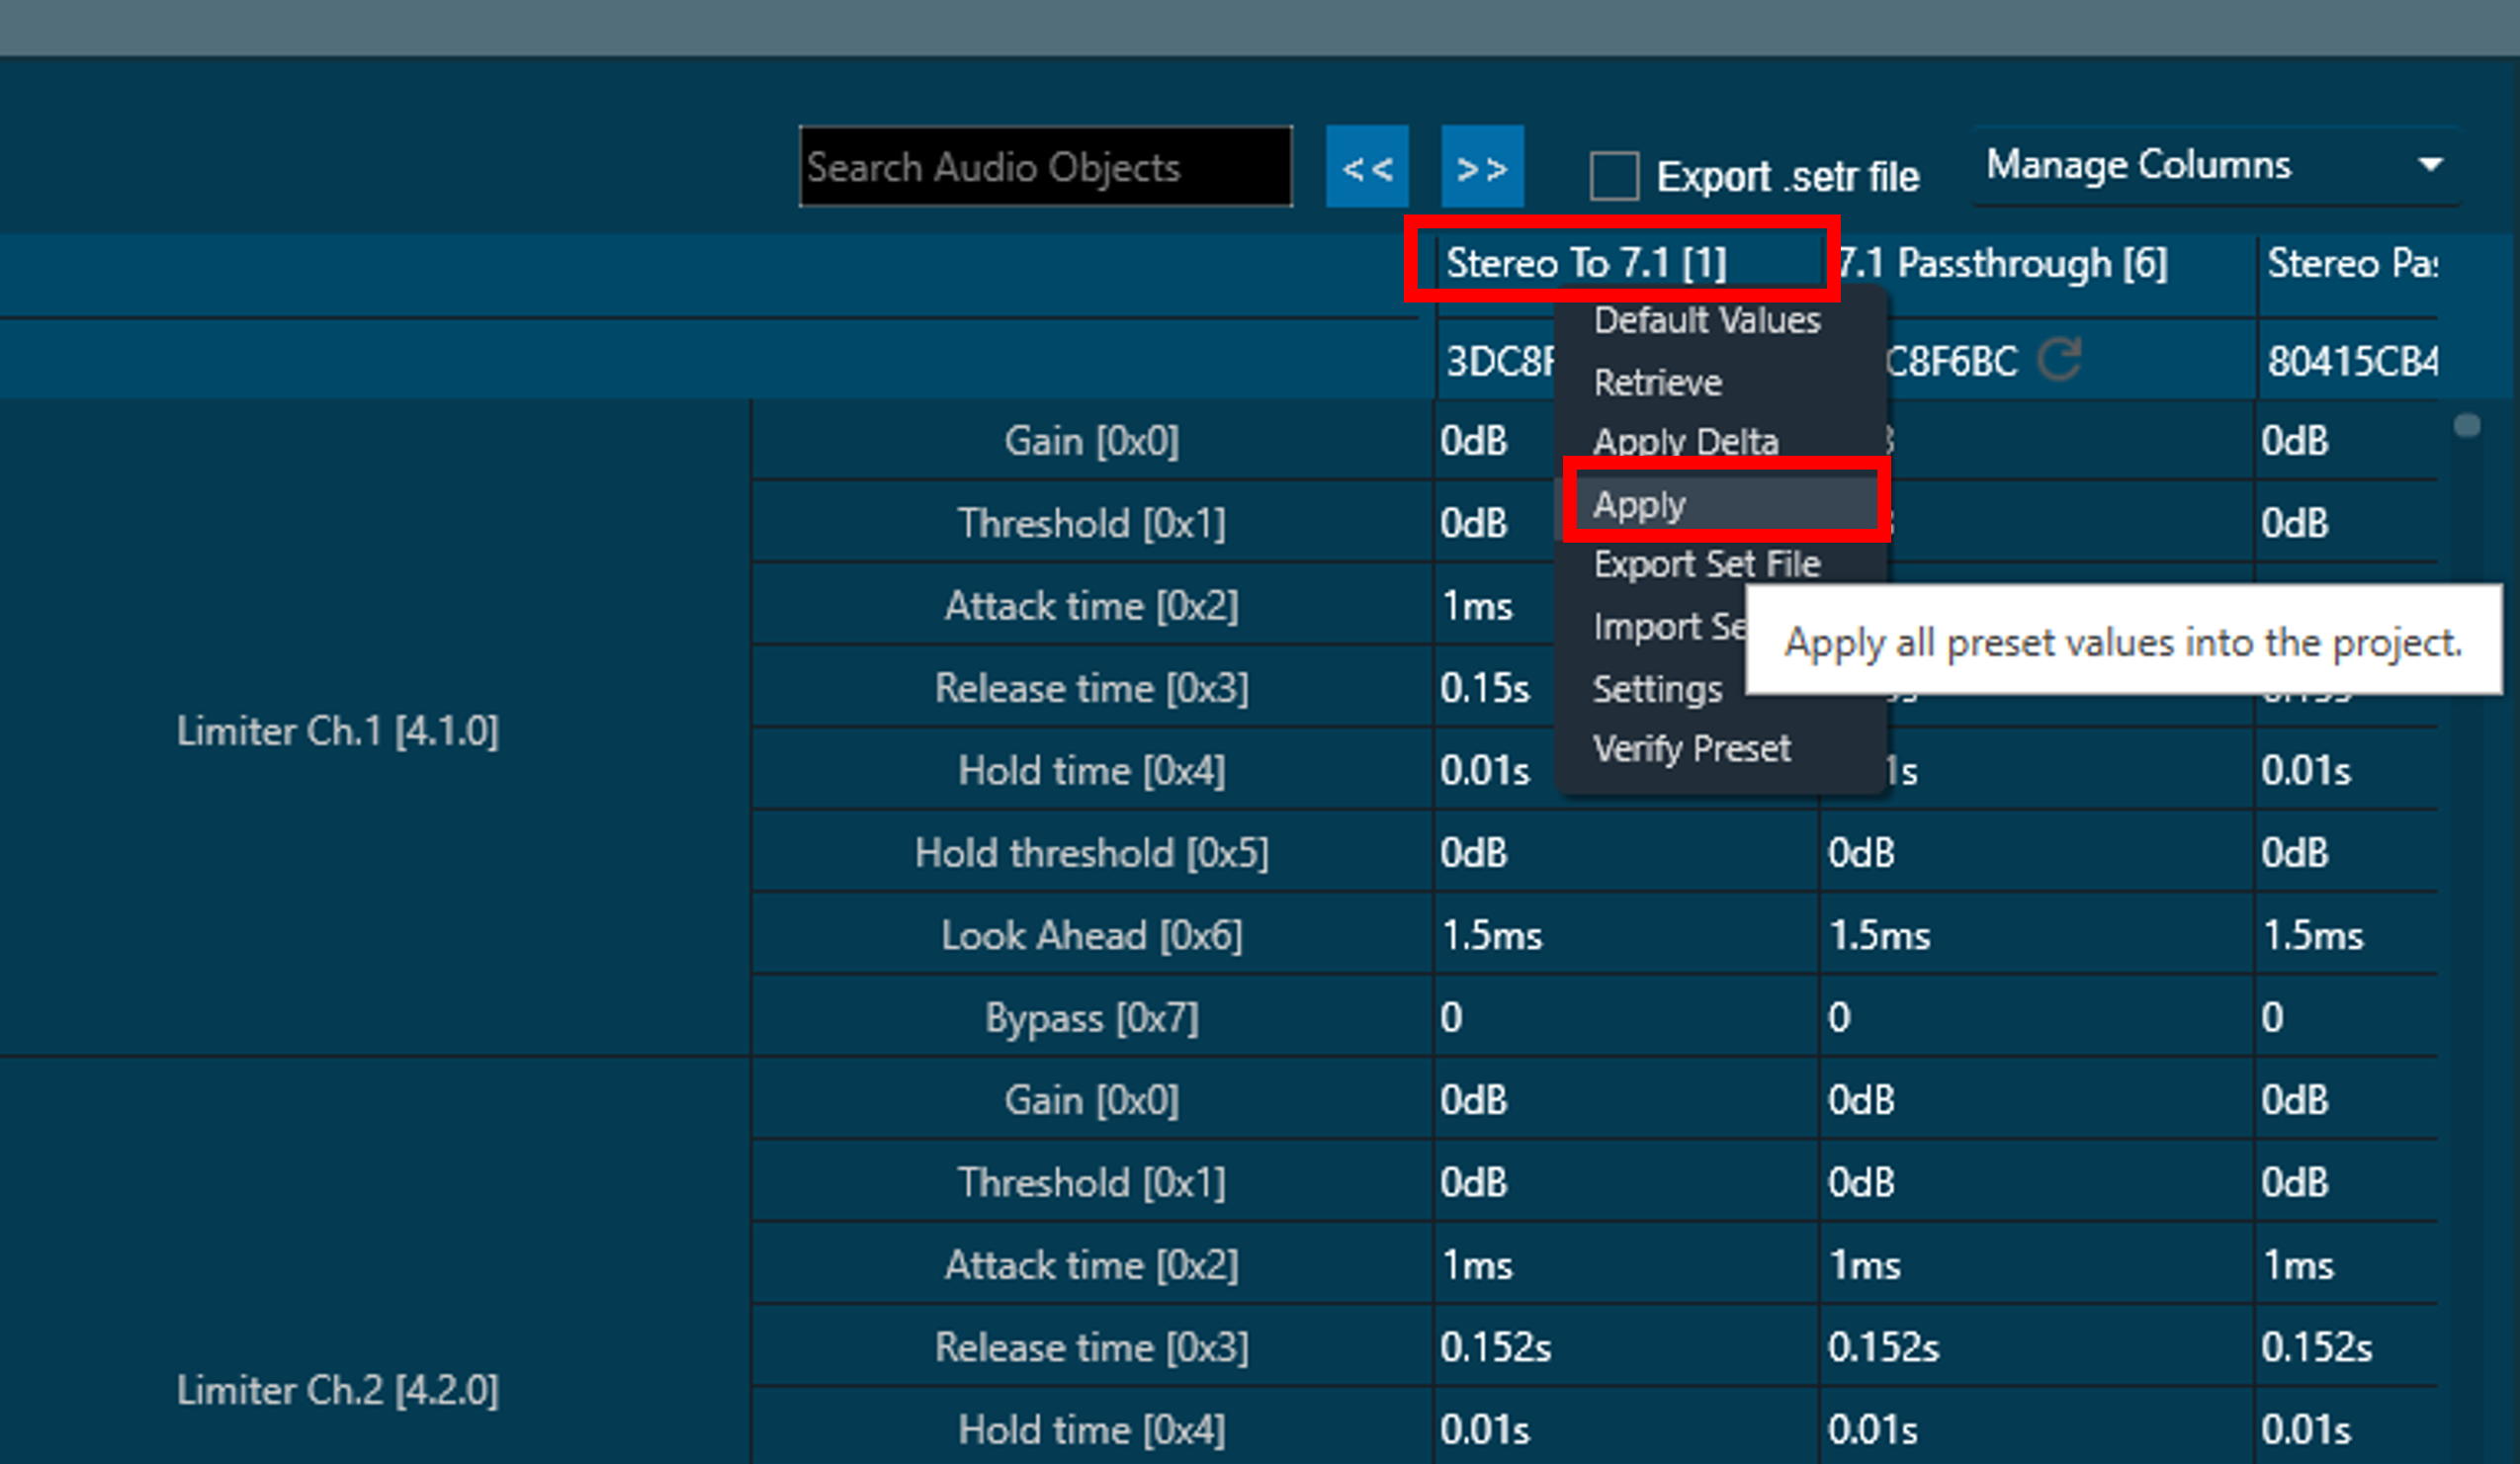
Applying a preset sets the tuning parameters in a live signal flow running in a target device (here it is the Starter Kit), only if the device is connected. If the target device (here, the Starter Kit hardware) is not connected to the GTT session, only the local states of the parameters within GTT will be updated, which then needs to be sent while connecting the device as described in Connecting to the AudioworX Starter Kit for Tuning
Managing Presets using the Preset Controller
GTT provides a method for recalling and managing presets using data files stored in the target device’s flash memory using the “Preset Controller”, which is accessible from the “Device Designer” tab of GTT as shown below.
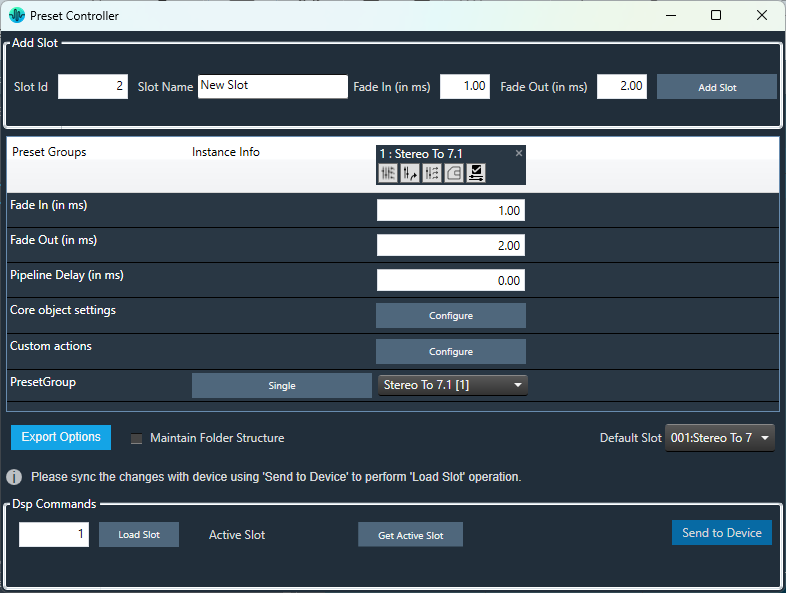
Presets made in the Parameter Sets tab can be mapped to slots in the Preset Controller, which represent preset files on the target device, for quick recall of presets. For more details on this feature, refer to Configure Preset Controller.
In the Starter Kit example GTT project, there is a single pre-made preset slot named “Stereo To 7.1”, which is intended as the startup configuration of the AudioworX Starter Kit upon boot-up and is set as the default slot. This slot is mapped to the “Stereo To 7.1” preset that is saved in the Parameter Sets tab, which is described in the previous section.