For all Audio Objects, inside their respective tuneXTP() methods, the received tuning data is NOT checked for valid range limits.
– If the Audio Object (AO) is tuned from GTT, the GTT ensures that the tuning parameters remain within the range prescribed by the toolbox methods.
– If the Audio Object (AO) is tuned using methods other than GTT, like SVE or xTP tuning, it is the responsibility of those entities to ensure that the tuning parameter values remain within the valid range as mentioned in the Audio Object Description User Guide.
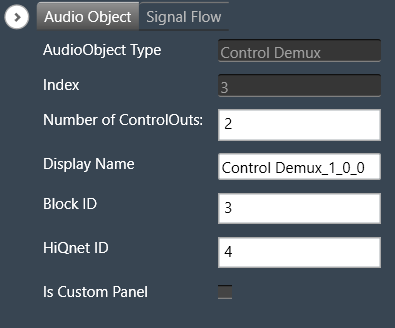
All audio objects describe their features, attributes and capabilities to the tuning tool through meta data that are used in signal flow design.
The list of supported core types by each audio object is one among them. If the list is empty, it indicates that there are no restrictions and the audio object is supported on all core types.
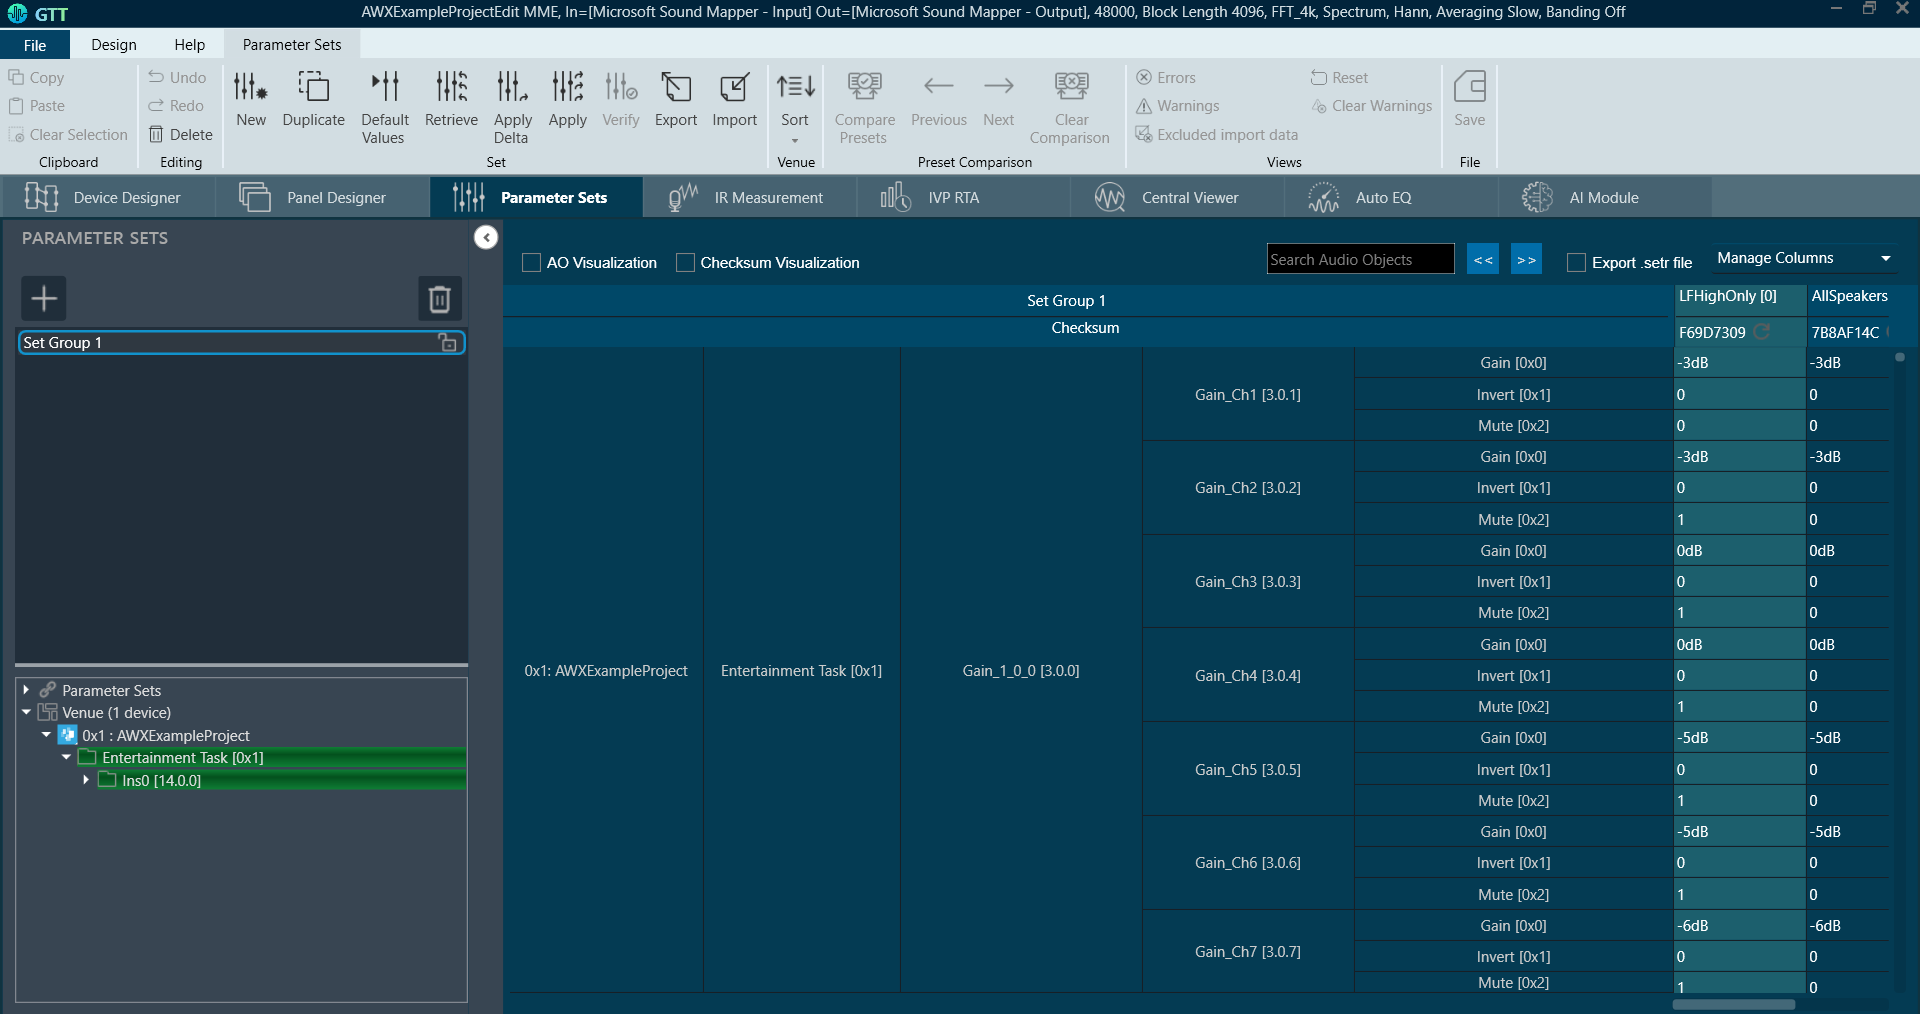
GTT allows you to tune the audio object memory by setting values using Parameters Set and measuring the audio experience.
The Parameter Sets show the tuning data of all the set of objects used in the signal flow design. These sets can be easily maintained, exported, and shared with others. Additionally, the Parameter Sets allow you to save the progress of the tuning of the audio objects at every milestone point. As a result, you can return to any level and start fine-tuning the device.
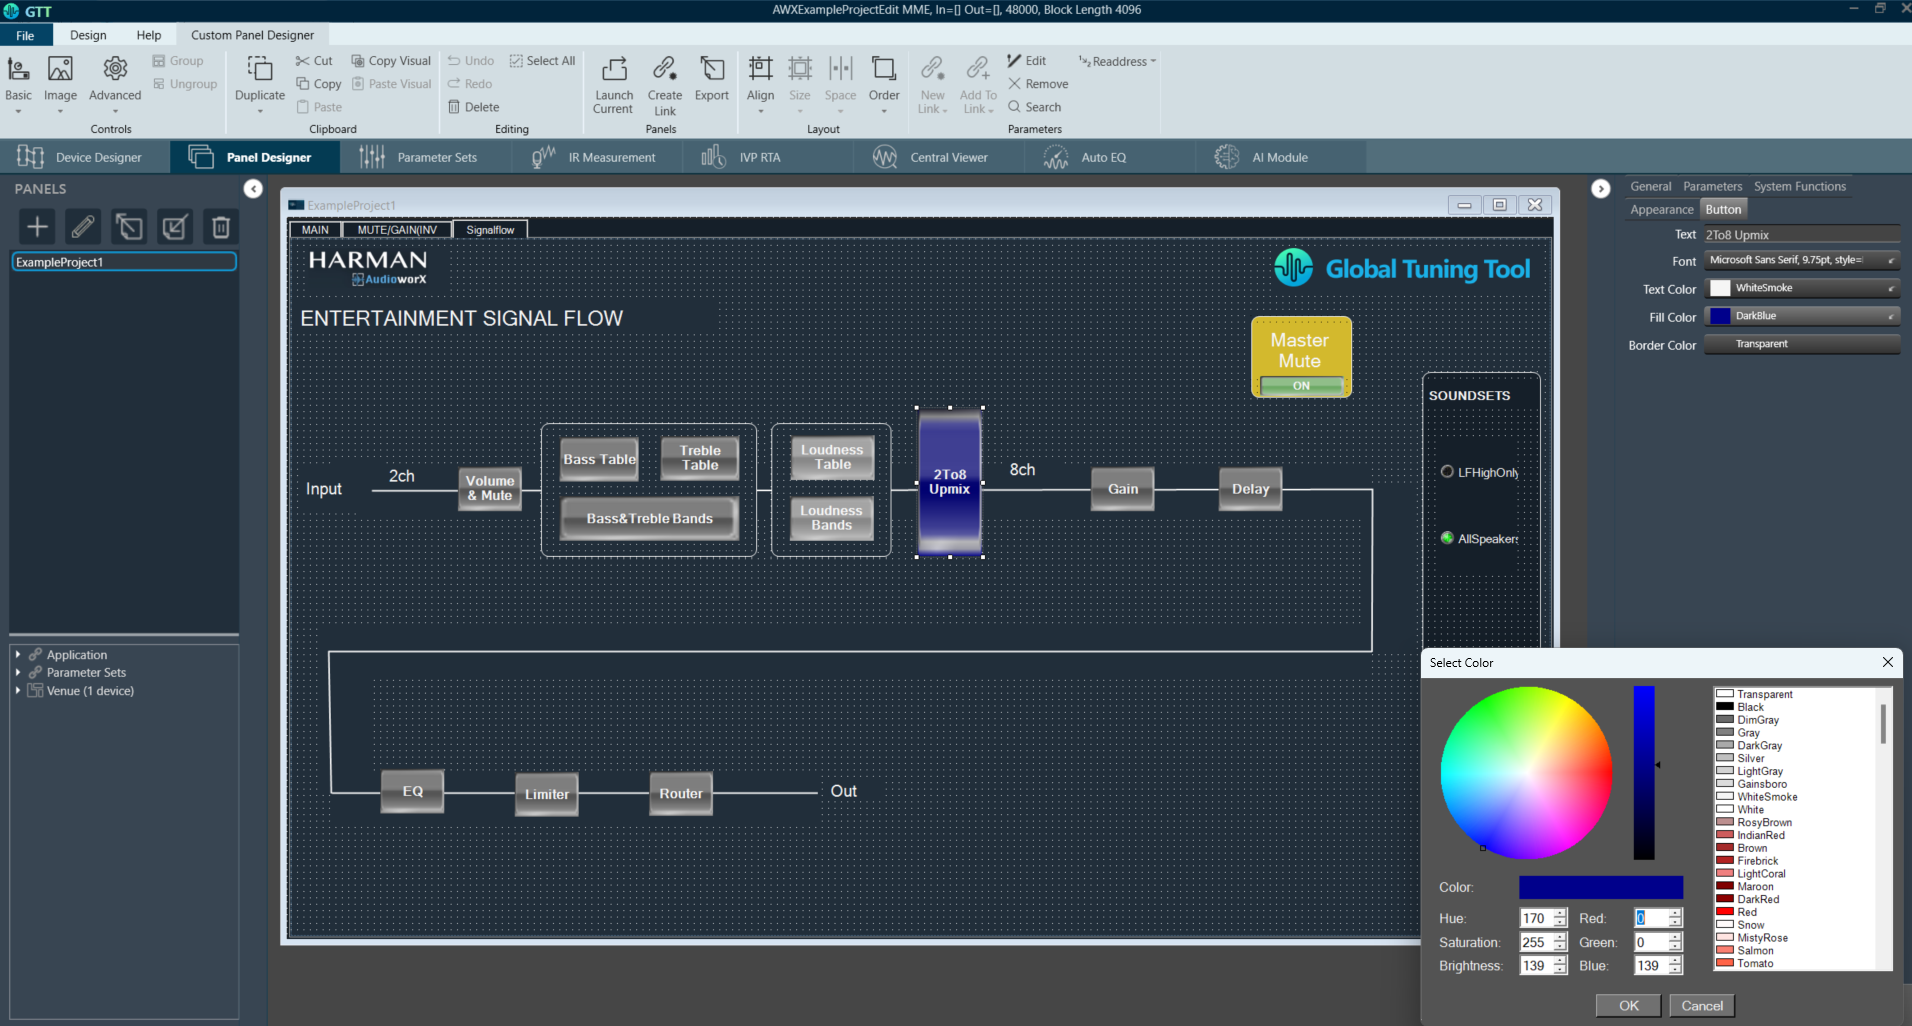
The Panel Designer offers a streamlined and user-friendly workspace designed for creating custom panels tailored to specific audio tunning needs. It features a variety of components and tools that facilitate the design and editing process. Using Panel Designer, you can quickly create a custom panel with all the elements you need and link the panel with a desired audio object. Let us have a look at some of the components of the Panel Designer workspace.
Key Features of Panel Designer
Ribbon Interface: The main interface includes a ribbon divided into several groups,
Controls: To access and utilize various panel controls.
Clipboard: For copy and paste functionalities.
Editing: Tools for modifying elements within the panel.
Layout: Options for arranging the panel components.
Parameters: To manage the settings and configurations of the panel.
Panels View: This section displays all custom panels, allowing users to create, delete, or import panels. It also provides access to the Venue Explorer for viewing devices, applications, and parameter sets.
Properties View: Located on the right-hand side, this area shows the properties of each component, enabling users to customize the panel according to their requirements.
Toolbox: Users can employ various tools found in the Toolbox to build custom panels effectively
Editor Windows: Editor windows linked to corresponding properties for streamlined customization.
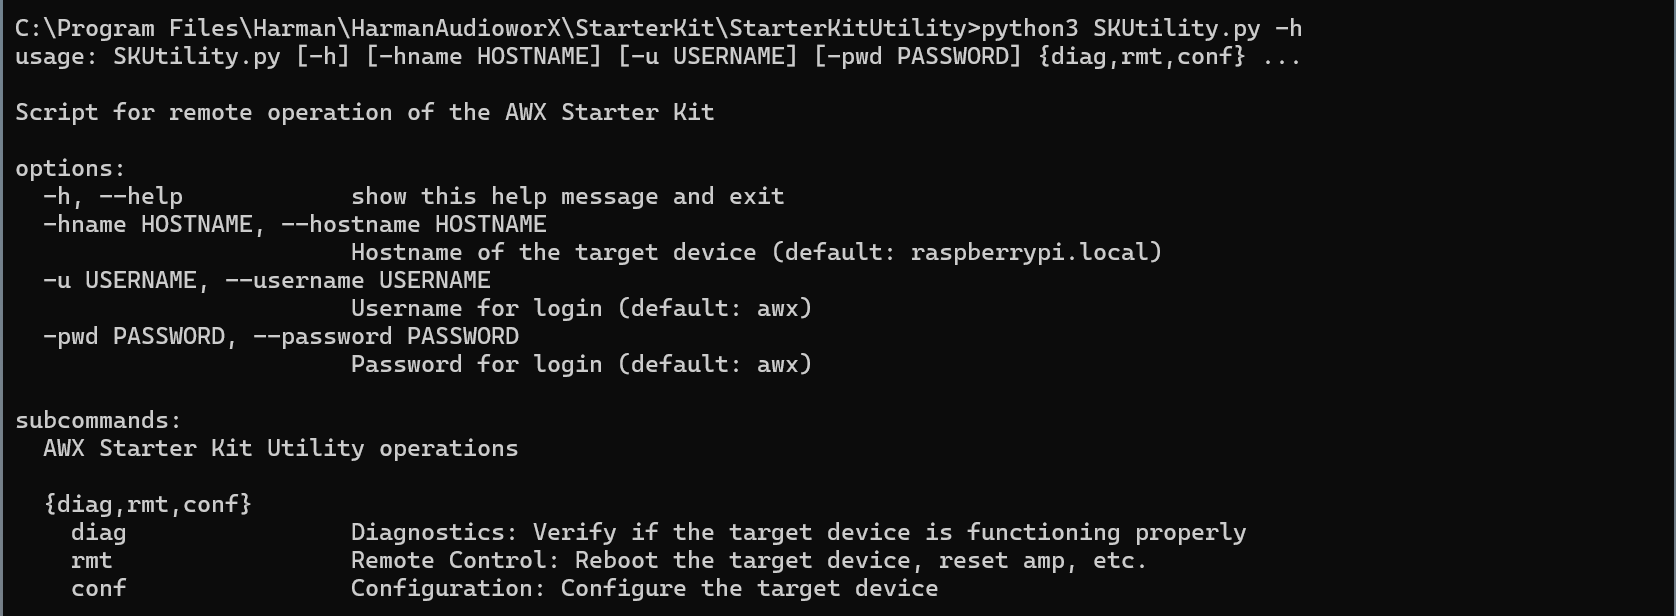
The SKUtility Tool has a command-line interface (CLI) that is included in the GTT installation. It is a Python script (SKUtility.py) that enables users to programmatically control the Starter Kit for advanced use-cases that may require rebooting, resetting, etc., without human intervention. This page describes the CLI tool and its usage in detail. Common useful commands are given in Useful SKUtility Commands.
The SKUtility.py script is not “installed” in the PC environment along with GTT and requires to be run from the GTT installation directory where it is stored.
Installing the Python Pre-Requisite Packages
The SKUtility.py is a Python script and requires Python 3.12 to be installed on the PC to be able to run. Download Python 3.12 and install it on the PC before proceeding.
The SKUtility.py script can be found in the default GTT installation directory “C:\Program Files\Harman\HarmanAudioworX\StarterKit\StarterKitUtility”. This directory has a requirements.txt file that lists all the python dependencies needed to run the script and remotely operate the Starter Kit hardware. To install the Python dependencies:
Open a Command Prompt window (or any terminal of choice of the user, for example, PowerShell, MSYS2 or git bash) from the start-menu,
Change directory to the location of the SKUtility.py script in the GTT installation directory as follows:
cd C:\Program Files\Harman\HarmanAudioworX\StarterKit\StarterKitUtility
Run the following command to install the python pre-requisites as shown below:
python3 -m pip install -r requirements.txt
SKUtility.py Usage
The “SKUtility.py” script takes command-line arguments as shown in the help text, which can be displayed by running the following command:
python3 SKUtility.py -h
SKUtility Command-line Help Text
The script, by default, connects to a target with the hostname “raspberrypi.local” and the username and password as “awx” (default credentials for the Starter Kit). This can be changed using the “-hname” argument for the hostname, “-u” argument for the username and “-pwd” argument for the password, if they are different from the default.
The Utility tool supports operations/actions that are classified into 3 functions or sub-commands:
Sub-command
Function
Description
diag
Diagnostics
Verify if the target device is connected and is functioning as expected
rmt
Remote Control
Perform actions such as rebooting the Raspberry Pi, resetting the AWX amp application, etc.
conf
Configuration
Configure the audio device to use and Wi-Fi to connect to
The following sub-sections describe each function in detail along with the usage.
SKUtility Diagnostics
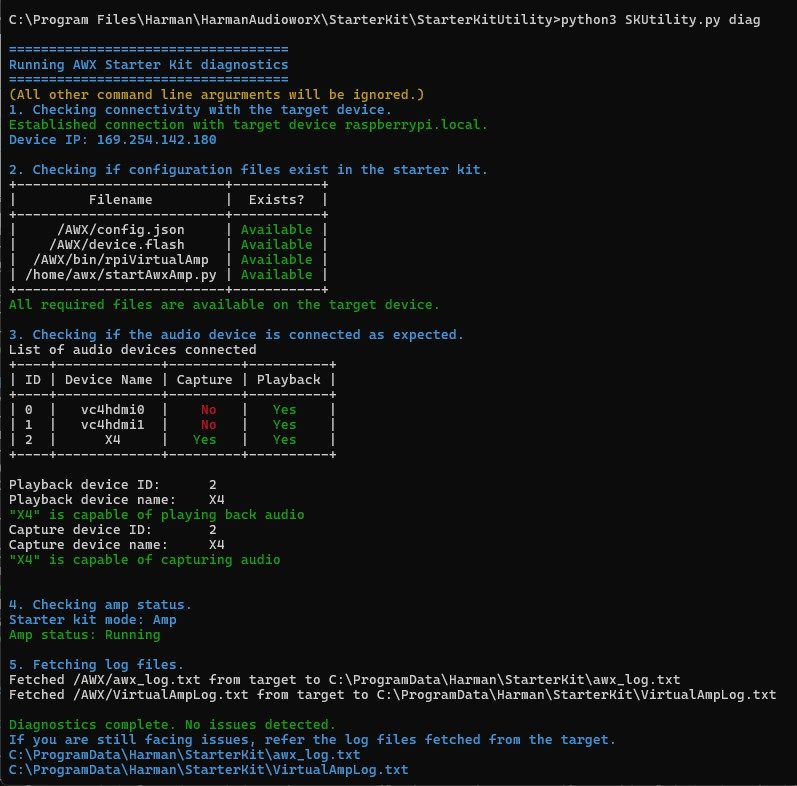
This function runs a series of checks to verify if the Starter Kit hardware is functioning as expected. The diagnostics report can be generated by running the command:
python3 SKUtility.py diag
Following is an example report that shows a working Starter Kit setup.
The diagnostics only finds issues in the configurations of the hardware that may be preventing proper operation of the AWX Amp application. If the Starter Kit is not functioning properly despite the diagnostics report showing no issues, refer to the log files fetched during the diagnostics to debug. The details on debugging using the Amp log file are given in the “AWX Amp Application Logs” section of Starter Kit Troubleshooting.
The “SKUtility Diagnostics Report” section in Starter Kit Troubleshooting describes the steps in the diagnostics in detail and highlights troubleshooting steps for resolving issues detected.
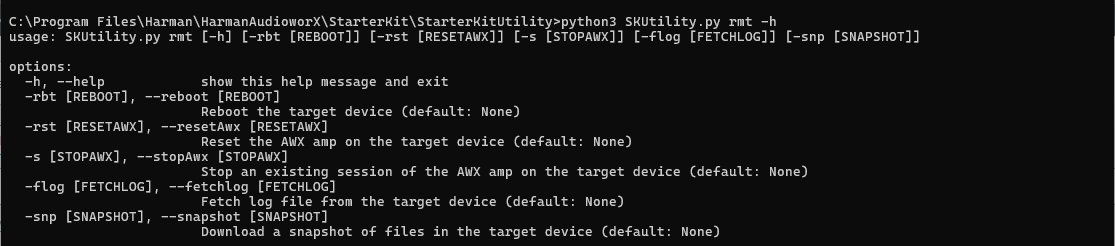
SKUtility Remote Control
This function/sub-command provides actions such as rebooting the Raspberry Pi, resetting the AWX Amp application, fetching log files and taking a snapshot of the Starter Kit data files.
The following image shows the help text for this function.
SKUtility Remote Control Command-line Help Text
The following are the actions that can be executed under the Remote-Control function:
Remote-Control Function
Command
Reboot the Raspberry Pi
To reboot the Raspberry Pi remotely, run the command python3 SKUtility.py rmt -rbt The utility tool will then trigger reboot and wait until the Raspberry Pi is booted up and reachable by the PC. This command may take about a minute.
Reset the AWX Amp Application running in the Starter Kit Hardware
To reset the AWX Amp application (needed when updating the device definition on GTT), run the command python3 SKUtility.py rmt -rst
Stop the AWX Amp Application
To stop the AWX Amp application, run the command python3 SKUtility.py rmt -s
Fetch Log Files
To fetch the log files from target, run the command
python3 SKUtility.py rmt -flog
This will fetch two log files from the target Starter Kit hardware and open the file location with the following files:
awx_log.txt: This file contains logs related to booting up of the Starter Kit hardware and running of the AWX Amp application.
VirtualAmpLog.txt: This file contains logs from the xAF framework that include initialization of the audio core, core AO, xAF instances, etc., based on the signal flow flashed on the Starter Kit hardware from GTT.
Take a Snapshot of the Data Files on the Starter Kit Hardware
The SKUtility.py can be used to take a snapshot of the data files in the Starter Kit hardware, either for saving the state of the Starter Kit or to send Harman AudioworX support for debugging, run the command: python3 SKUtility.py rmt -snp
This will take a snapshot, fetch a .zip file from the Starter Kit, and open the file location.
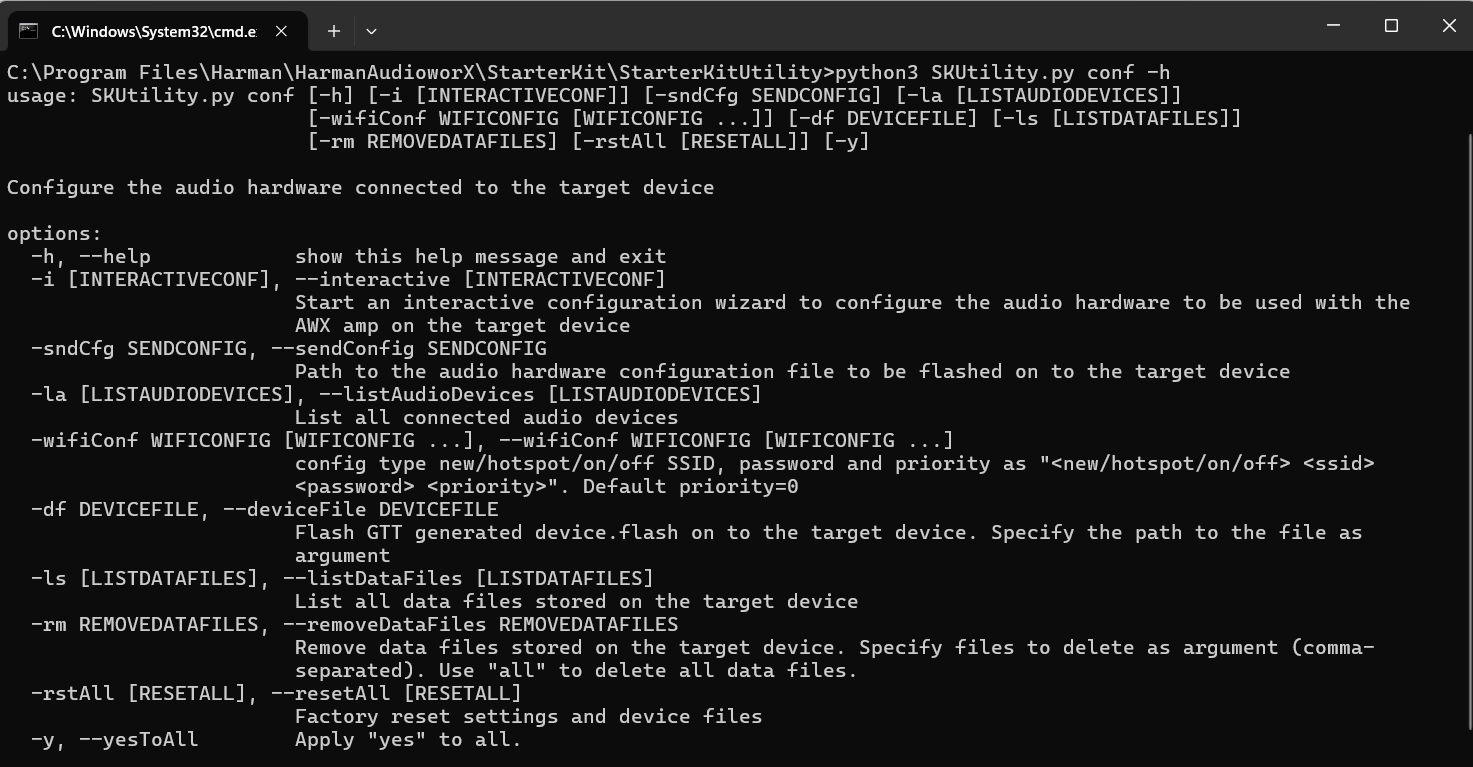
SKUtility Configuration
This function provides configuration options for the user to configure the behavior of the Starter Kit hardware, and the audio interface connected. The following is the help text for this function.
The following are the actions that can be executed under the Configuration function:
SKUtility Configuration
Descriptions
Interactive Audio Device Configuration
The utility tool provides an interactive setup wizard for configuring the audio device to be used by the AWX Amp application. This is necessary when using a different audio interface than the Creative Sound Blaster X4.
To start the interactive setup wizard, run the command python3 SKUtility.py conf -i
The wizard takes the user through the following steps:
Specify the name of the .json file to save the configuration locally. This is useful to avoid going through the interactive menu if the user wants to revert to a known configuration. Type the file name (default file name is if no input is provided is “config.json”) when prompted.
Set the start-up mode for the Starter Kit hardware. The Starter Kit can be set to boot up in one of 2 modes.
Amp Mode – In this mode AWX Amp application is automatically started on when the Raspberry Pi is booted up.
Dev Mode – In this mode, the auto start of the AWX Amp application is disabled. This mode is only meant for developers.
If no input is provided by the user, the default mode chosen in the “Amp” mode.
Select the device for capture and playback from the displayed list of connected audio devices with their audio capabilities. Type the IDs for capture and playback devices when prompted.
Set the selected configuration on the Starter Kit hardware by sending the saved config.json file to the target hardware.
The below figure shows the interactive configuration menu where the no input is provided for the filename and the Starter Kit modes, and the sound card named “X4” (Creative Sound Blaster X4) is chosen as the device for both input and output.
Send a Previously Saved Audio Device Configuration
This is used to send a previously saved audio device configuration file generated by the interactive wizard.
run the command:
python3 SKUtility.py conf -sndCfg
List Audio Devices Connected to Raspberry Pi
To list the audio device connected to Raspberry Pi, run the command. python3 SKUtility.py conf -laThis command will display all the connected audio capable devices along with their capture and playback capabilities.
Set a Wi-Fi for Raspberry Pi to Connect
This command is used to configure a new Wi-Fi for the Starter Kit to connect to, by specifying the ssid (Wi-Fi name), password and optionally, the auto-connect priority for the Wi-Fi. Run the command: python3 SKUtility.py conf -wifiConf new <SSID> <password> <priority>The below figure shows how to configure a Wi-Fi named “awx_wifi” with the password “awx_wifi_password” and an auto-connect priority of 10.
The optional “priority” parameter can be used to set the priority of the Wi-Fi connection for the Starter Kit to auto-connect on boot-up in the range (-999, 999), where higher the number, higher the priority. By default, the priority is set to 0. This parameter is useful when there are multiple Wi-Fi connections available and to prioritize them as required. The user can choose to reboot the Starter Kit to save changes and connect to the Wi-Fi network based on priority. The above figure shows that the Starter Kit has successfully connected to the new Wi-Fi on reboot. The user can also configure the Raspberry Pi 5 to behave as a Wi-Fi hotspot for the PC to connect to, using the following command: python3 SKUtility.py conf -wifiConf hotspot <SSID> <password> <priority>
To turn off the Wi-Fi on Raspberry Pi, use below command:python3 SKUtility.py conf -wifiConf off
To turn on the Wi-Fi on Raspberry Pi, use below command:
python3 SKUtility.py conf -wifiConf on
Flash a Device File
To flash a device file generated from GTT on to the Starter Kit hardware, run the command:
python3 SKUtility.py conf -df <device file path>
The “device.flash” is necessary for a signal flow to run on the AWX Amp application. The steps for generating the “device.flash” file on GTT are illustrated in “Configuring a Custom Device Compatible with the AudioworX Starter Kit” in the “Adding a Device to the Project” section of Creating a New Project on GTT.
List Data Files on the Starter Kit
To list the data files that are currently stored in the Starter Kit, run the command:
python3 SKUtility.py conf -ls
The AWX Amp application makes use of data files with the extensions “.flash”, “.set” or “.info” sent from GTT for initializing the device, signal flow, presets, etc.
Remove Data Files from the Starter Kit
To delete data files (“.flash”, “.set”, “.info”) from the Starter Kit hardware, run the command:
python3 SKUtility.py conf -rm <list of files to be deleted or wildcards>
It may be required by a user to delete some or all the data files to roll back actions or start afresh before flashing a new project with device definition being different than the project that the Starter Kit hardware is currently flashed with. For example, the new project may have a different number of audio inputs, outputs, xAF instances, virtual cores, etc. In such cases, the user may need to wipe out the data files from the Starter Kit and flash new data files from GTT. The files that are stored in the Starter Kit hardware can be listed by using the “-ls” argument. Alternatively, to remove all data files from the Starter Kit hardware, run the command: python3 SKUtility.py conf -rm a
Running the “conf -rm a” command will all data files command will also delete the “device.flash” file which will have to be restored as directed in Flash a Device File or by resetting configuration (given below).
Reset All Configurations to Default
To reset the Starter Kit hardware to its default state, run the command:
python3 SKUtility.py conf -rstAll
The reset all action goes through the following steps:
Get confirmation from the user to reset all configurations. If confirmed, all files related to AudioworX will be removed from the Starter Kit hardware and restored to their default states, effectively re-installing the version that is included in the GTT installation.
Go through the interactive audio device configuration step if required by the user. For complete details of this step refer to Interactive Audio Device Configuration.
The following sections explains them and how to troubleshoot problems.
SKUtility Diagnostics Report
The Starter Kit diagnostics, goes through a series of steps to verify the hardware connections and configuration of the Starter Kit.
Following are the different stages:
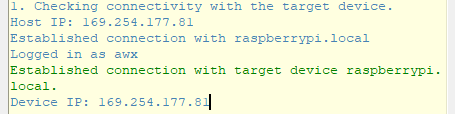
Verify that the Starter Kit hardware is reachable by the PC over the LAN.
Verify that the configuration files and AWX Amp application are present in the target Starter Kit hardware.
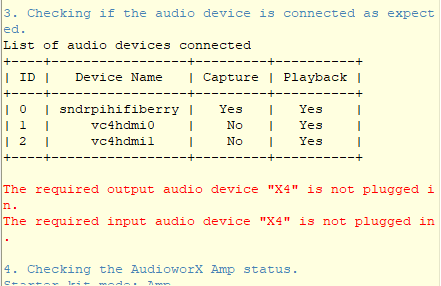
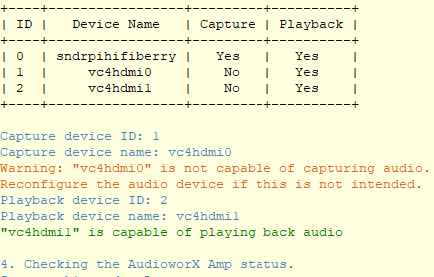
Verify that the audio hardware required by the set audio configuration are connected and verify their playback and capture capabilities.
Verify that the AWX Amp application is running if the Starter Kit hardware is set to “Amp” mode.
Fetch log files for further diagnosis.
The diagnostics only verifies and flags issues related to connectivity between the PC and the Starter Kit, configuration files on the Starter Kit, audio hardware connected and configured for the AWX Amp application and the status of the amp application. Harman AudioworX Support can be contacted to diagnose issues outside of these.
The following sub-sections provide instructions on how to fix the issues identified in the diagnostics report.
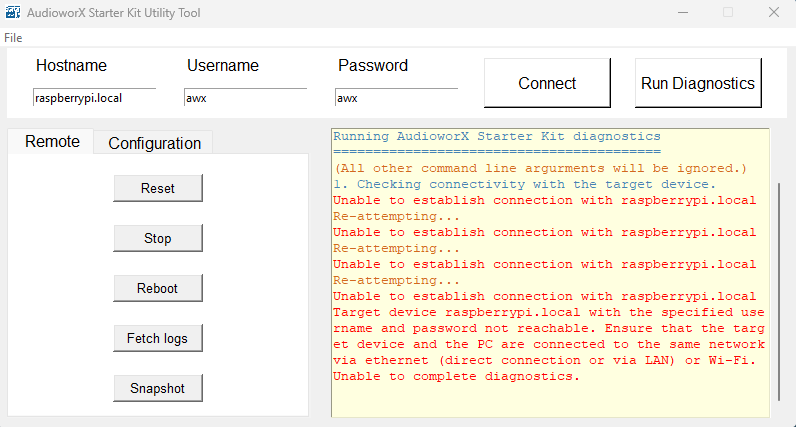
Issues in Connectivity
If there is a connectivity issue between the PC and the Starter Kit, it will be identified in the very first step of the diagnostics. In such cases, the diagnostics will exit soon after as shown below:
To fix this issue, ensure that the Starter Kit and the PC are both on the same network. As mentioned in Hardware Components Setup of this document, direct connection between the PC and the Starter Kit over ethernet is preferred due to zero network traffic. However, there may be situations where a direct connection is not possible, for example, if the PC’s ethernet port is already in use or the PC does not have an ethernet port at all.
In such cases, the Starter Kit’s hotspot feature may be used to establish connection between the PC and the Starter Kit. The Starter Kit is configured to automatically start a Wi-Fi hotspot with the following login credentials, when it is not connected to any known Wi-Fi network:
SSID: AP_AWXStarterKit
Password: starterkithotspot
Connect to this hotspot from the PC to first establish direct Wi-Fi connection to the Starter Kit and then run the diagnostics again. Step one of the diagnostics should be successful, indicating that the Starter Kit is accessible from the PC.
The IP address of the Starter Kit starts with a number other than ”192“or ”169“, which indicates that the PC is connected to the Starter Kit’s Wi-Fi hotspot. The user must be warned that in this setup, the PC will no longer have access to the internet via Wi-Fi. For convenience, it is recommended that the Starter Kit is configured to connect to a common Wi-Fi network using the instructions in “Starter Kit Configuration > Wi-Fi Config” in SKUtility Tool – Graphical Application after connecting to the Starter Kit hotspot.
Issues with Configuration Files
The second step of the diagnostics verifies if all the files that are required for functioning of the Starter Kit are present in the file system of the Starter Kit. If the diagnostic report indicates missing files, a simple brute-force solution would be to reset all files to their original states using the Configuration >Factory Reset button in the Starter Kit Utility, which is described in SKUtility Tool – Graphical Application.
All the data files in the Starter Kit will also be restored to their original states (corresponding to the example project), which means that any changes made to the audio hardware configurations or the signal flow flashed on the device (.flash files) will be lost, and need to be reconfigured.
It is recommended to take a snapshot for back up using the SKUtility UI Tool before resetting all the configurations.
The following table shows the solution to restore individual files:
Missing File
Solution
/home/<user>/HarmanAudioworX/config.json
Reconfigure the audio device using Audio Config in SK Utility tool.
/home/<user>/HarmanAudioworX/device.flash
Export device file and send it to the device (refer to Configuring a Custom Device) using the Send Device File option in the SKUtility tool.
All other files
Restore all files using Factory Reset option in the SK Utility tool.
Issues with the Audio Device
The Starter Kit diagnostics verifies if the audio input and output devices set in the audio device configuration are connected. Below is an example diagnostic report showing an error with the audio device:
If such an error is shown, verify if the required audio device is physically connected is powered on.
Two separate audio devices, one for input and the other for output, may be used simultaneously. If the input or output device is not capable of capture or playback, respectively, the diagnostic report will show a warning (in yellow).
If this is not intended, reconfigure the audio device using the SKUtility Tool.
Issues in the AWX Amp Application
The AWX Starter Kit has two start up modes set via the interactive config menu described under “Configuration > Audio Config” in SKUtility Tool – Graphical Application.
Amp mode
Dev mode
Step 4 in the diagnostics verifies the status of the AWX Amp application based on the mode that is configured. If the Starter Kit hardware is set to “Amp” mode, the AWX Amp application is expected to be running.
An error may be reported in this step for the following reasons:
Failure in any of the previous steps.
The expected audio interface is not available at the time of amp start-up. Ensure that the audio device is plugged in and powered on (if the interface has dedicated power) before powering-on the Raspberry Pi 5 (not required for the HiFiBerry HATs).
Problem in starting the AWX Amp application due to audio device setup or framework initialization, refer to AWX Amp Application Logs section.
Once the issues detected are rectified, reset the AWX Amp application from Remote > Reset in the SKUtilityGUI, or using the python3 SKUtility.py rmt -rst command and re-run the diagnostics. If problems persist, contact Harman AudioworX support by following the information given in Reporting Issues section.
AWX Amp Application Logs
The Starter Kit produces logs at different points showing information on boot times, the AWX Amp application start and stop times and includes logs from the AWX Amp application showing initialization and configuration statuses during the audio driver setup and writes them into a file named awx_log.txt in the Starter Kit. This file can be fetched from the Starter Kit using Remote > Fetch Logs in the SKUtilityGUI, or by running the command python3 SKUtility.py rmt -flog.
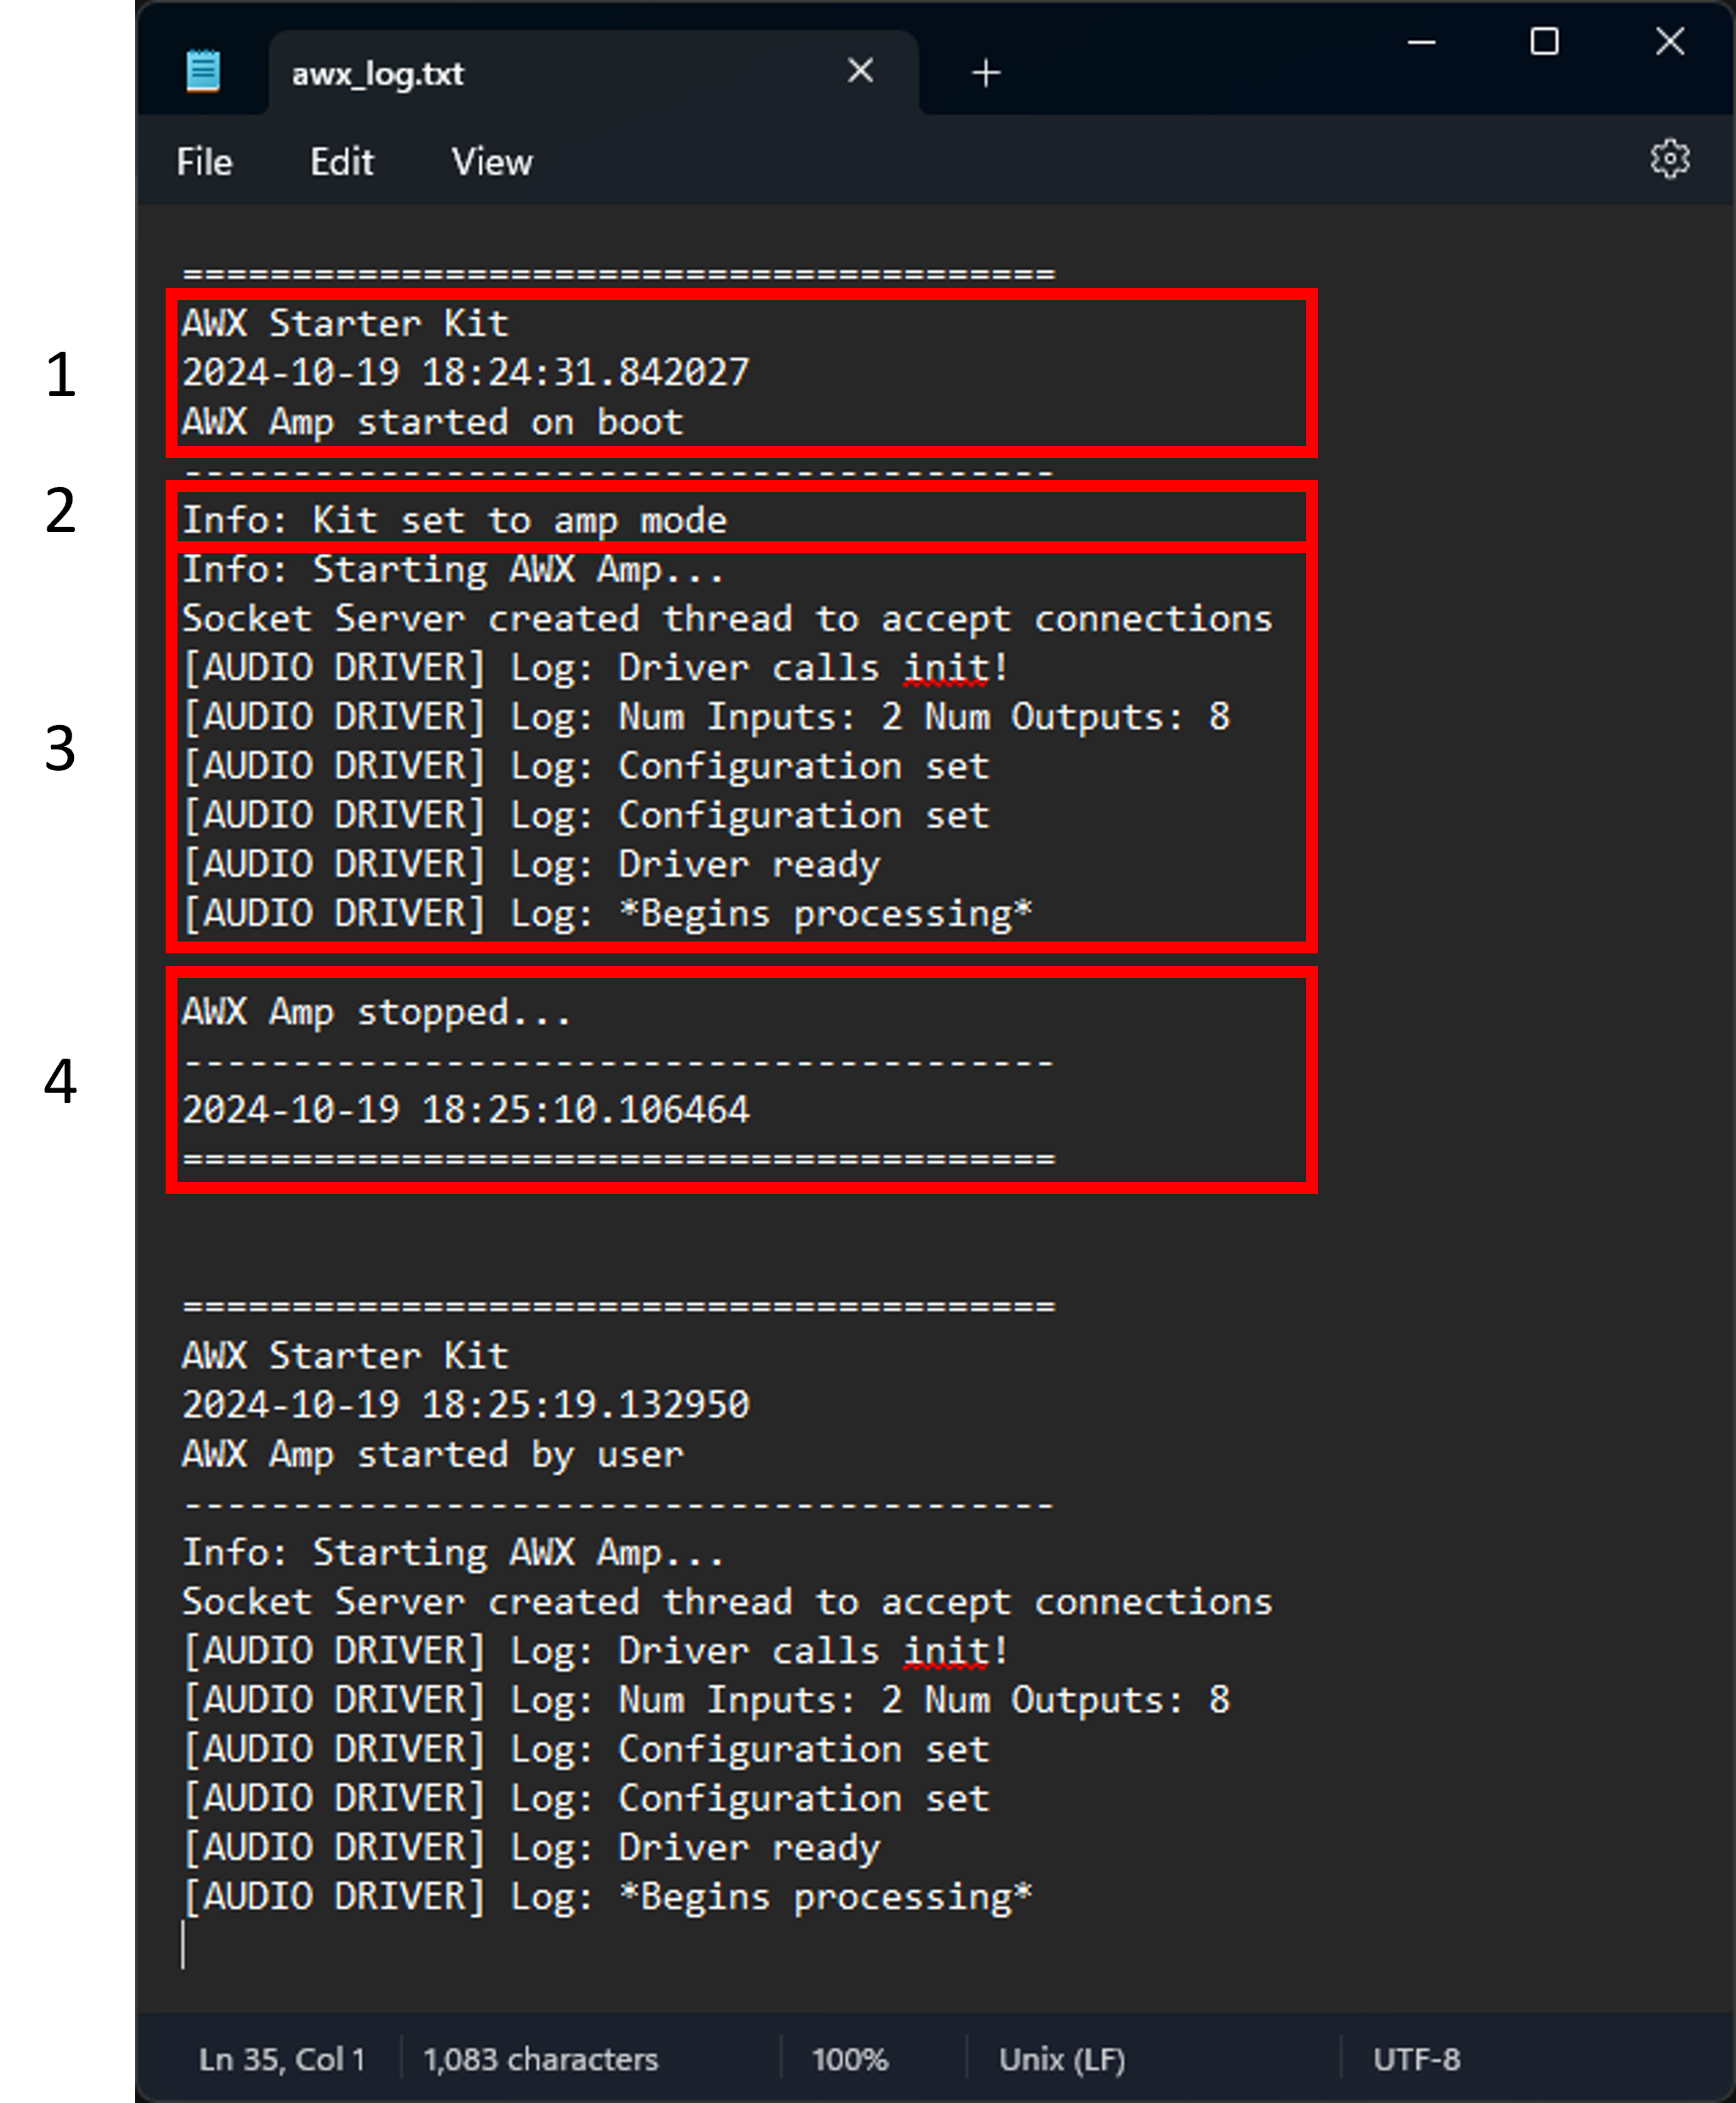
Following figure shows an example log file in the Starter Kit.
AWX Amp Application Logs
The above figure shows 4 parts in a log:
Start Time: This part of the log shows the boot time and date if the log was generated at boot time, or the start time and date of the AWX Amp application if the amp was reset or started using the Starter Kit Utility. The first half (highlighted text) shows logs generated on boot, and the second half shows logs generated at amp reset by the user (notice the text “AWX Amp starter by user”).
Amp Mode: This part shows the mode in which the Starter Kit is configured. This text is only shown at boot time and not when the amp is started using the Start Kit Utility, as shown in the second half of the figure.
AWX Amp Application Logs: This part of the log shows logs generated by the AWX Amp application, which includes logs from the amp front-end, audio driver, etc. Logs related to SFD initialization from the xAF framework can be found in the other log file (VirtualAmpLog.txt), which is downloaded along with the awx_log.txt file.
AWX Amp Stop Time: Finally, the last part of the log indicates the stop time of the AWX Amp application. Note that this part of the log will not be printed if the Starter Kit is abruptly powered off or shutdown while the AWX Amp application is still running.
The latest logs are written to the end of the file. The above figure shows that the amp may be running since the end of the log file has logs from the AWX Amp application and not the stop time.
Running the “Reset All Configurations” command will remove all log files on the Starter Kit hardware. Before resetting configurations, it is recommended that a snapshot is taken using Remote > Snapshot in the SKUtilityGUI or fetch the log files using Remote > Fetch Logs.
Reporting Issues
For reporting issues related to the AudioworX Starter Kit, write to AudioworXSupport@harman.com with the following information:
Subject line — “AudioworX Starter Kit – short description of the issue faced”
Detailed description of the issue.
Attach the following files (if any).
The GTT project file (.gttd) used, which can be exported from GTT (File > Export Project).
Snapshot of the flash files on the Starter Kit hardware which can be generated using Remote > Snapshot in the SKUtilityGUI, or the command python3 SKUtility.py rmt -snp. The snapshot will be downloaded to “C:\ProgramData\Harman\StarterKit”.
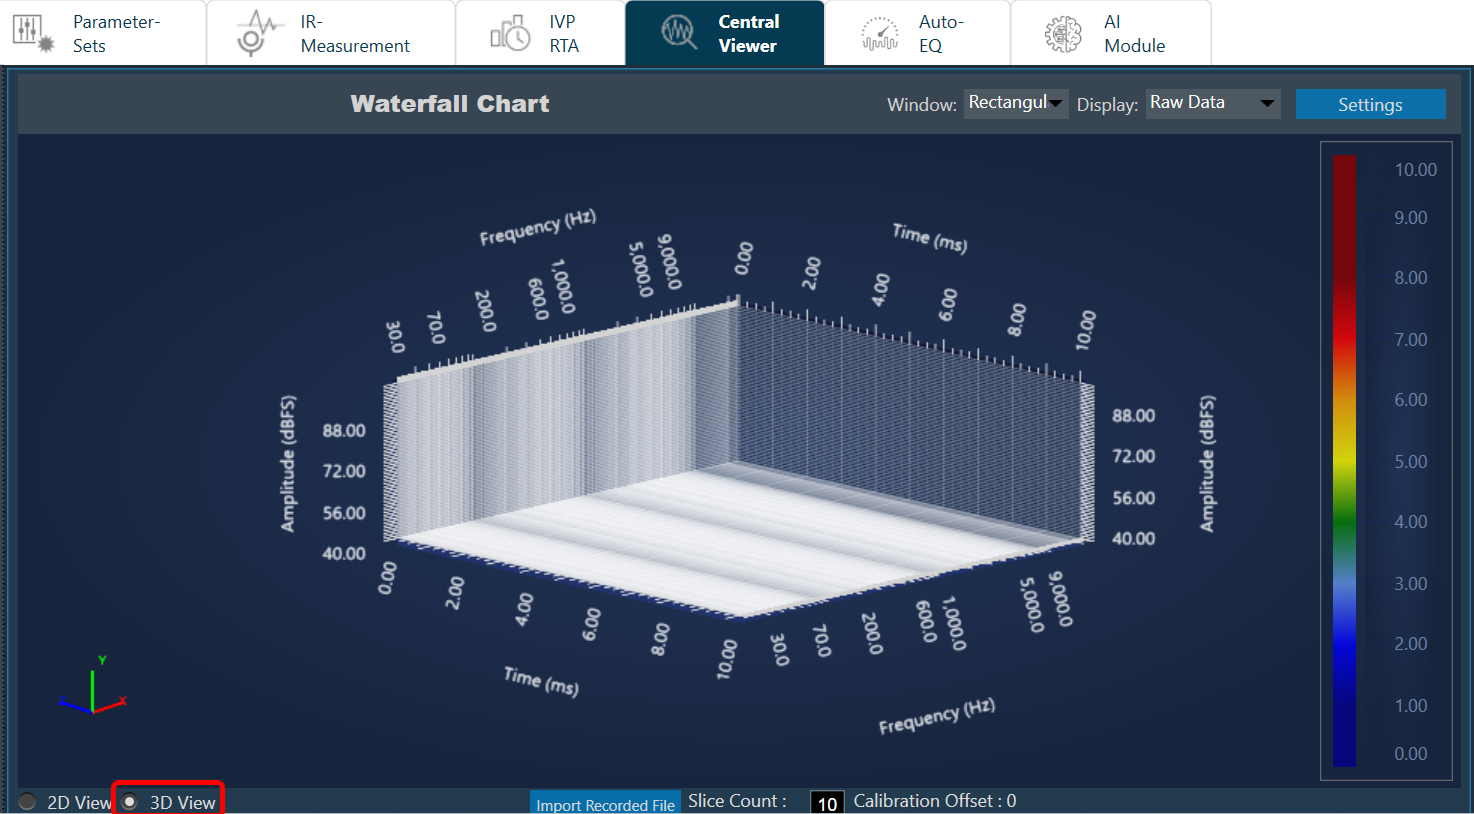
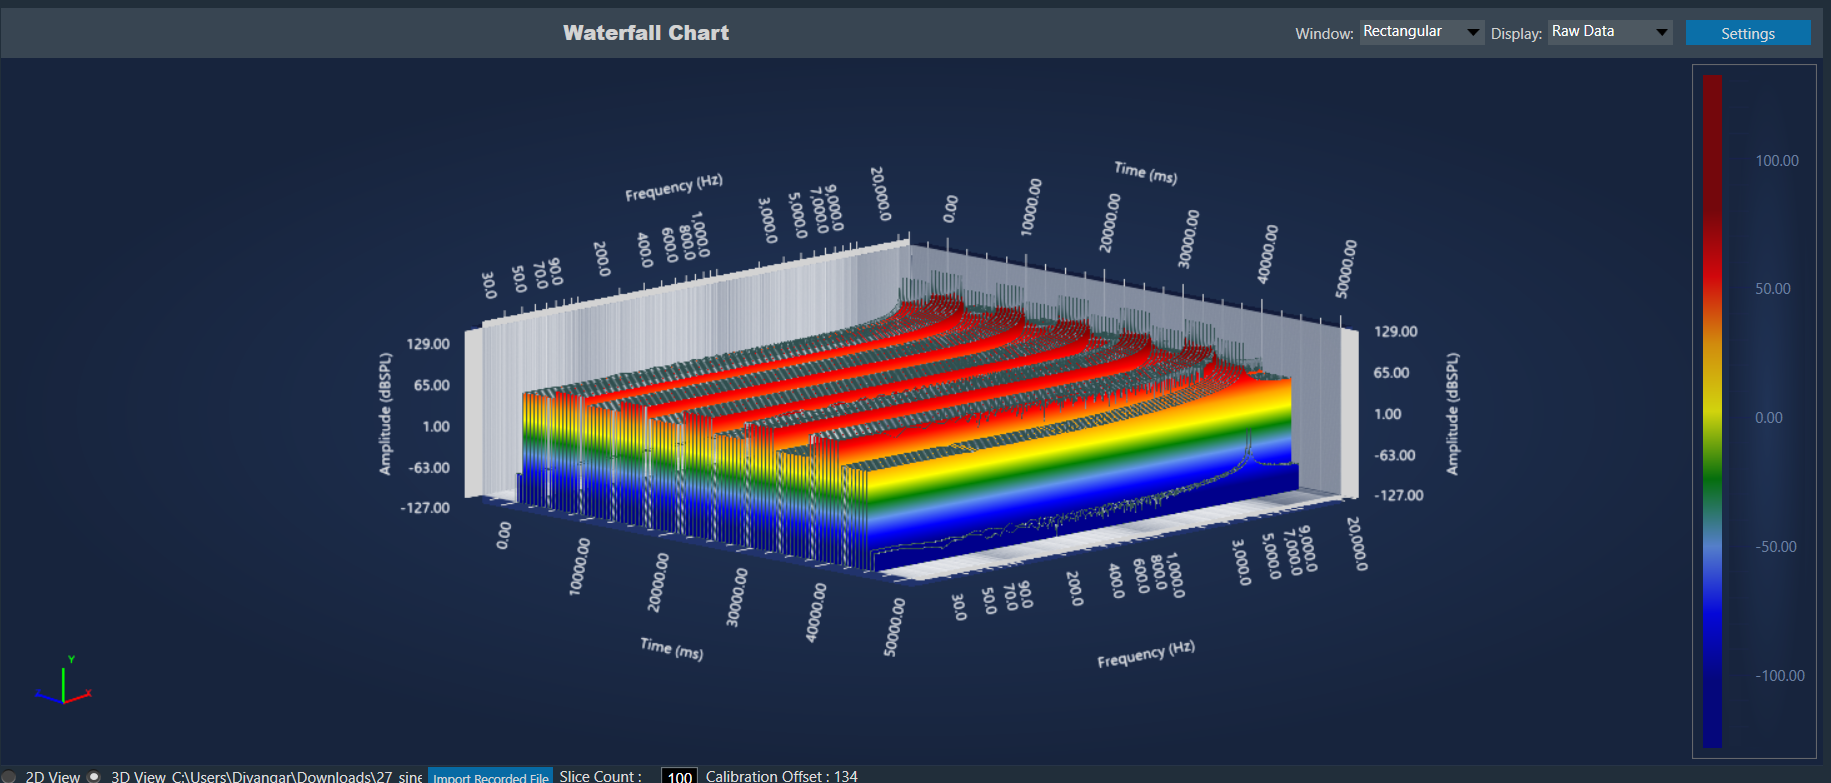
The Waterfall Graph is a visual representation used to analyze and interpret the frequency content of a WAV file or any other signal data. This graphical representation provides a comprehensive view of the signal frequency distribution over time, allowing to identify patterns, anomalies, and trends that may not be evident in a traditional time-domain or frequency-domain plot.
You can easily identify dominant frequencies, harmonics, and noise within the signal. The intensity and color of each frequency component indicate its amplitude and presence within the signal, respectively.
On the Central Viewer window, you can switch to 3D view of the plot. On the 3D view, you can see the waterfall chart.
Import Recorded File: Click “Import Recorded File” to import .wav audio files directly onto the chart.
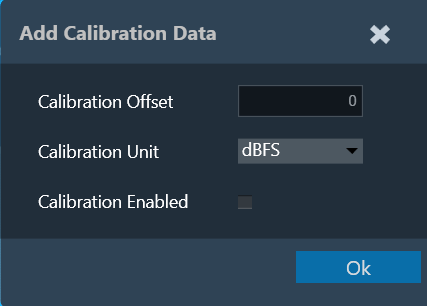
Customize Calibration Data: You can adjust the calibration offset, measurement unit, and enable/disable flags for the recorded files. On entering the calibration details, corresponding values will be applied to the chart.
Chart Details
Axis Details: X axis represents the frequency, Y axis represents the amplitude, and Z axis represents time.
Calibration offset is displayed at the bottom for reference.
A legend represents the energy levels of the graph.
Customization Options: Apply different Window and Display options to customize the graph appearance.
Zoom and Rotate: Explore the data in detail with mouse scroll, pinch-to-zoom, and 360-degree rotation capabilities.
Slice Control: Choose the number of slices (10-100) to segment the graph for analysis.
The selected .wav file and settings are saved and retrieved within the project.
IR measurement plot
It is possible to view IR measurement also in 3D view. Any mic and speaker selection plot will be displayed in waterfall plot.
At any point of time only one signal can be viewed. Multiple mode is not applicable for 3D plot.
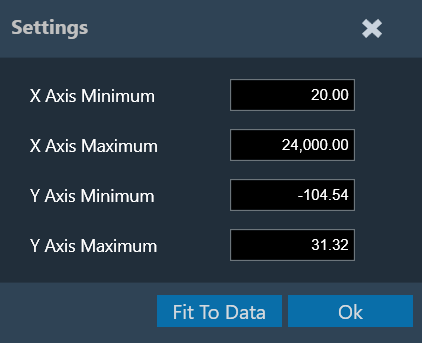
Settings:
It is possible to change the X and Y axes range of the graph. “Fit To Data” will consider the min and max values of X and Y range. However, there is a known limitation of cropping in while using the settings.
Limitations
It is not possible to view both IR and imported file plot at same time. Graph always shows latest selected option.
It is not possible to delete or clear the plot. Workaround is to import new file again.
dBFS unit is by default. Since it is not possible to add calibration with this unit, this unit will be removed in future.
Known behavior
There are a couple of specific behaviors in the 3D view that deviate from expectations. These require a fix from the third-party.
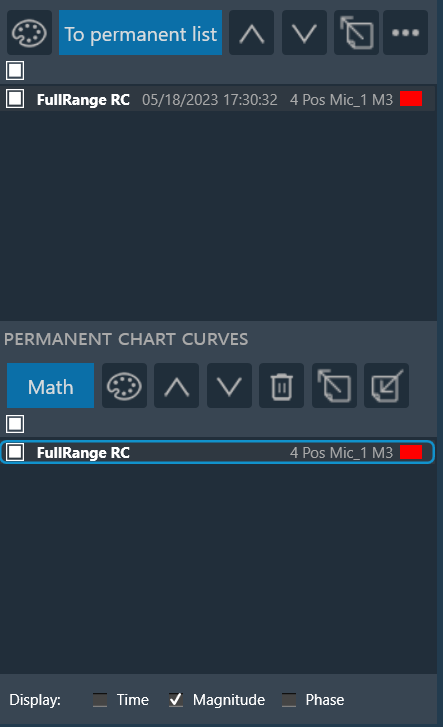
Every curve displayed in a graph is referenced by an entry in either the browsing or the permanent curve list.
A curve list entry consists of following components:
Parent configuration of the curve.
Speaker name of the curve.
Microphone name of the curve.
Color of the curve.
Checkbox for show or hide the curve.
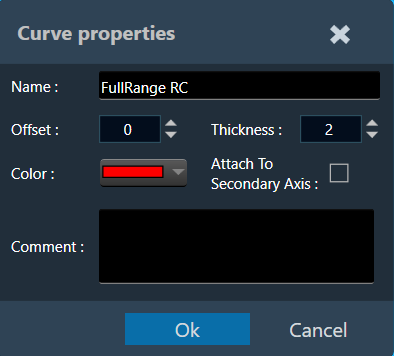
You can change the following curve properties of an entry:
Change the name.
Change curve thickness.
Change offset.
Change the color.
Attach curve to secondary axis (right axis).
Add comment for trace. The provided comment will be exported and imported along with curve.
Shows the associated math operation (in the case of math curves).
Double-click on the entry to open curve properties dialog box, perform the respective change, and click ok.
The curve name is not editable if the average is calculated with a cross-mic array.
Browsing List
The browsing list holds entries for all curves that are directly linked to elements currently selected on the scene.
The curves will immediately disappear once the respective elements on the scene are de-selected. It still remain in the same order if GTT re-open.
The browsing list toolbar offers the following options.
Name
Icon
Description
Recolor All Curves
The recolor button assigns easily distinguishable colors to all curves present on the graph.
To permanent list
Sends the highlighted curve from the browsing list to the permanent list, detaching it from the scene selection
Move Curve Up
To move the highlighted curve up in the list.
Move Curve Down
To move the highlighted curve down in the list.
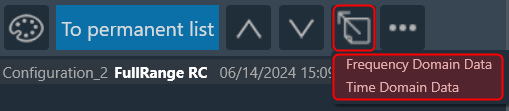
Export Curve
Using the export option you can send two type of data.
Frequency domain data
Time domain data
Based on the selection, GTT will export the trace data (frequency-magnitude-phase or time-amplitude) into a text file.
More Options (…)
Re-Measure Step: Once completing the initial measurements and conducting a thorough analysis of the acquired data in the Central Viewer, it may be identified that re-acquisition is necessary for certain speakers due to changes in hardware setup or tuning data.
In such cases, GTT provides an option to re-acquire specific steps, allowing for the overwrite or appending of new measurements to the existing session.
To utilize this feature:
Analyzing the acquired data in the Central Viewer, determine if there are any discrepancies or changes that require re-acquisition.
On the Browsing Chart Curves view, navigate to the more option (…) button and click on Re-Measure Step.
This will initiate the process for re-acquiring specific steps of the measurement.
In theMeasurement acquisition view, select the option to overwrite the current measurement or append to the session and then execute re-acquisition for the selected step.
Once the re-acquisition process is complete, review the results in the Central Viewer to ensure that the desired changes have been captured accurately (all configurations modified are going to be re added to have a clean import).
The Re-Measure Step feature provides flexibility and precision in managing measurement data, enabling to adapt to changes in hardware setup or tuning data effectively.
The Re-Measure step is possible only if one Mic array is selected on car view.
Set as Original Instance: When we perform a re-measure with the append option, multiple measurements can be available for a single speaker. In this case, the user can select a particular measurement instance (browsing curve) and mark it as the ‘Original instance.’ This means that when averaging mics across the mic array, only the mic array instances marked as original will be considered.
This option is available other than ‘Average’ Mic selection mode.
To remeasure Mannequin measurements, GTT will look for the MQTT broker address, which the user needs to provide.
Permanent List
The permanent list holds curves that are manually sent from the browsing list and the results of math operations. Curves in this list are detached from the scene selection and kept in the same order, until they are manually deleted.
The permanent list toolbar offers the following options.
Name
Icon
Description
Math
Opens the math operations dialog. Any math result will be stored in the permanent list
Recolor All Curves
The recolor button assigns easily distinguishable colors to all curves present on the graph.
Move Curve Up
To move the highlighted curve up in the list.
Move Curve Down
To move the highlighted curve down in the list.
Move Curve Down
Remove highlighted curve from the permanent list
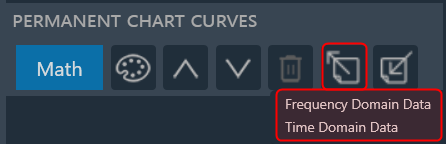
Export Curve
Using the export option you can send two type of data.
Frequency domain data
Time domain data
Based on the selection, GTT will export the trace data (frequency-magnitude-phase or time-amplitude) into a text file.
Import Curve
Using the import option you can import following type of data.
HATS files data (frequency-magnitude-phase)
OVL files data
RTA frequency files.
This feature facilitates you preform following comparison:
Compare legacy measurements conducted using HATS software with GTT measurements.
Compare imported files from RTA or exported from Central Viewer.
Additionally, using the imported files you can perform math operations and adjust graph settings such as smoothing.
Math Operations
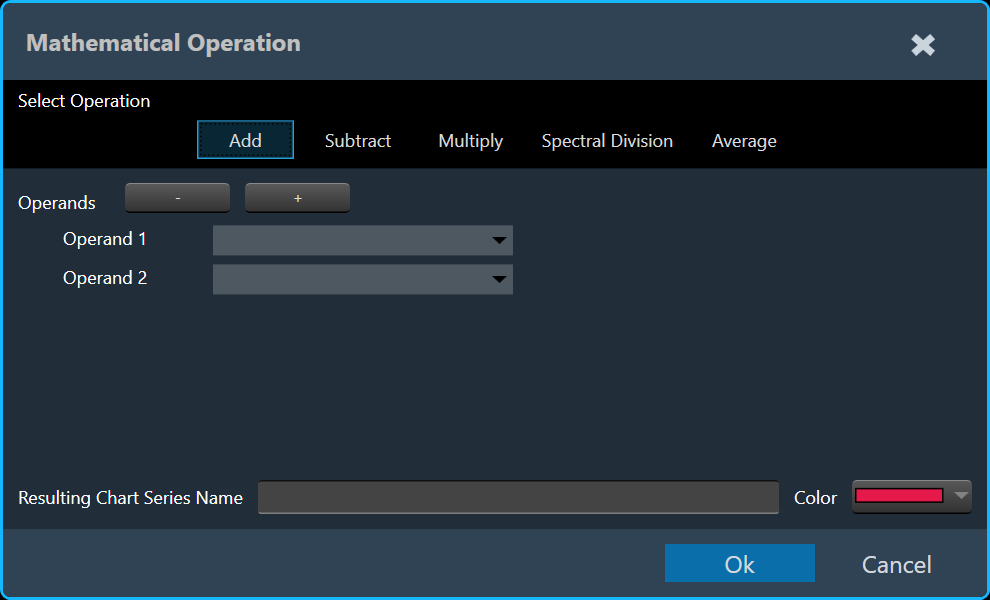
The math operation allows you to performing calculations on your curves. Clicking on the “Math” button opens a Mathematical Operation dialog box with various tabs, each offering a specific mathematical function.
The following math functions you can perform.
Add: To add two or more signals.
Subtract: To subtract of two signals.
Multiply: To multiply frequency domain of two signals.
Spectral Division: To divide frequency domain of two signals (to calculate frequency difference).
Average: To calculate average frequency domain for magnitude and phase.
To illustrate combining curves, let’s explore the steps involved using the Add tab.
On the Add tab, select Operand 1 and Operand 2 curve.
If required, add or delete an operand using + and – option.
Enter the Resulting Chart Series Name and select the color.
Click Ok. The result of the curve added to the active chart.